Akawa

ETY001的博客

下午购买了新的vps,从原来的 1核1G内存100G硬盘100M带宽1TB流量 升级到 2核6G内存500G硬盘100M带宽流量不限,为了搭建 steem-mysql 我也是拼了血本了。

为了转移已经同步好的数据库文件,大约有33G,一开始大意了,使用了 scp ,然后就放在那里传输,也忘记开个 screen ,中间打了个盹,等醒了的时候发现,服务器断开连接了😂。由于 scp 不带断点续传,所以说已经传完的60%多的数据就是白传了🤣🤣🤣🤣。

大文件的传输还是得靠 rsync,自己大意了。rsync 除了支持断点续传外,还可以进行 gzip 压缩传输,这样效率更高,以下是两者的对比:

scp:

1
2
3
root@steem-mysql:~# scp /data/mysql.tar root@173.249.63.24:~/
root@173.249.63.24's password:
mysql.tar 18% 6158MB 6.9MB/s 1:05:55 ETA

rsync:

1
2
3
4
5
root@steem-mysql:~# rsync -avzhP /data/mysql.tar  root@173.249.63.24:~/
root@173.249.63.24's password:
sending incremental file list
mysql.tar
13,484,294,144 38% 21.12MB/s 0:16:30

如果 ssh 端口换了,那么需要加个参数

1
rsync -avzhP -e 'ssh -p 1234' /data/mysql.tar  root@173.249.63.24:~/

另外,为了防止网络不稳定,在执行一些用时比较久的任务时,建议使用 screen 新开一个 session 来进行耗时较久的任务:

1
$ screen -S ws   # ws是自己定义的一个session名字

如果中途网络断开了,我们重新连入服务器,只需要执行

1
$ screen -r ws

即可恢复刚才的 session.

如果有多个 session 的话,可以使用下面的命令查看有哪些 session:

1
$ screen -ls

Portainer is a simple UI management for docker. It’s easy to use and all your resources will show you friendly. It’s very light especially using a VPS which has only 512MB RAM.

In this tutorial, we will make a LNMP server over the docker container by Portainer.

What Will I Learn?

  • You will learn how to setup portainer
  • You will learn how to create a custom network with the docker
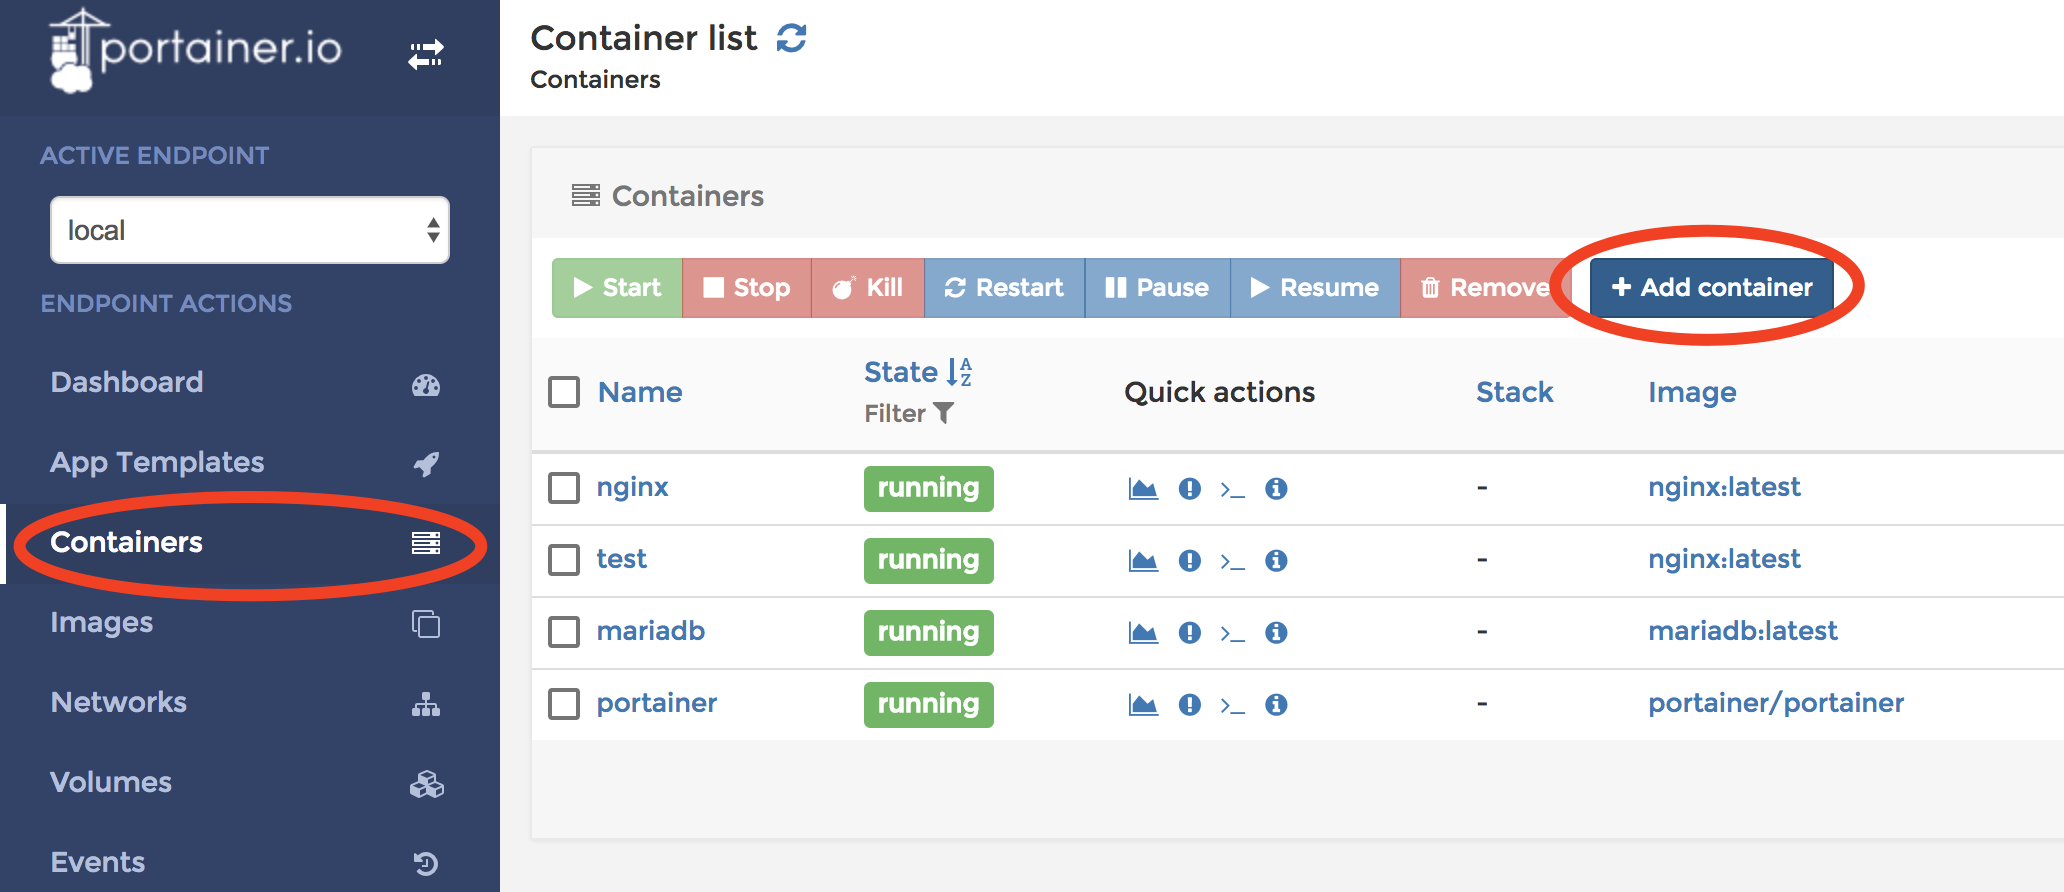
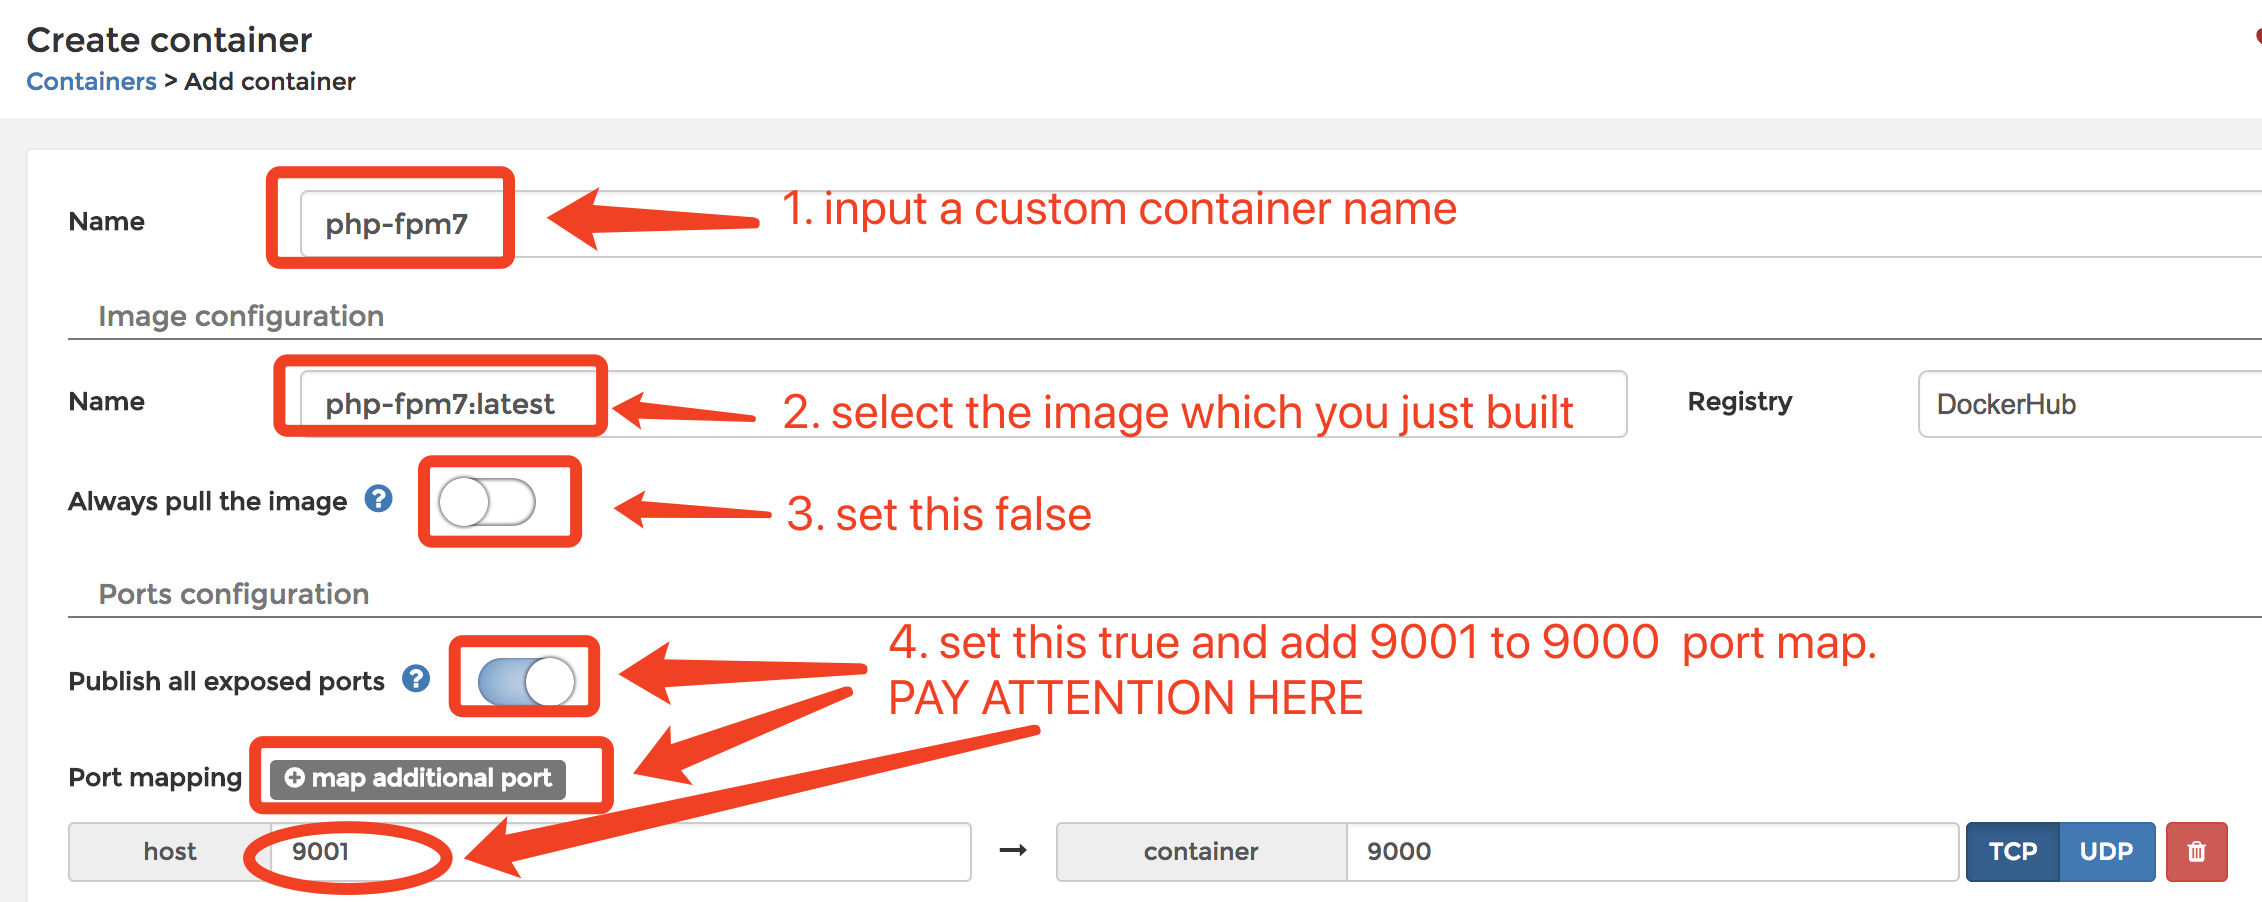
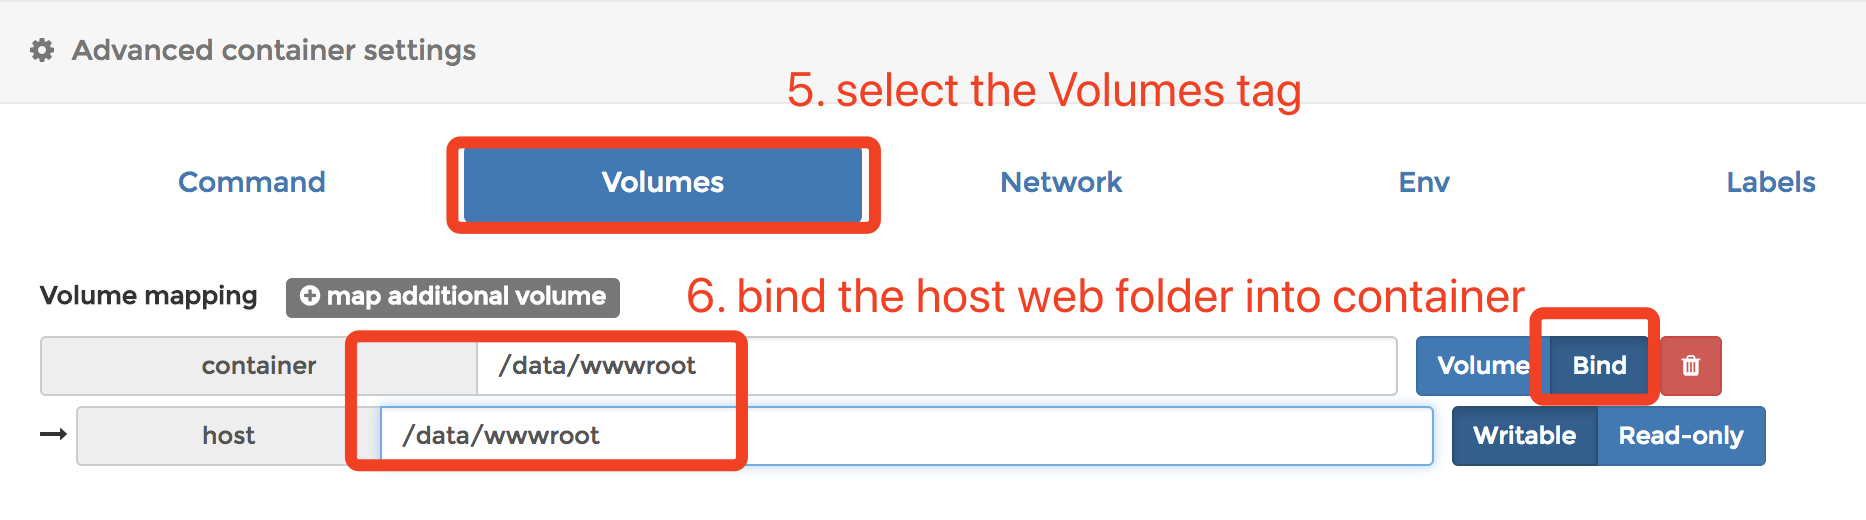
  • You will learn how to create a container

Requirements

  • Ubuntu 16.04 (64-bit)
  • Base bash knowledge
  • Base docker knowledge
  • Built a normal LNMP environment before

Difficulty

  • Intermediate

Tutorial Contents

Setup Portainer

1.Create a volume to save the portainer data. You also can bind a folder.

1
$ docker volume create portainer_data

2.Run the Portainer docker.

1
$ docker run -d -p 9000:9000 --name portainer -v /var/run/docker.sock:/var/run/docker.sock -v portainer_data:/data --restart always portainer/portainer
  • -d means run as daemon
  • -p 9000:9000 means making a port map. Portainer needs port 9000 opening.
  • -v /var/run/docker.sock:/var/run/docker.sock This parameter is important if you want portainer to manage your local docker.

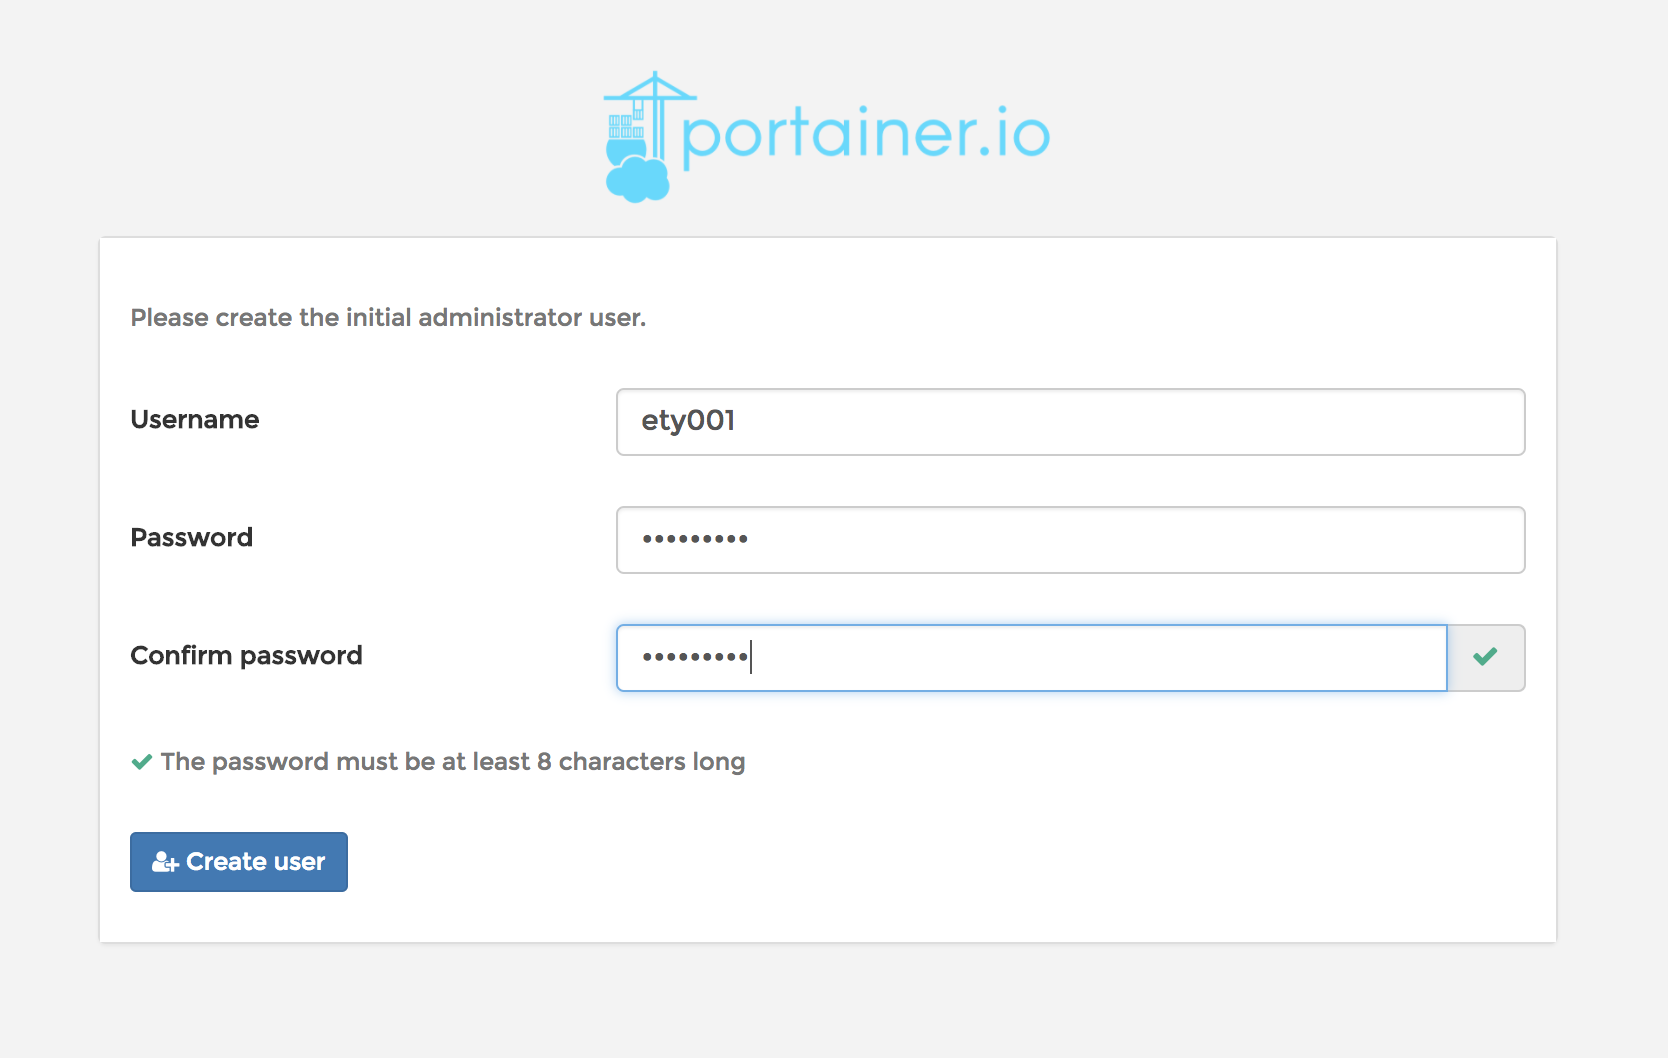
3.Visit http://localhost:9000 in your browser and input your username and password to create the administrator user.

1.png

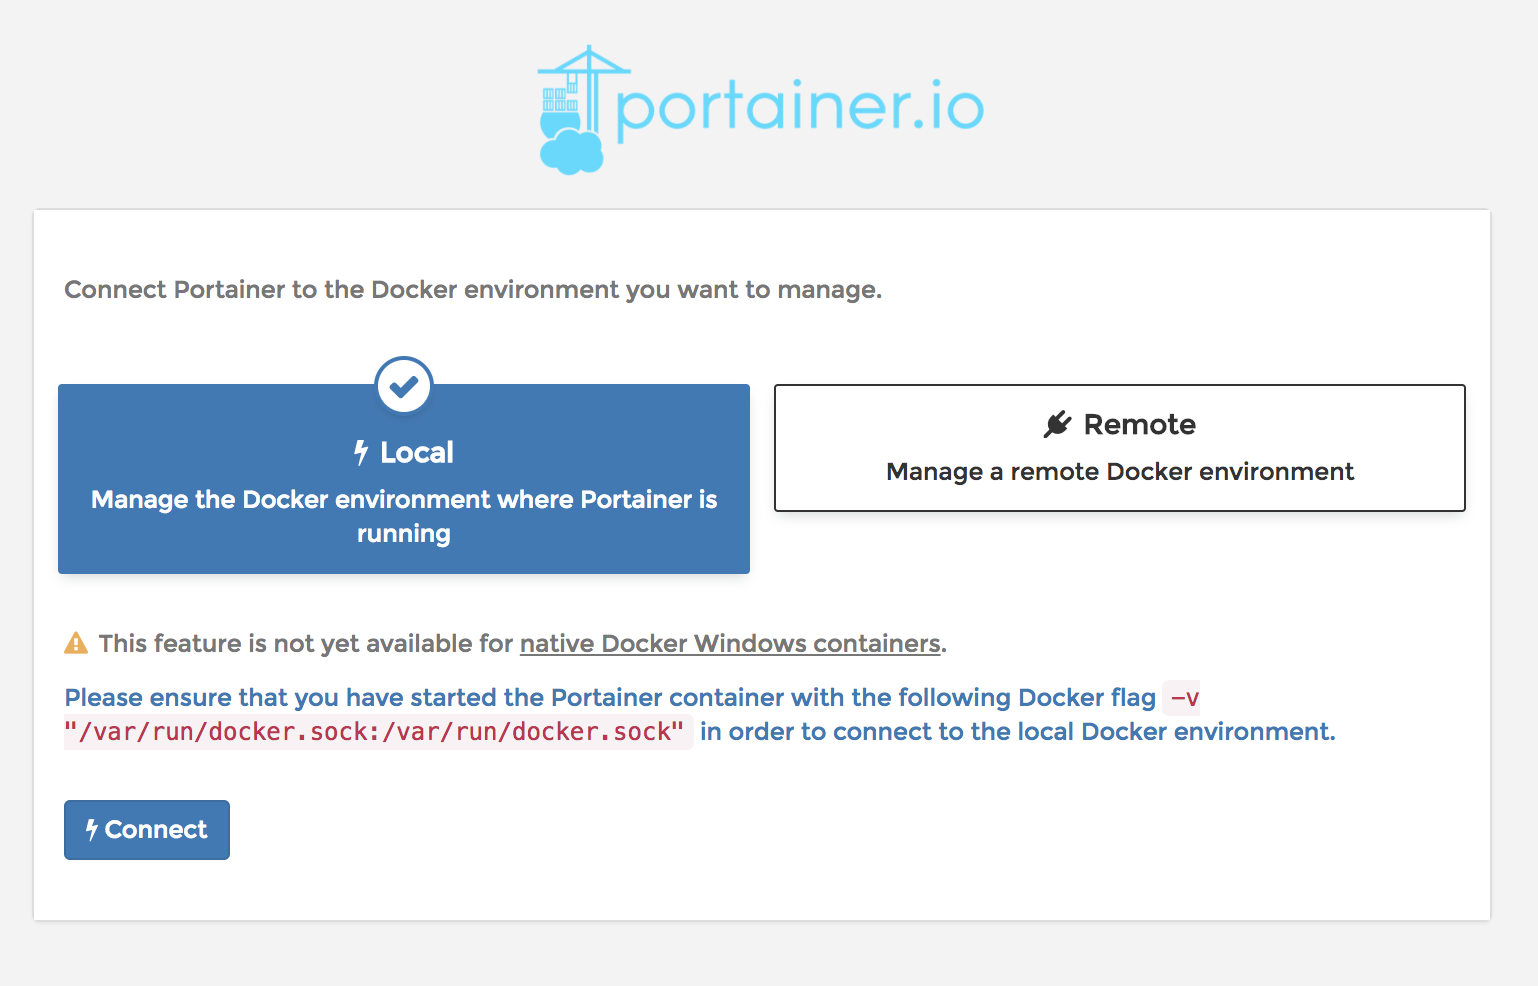
4.In next step select the Local option and press Connect button to finish setup.

2.png

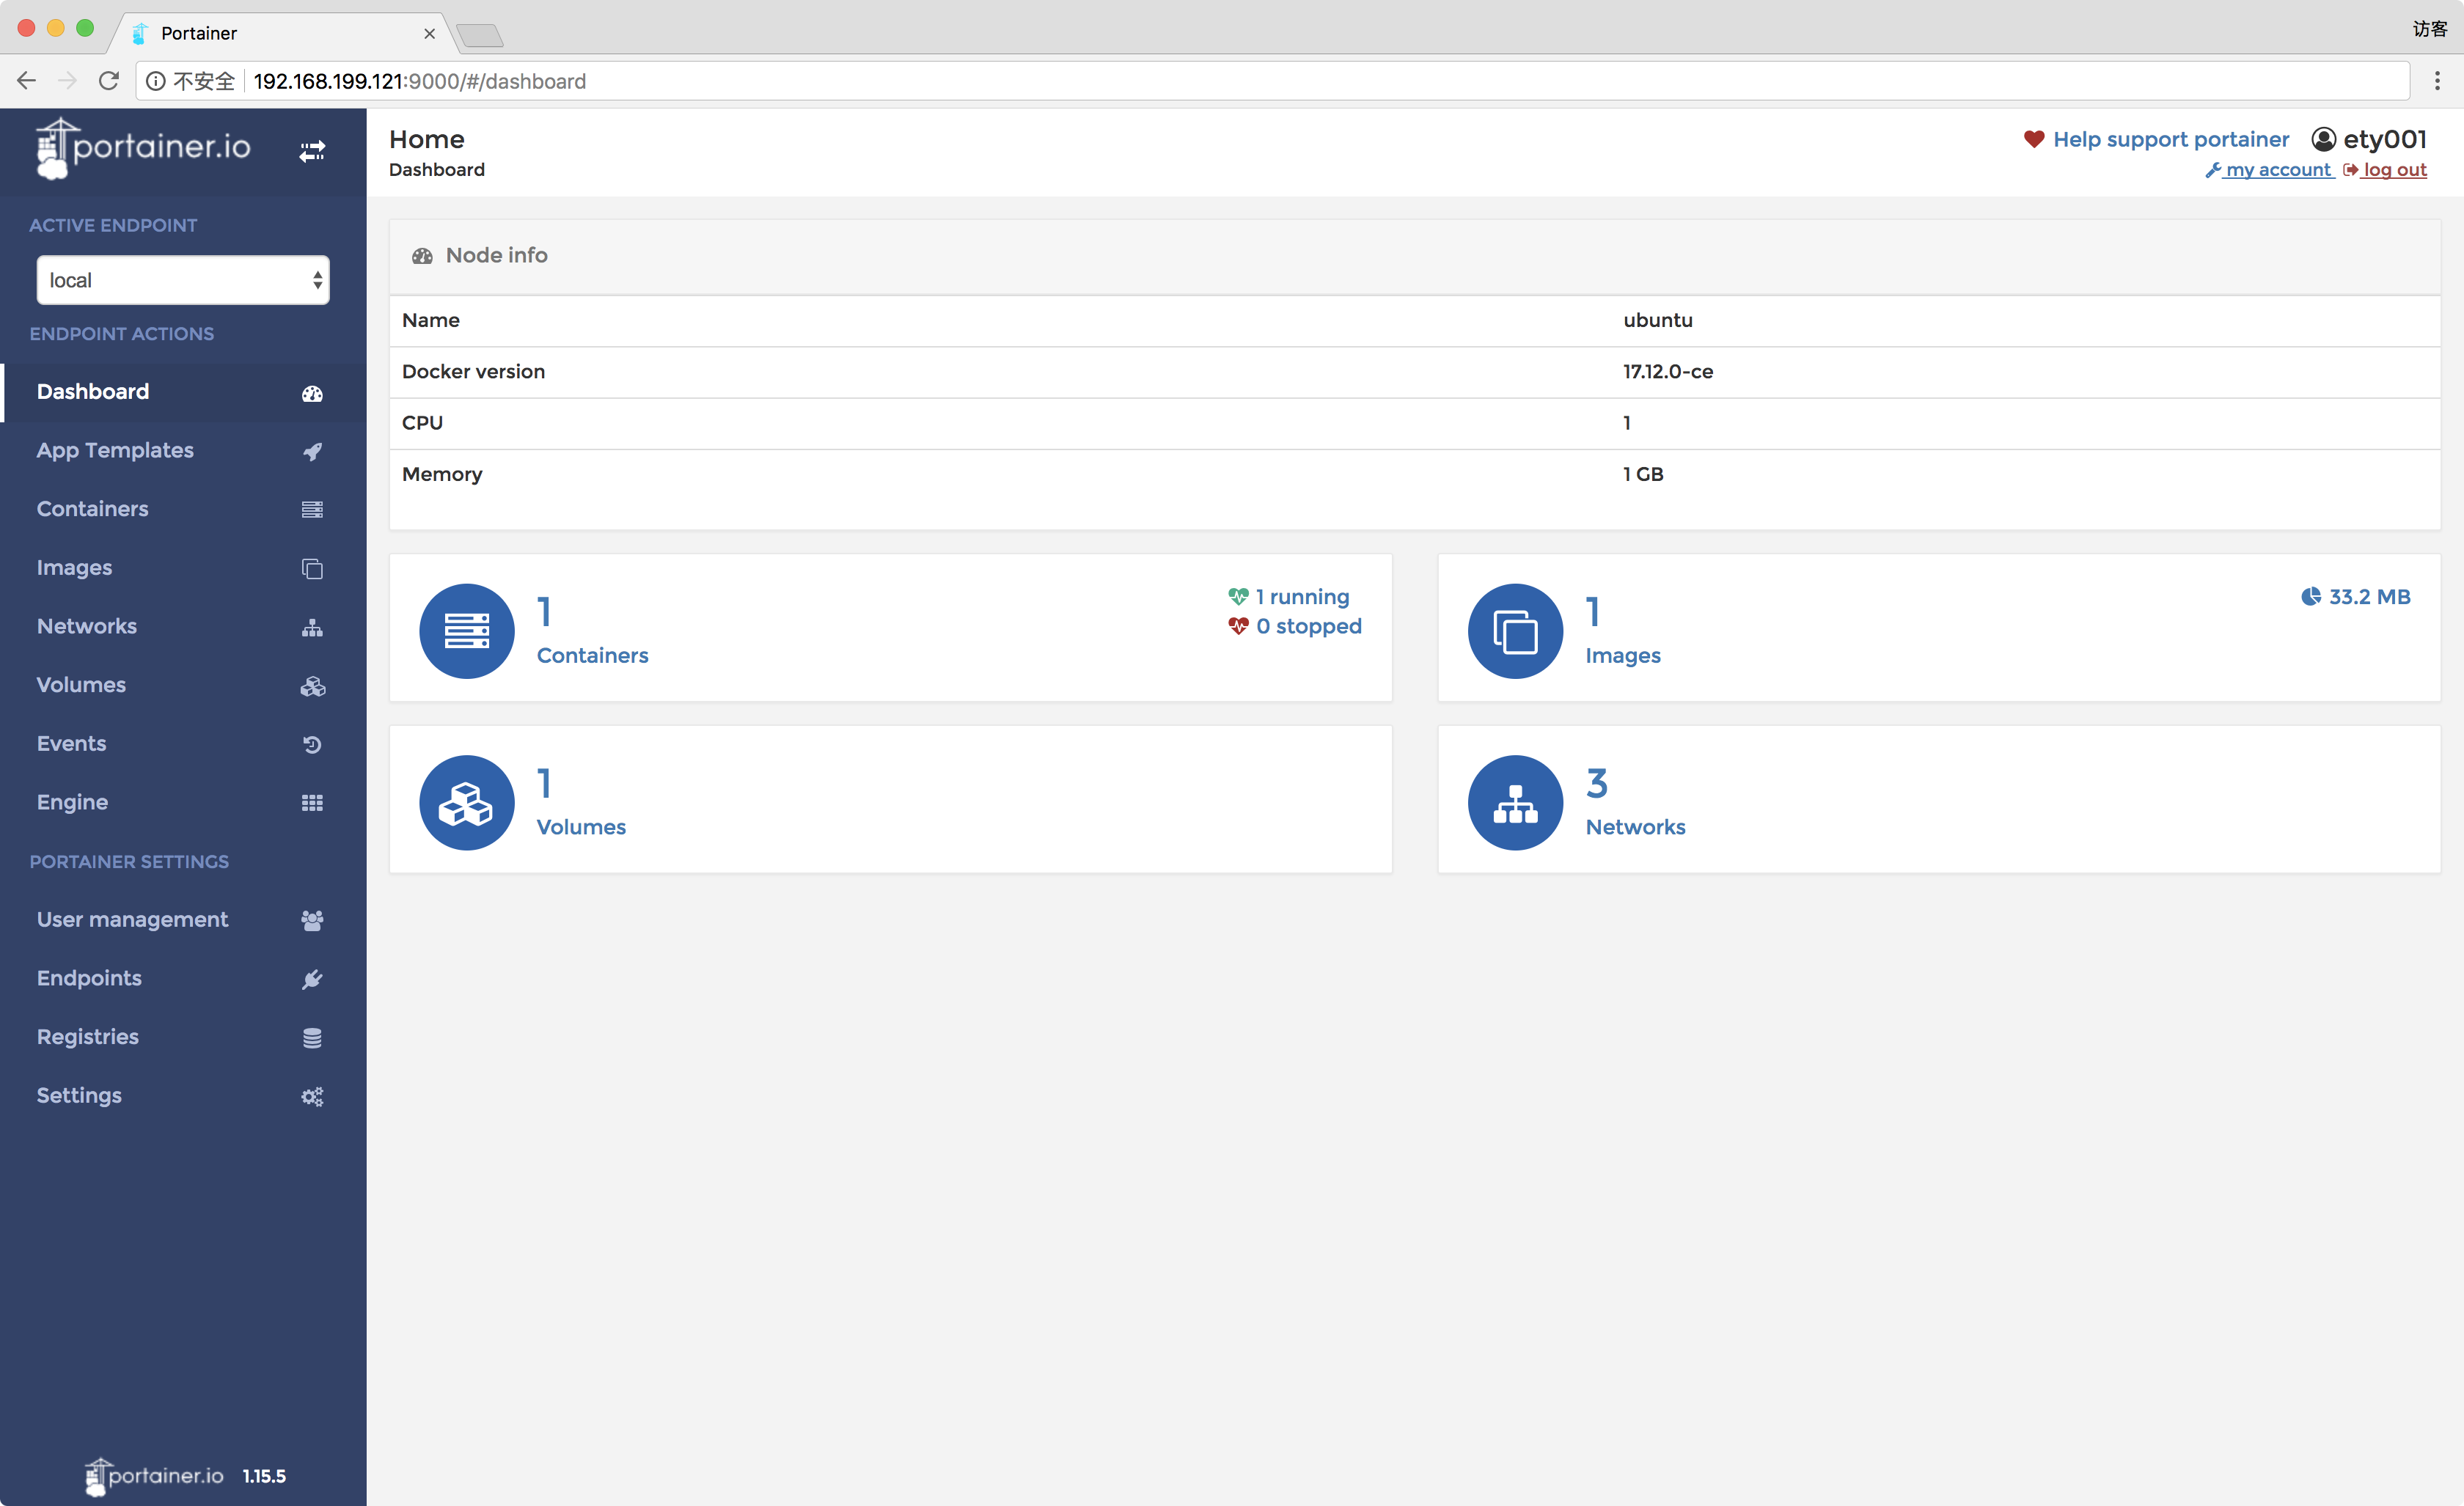
5.When you see the main page, the installation is over.

3.png

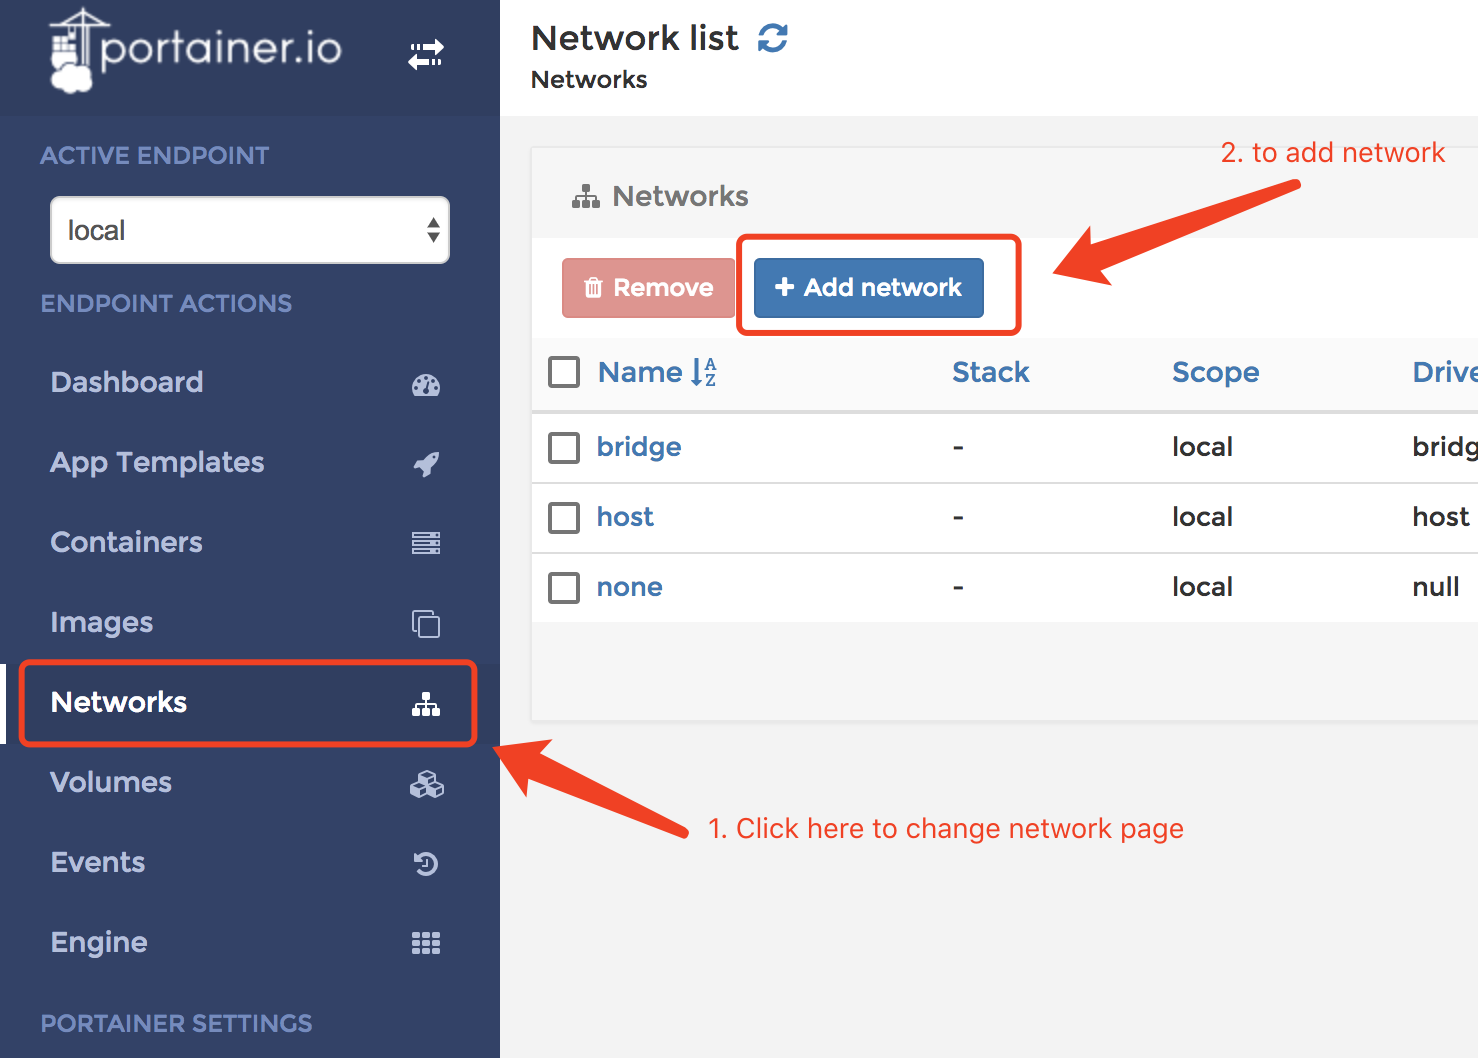
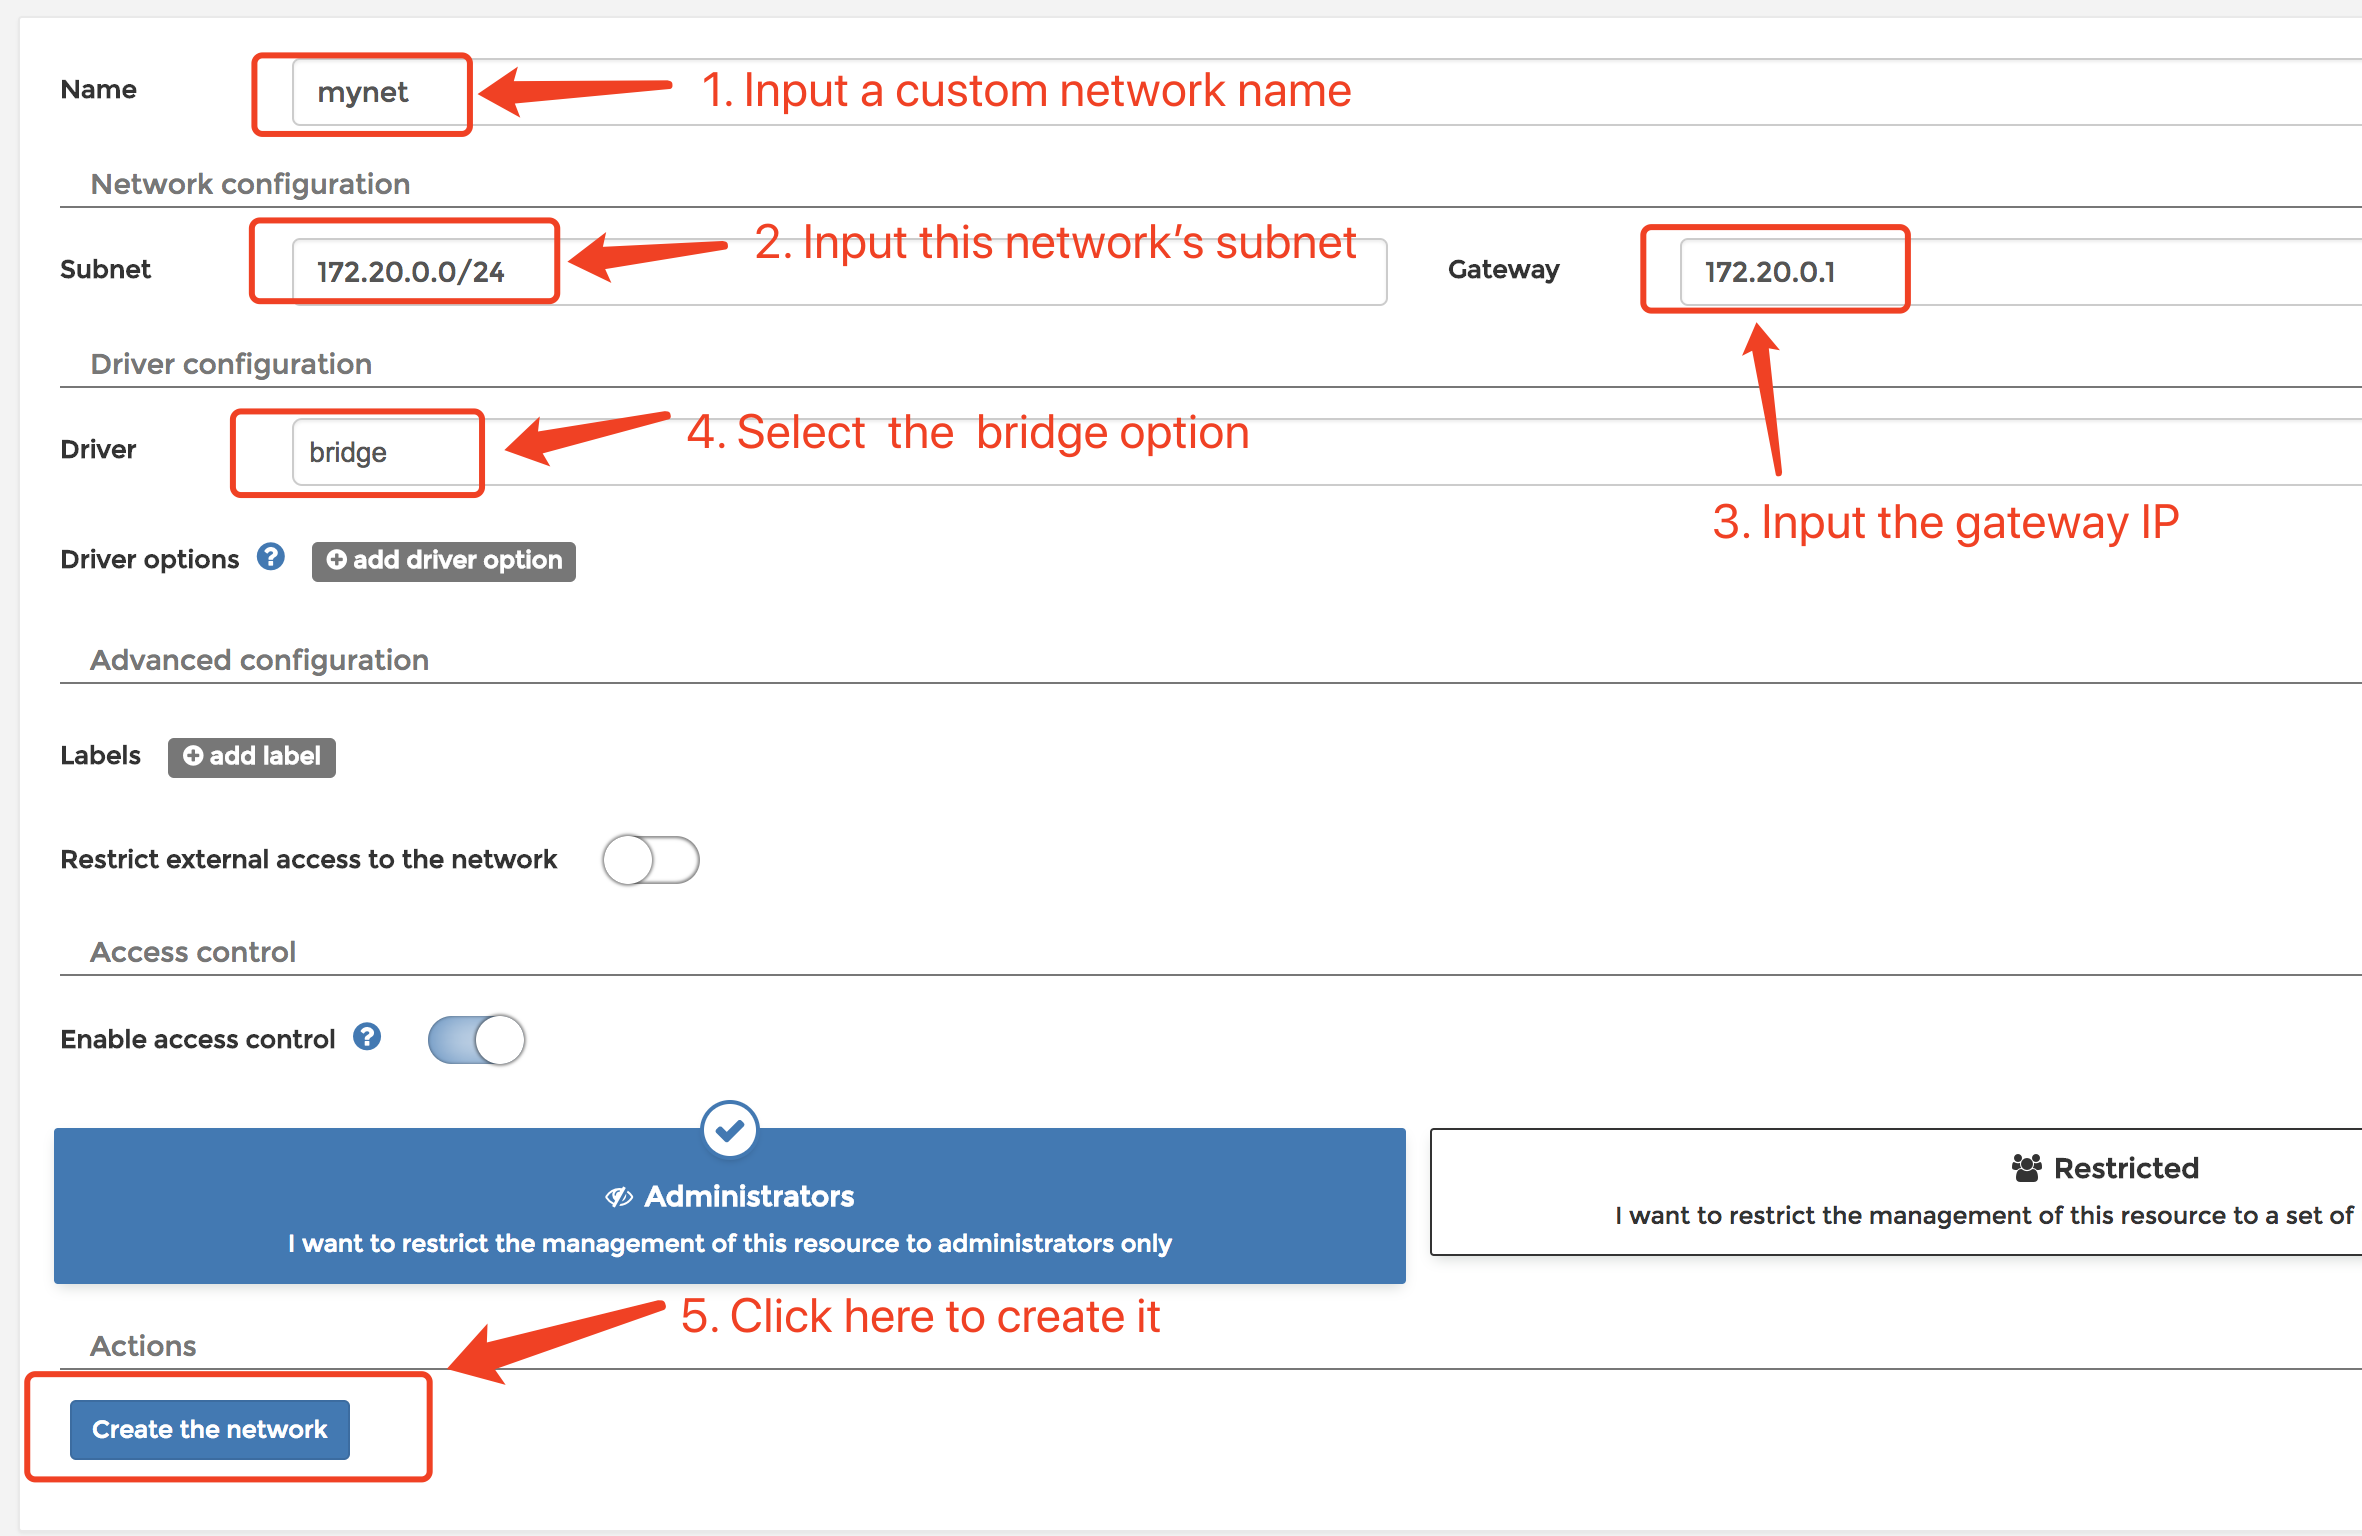
Create a new network

The container link is out of date now. The portainer doesn’t support the container link any more. So we need to create a new bridge network and bind static IPs to every container we create. Then each container can communicate with each other through the static IPs.

1.Get in the Networks page and click the Add network button.

4.png

2.Input the required information like the snapshot and then click the Create the network button.

5.png

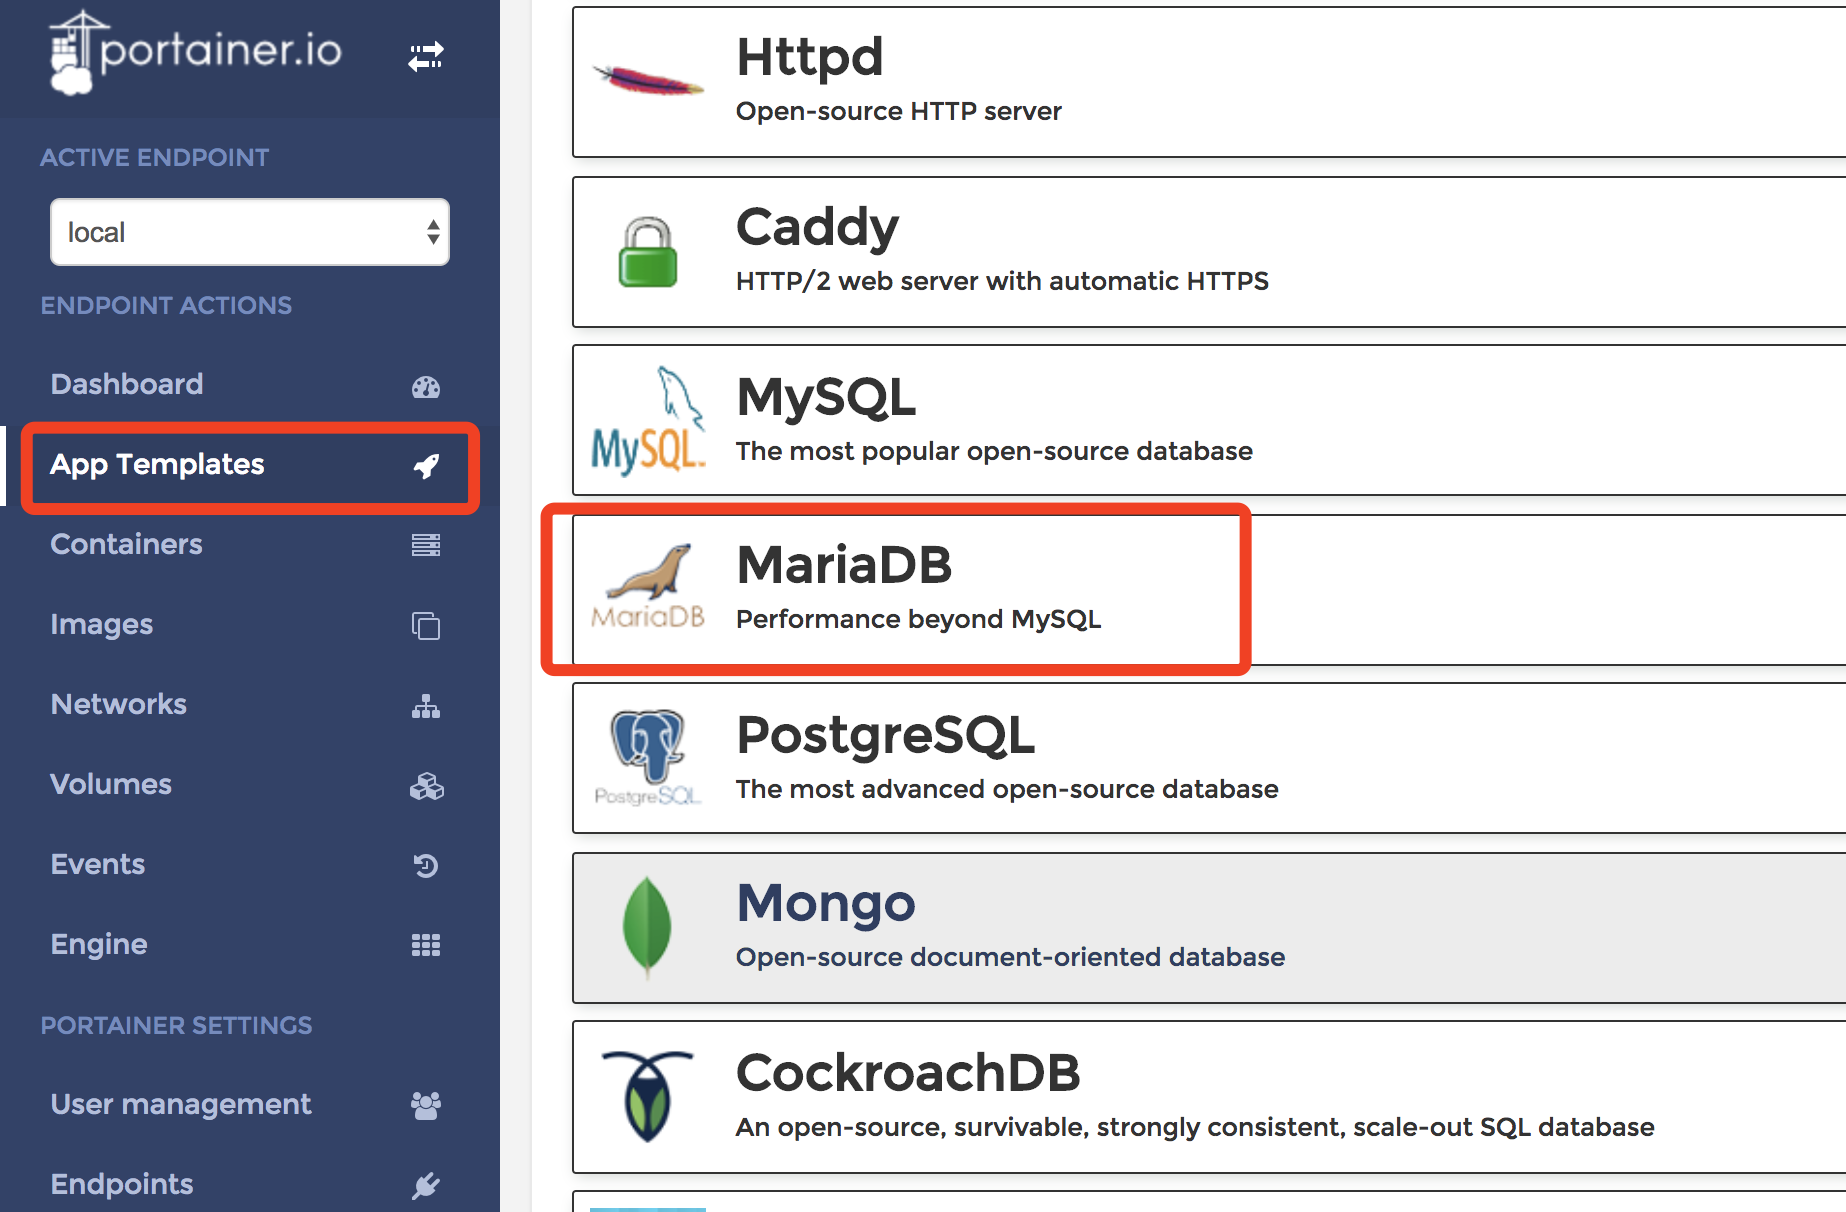
Add MariaDB container

In this tutorial, we use the App Template to create the MariaDB container.

1.Create a folder to storage the MariaDB database file

1
$ sudo mkdir -p /data/mariadb

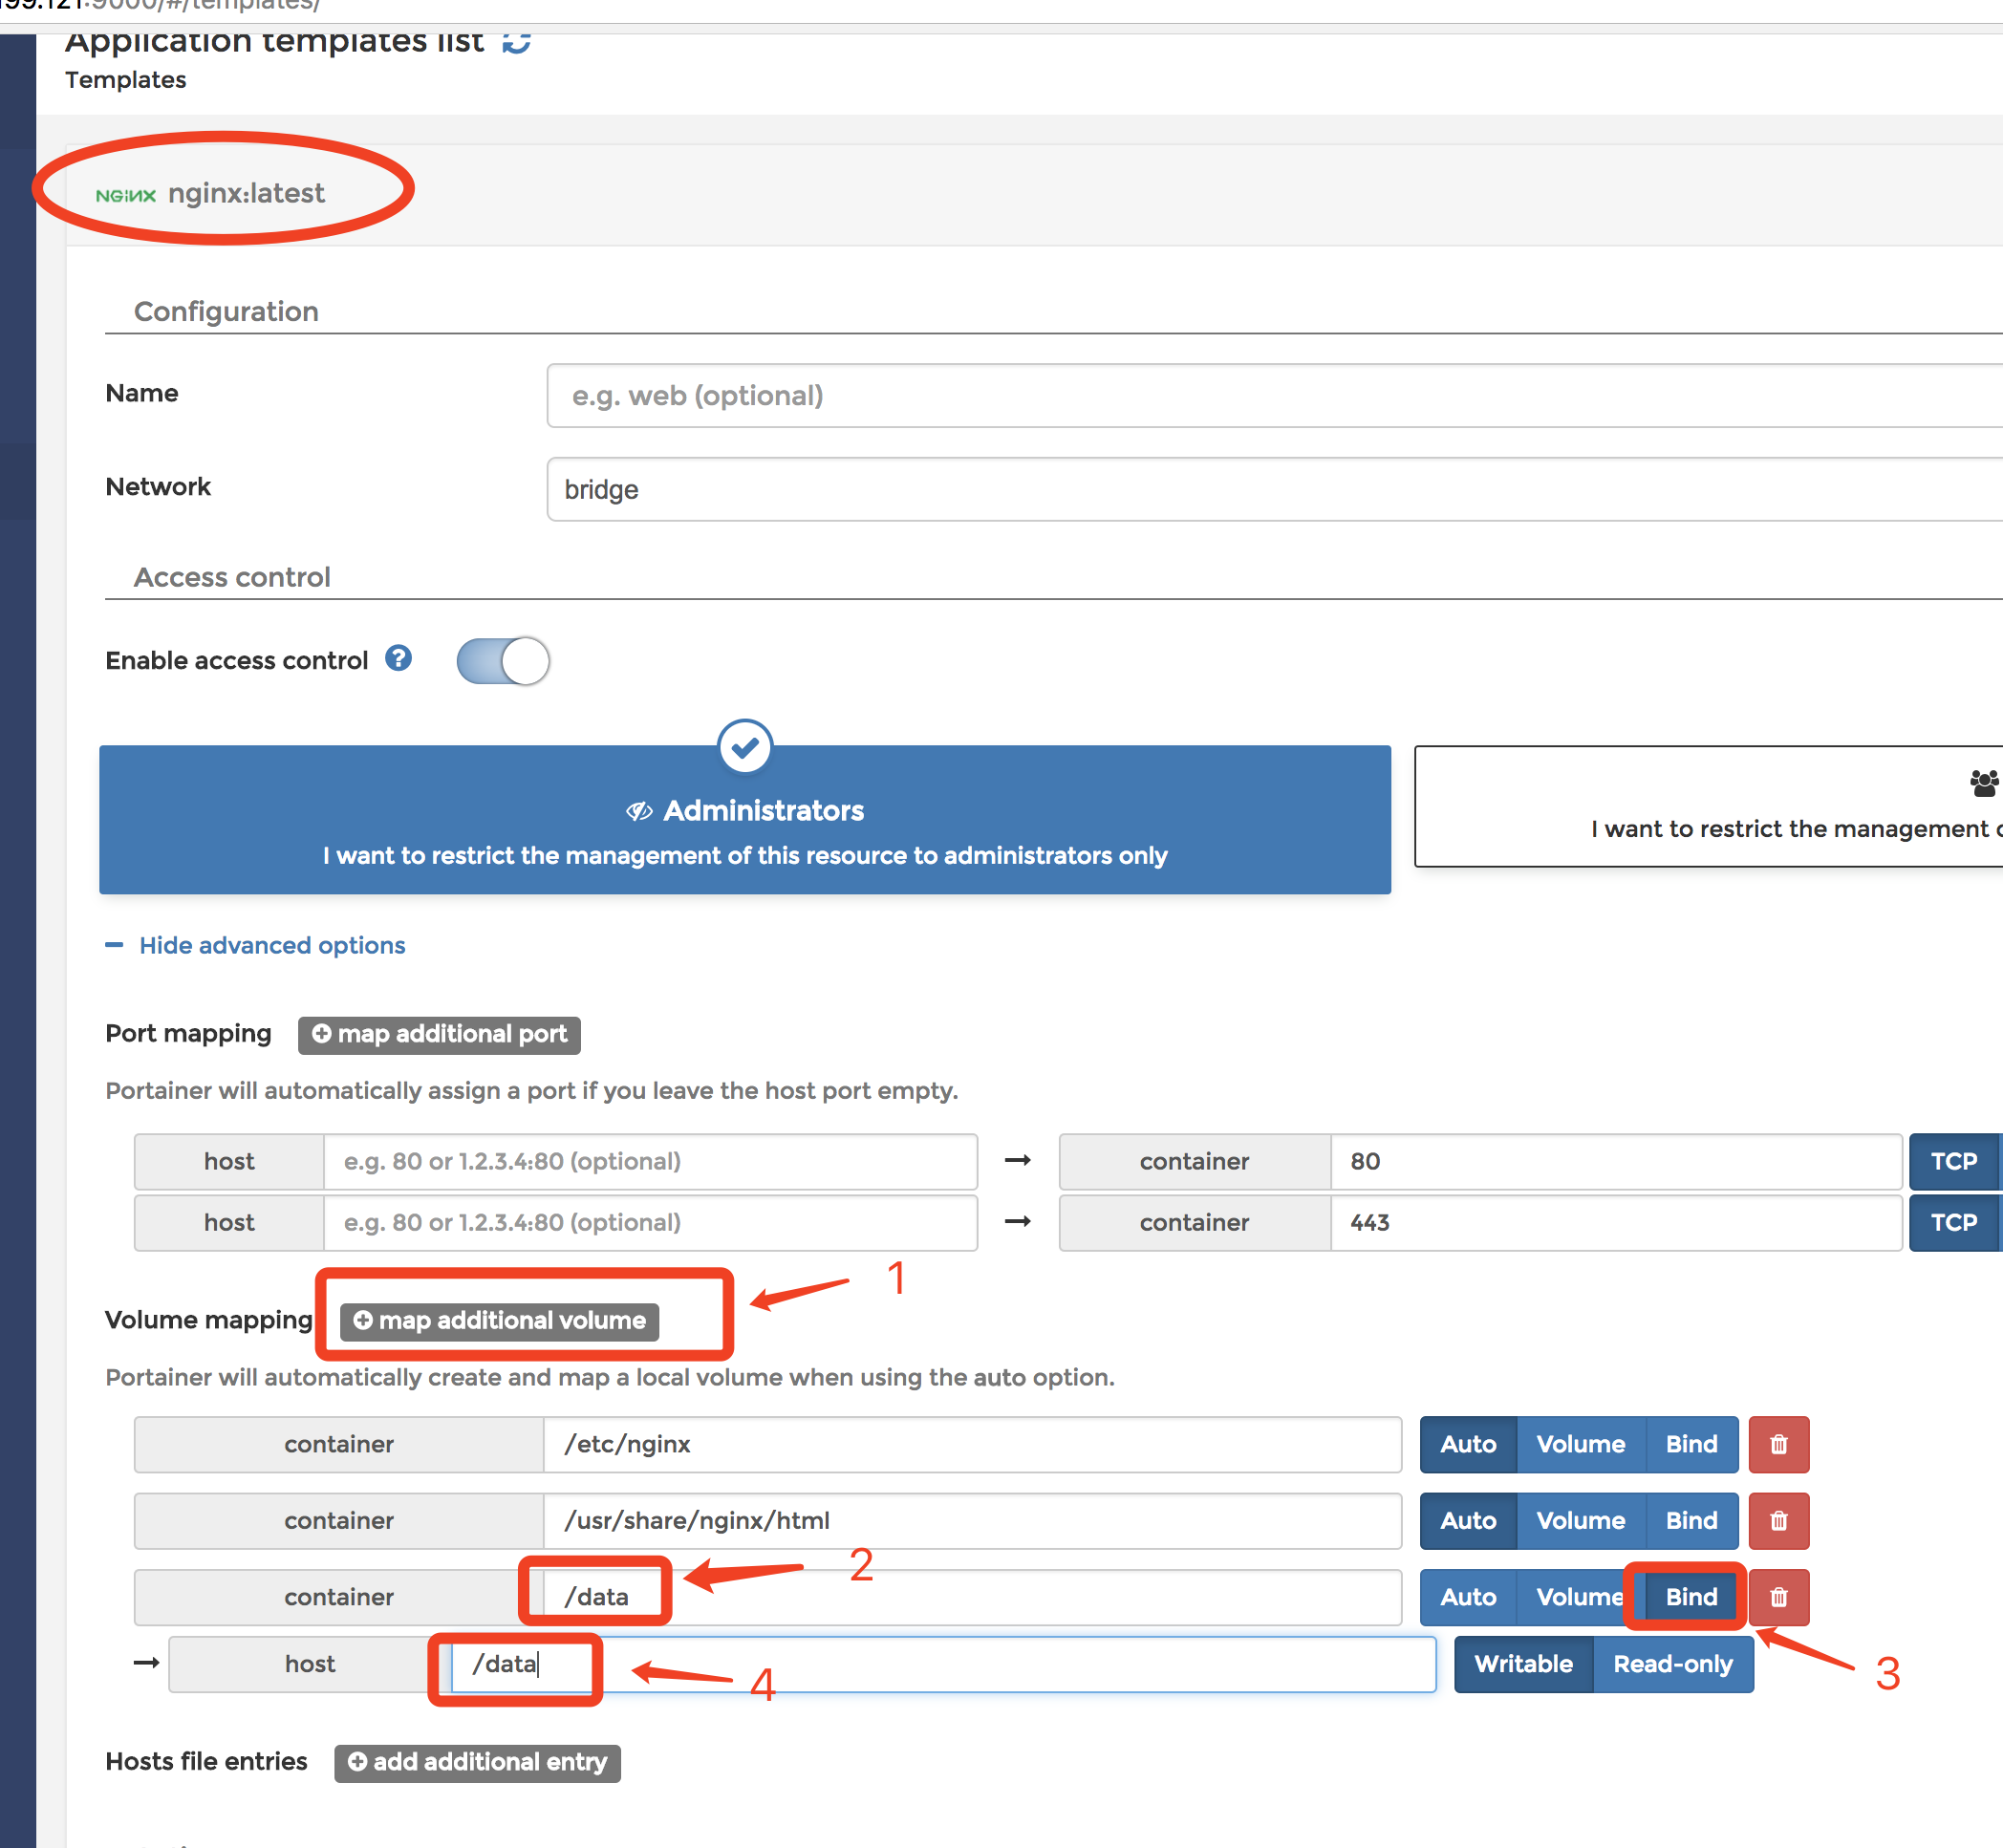
2.Enter the App Template page and select the MariaDB option.

6.png

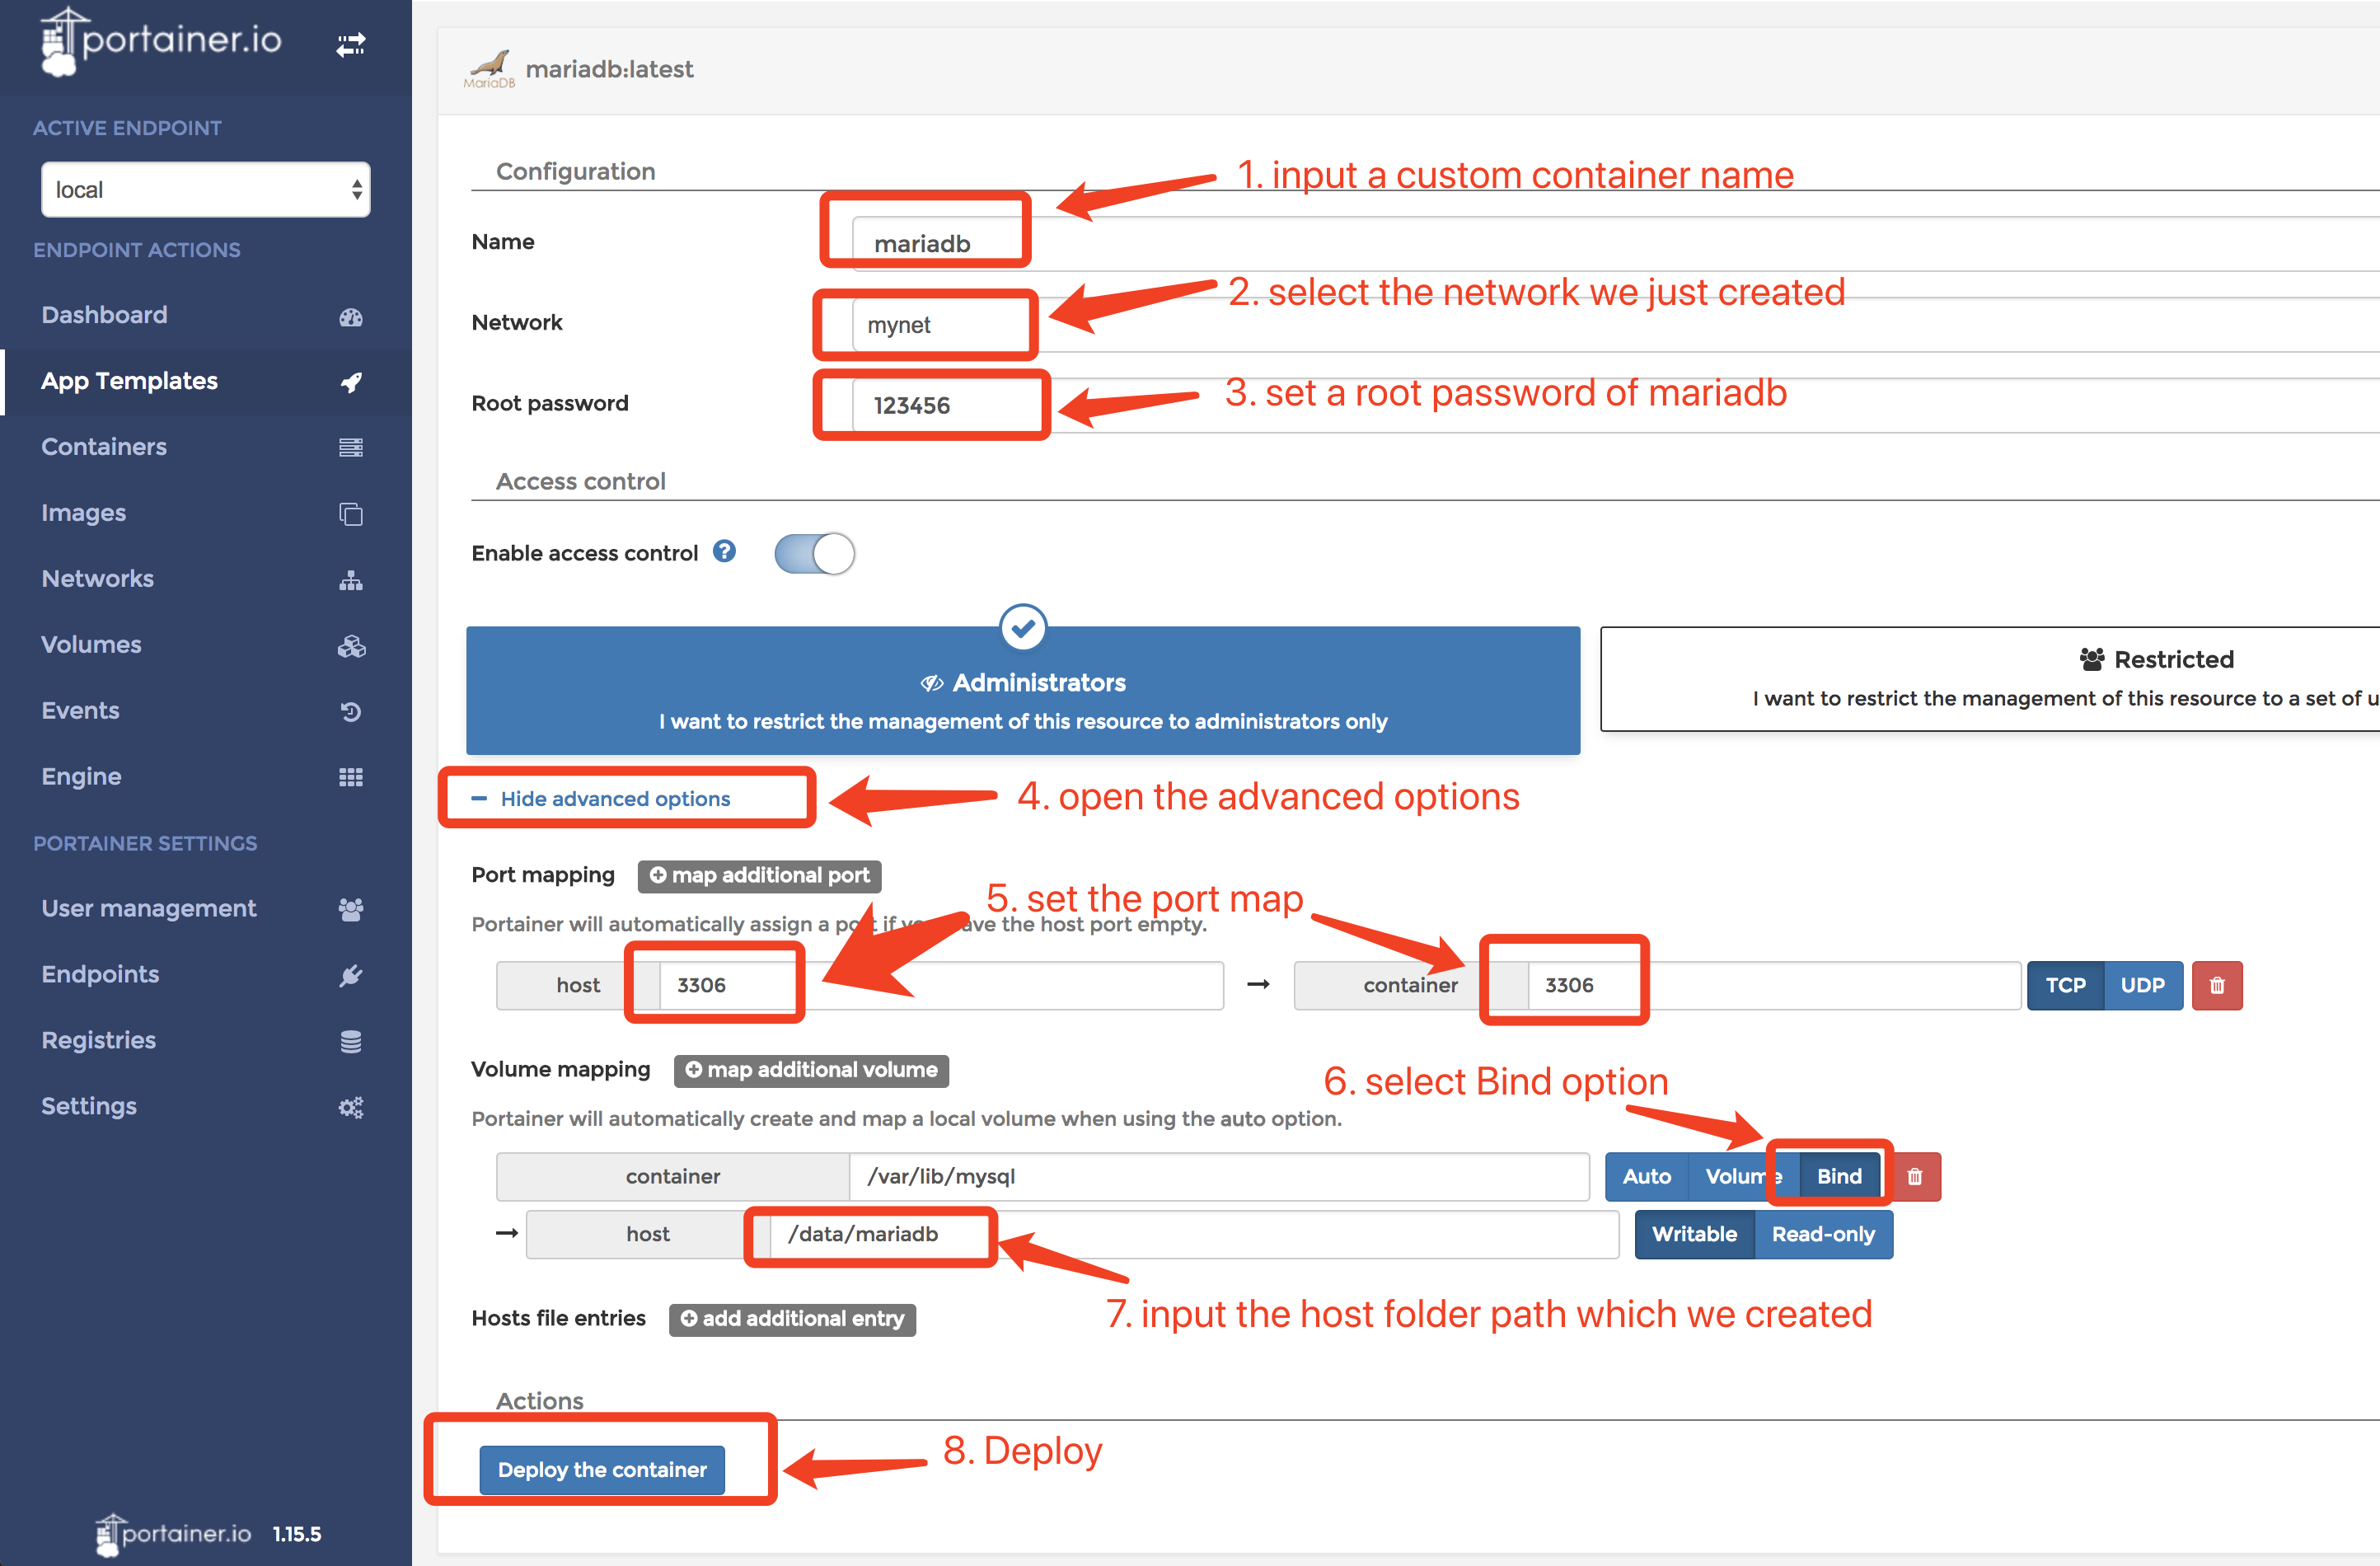
3.Input required information with snapshot (When you clicked the Deploy the container button, you need waiting a while. Because docker is pulling the portainer image.)

7.png

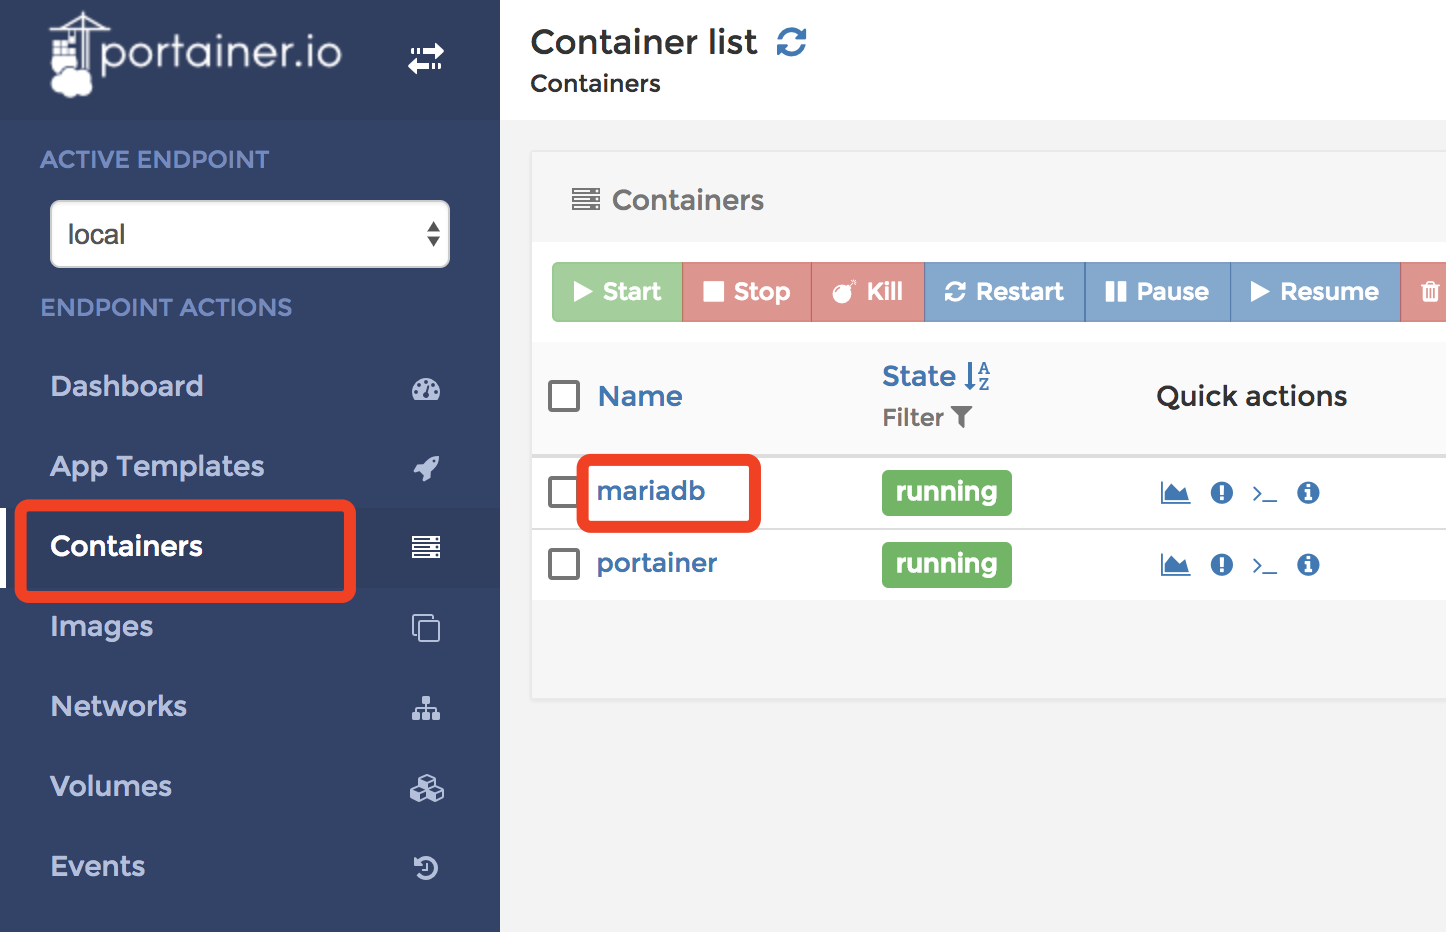
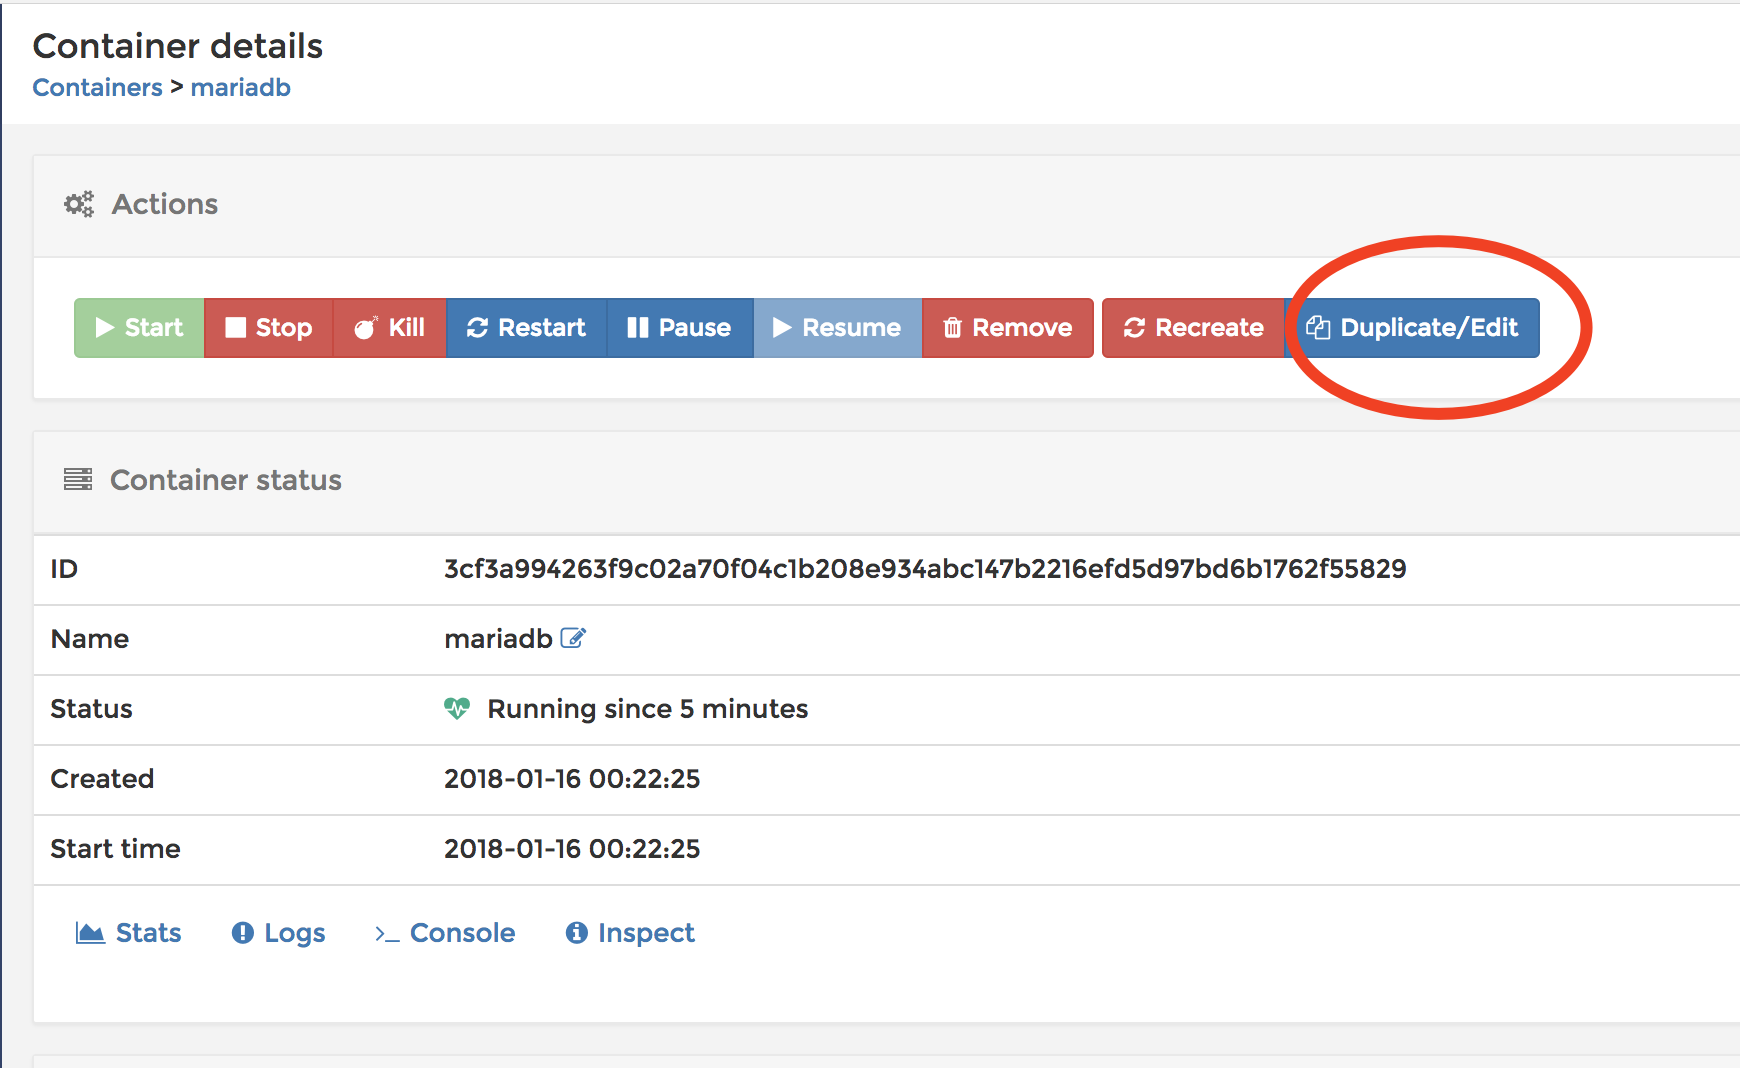
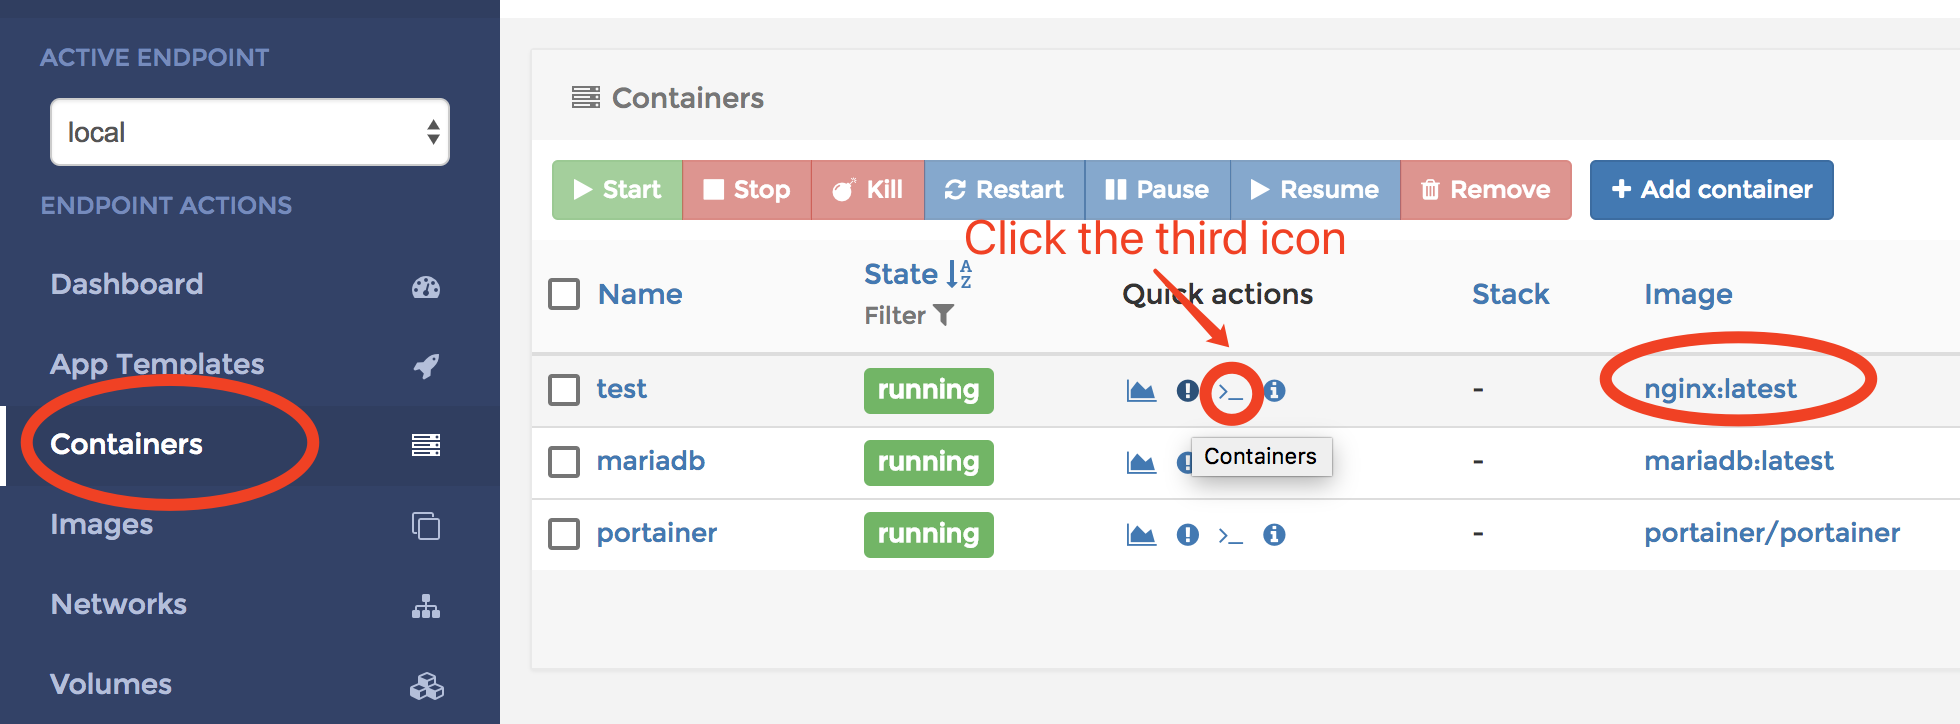
4.Because the App Template doesn’t set the static IP, we need set it with editing the container configurations manually. Open the container detail page:

8.png

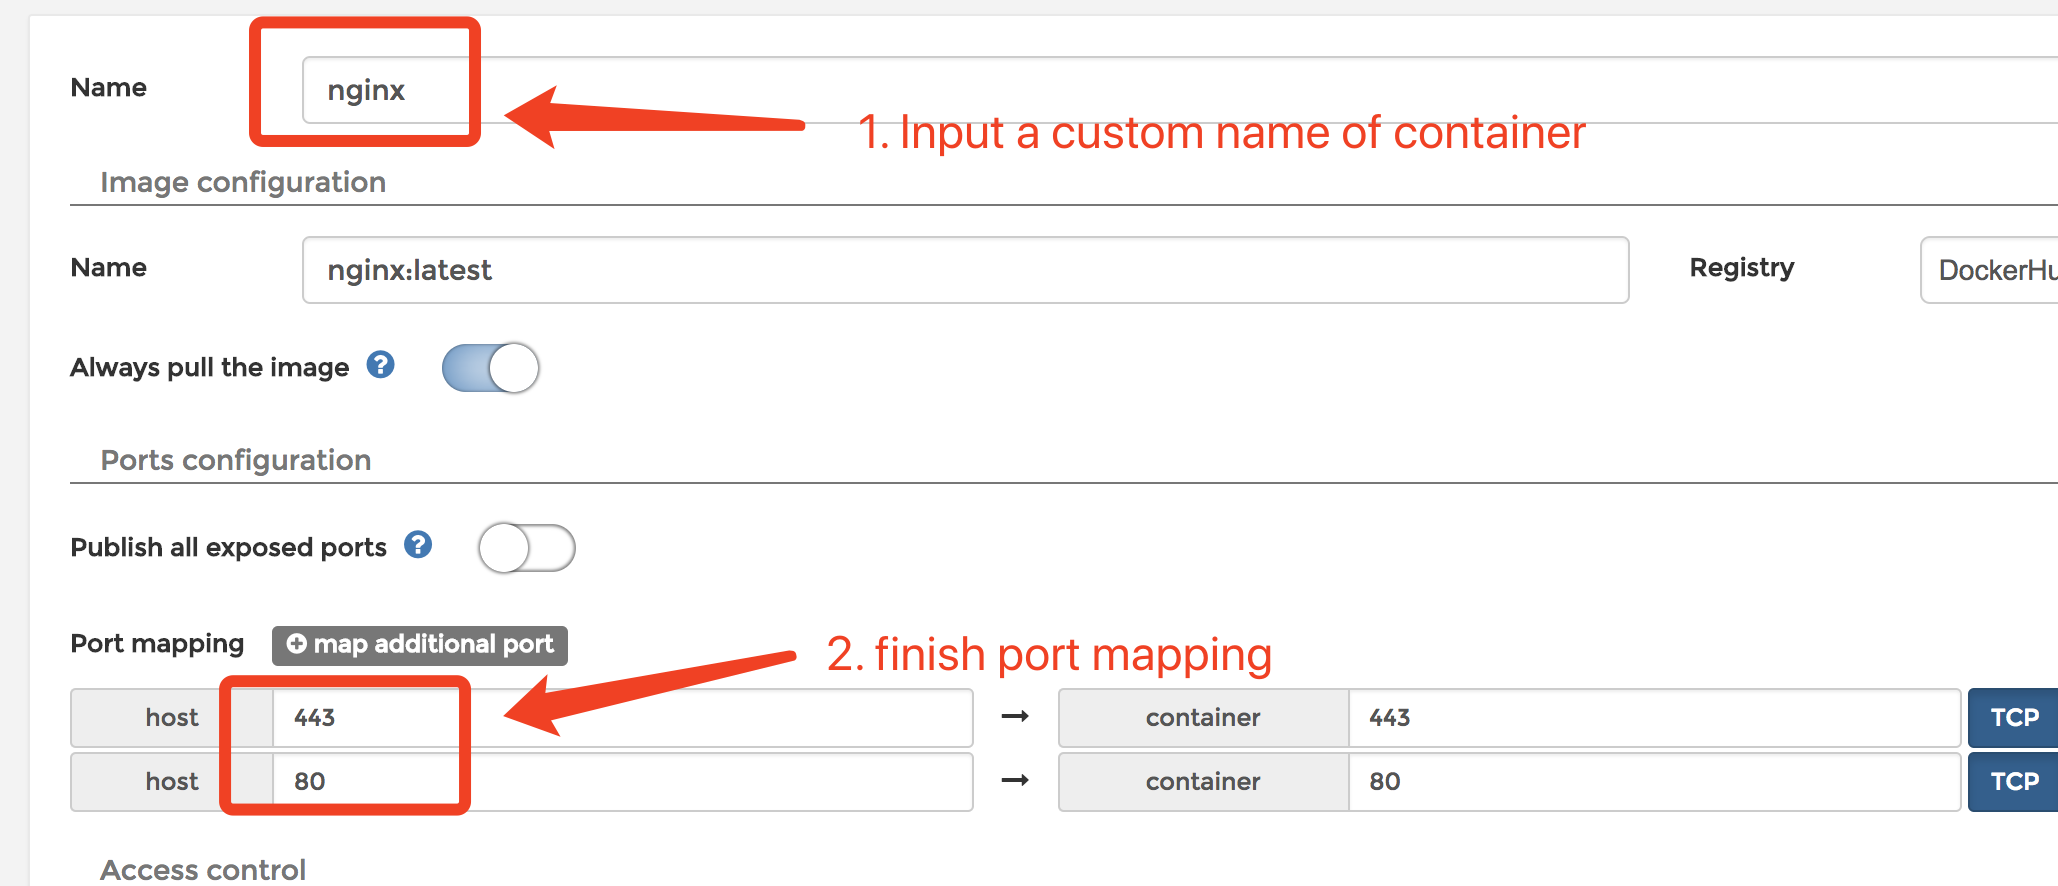
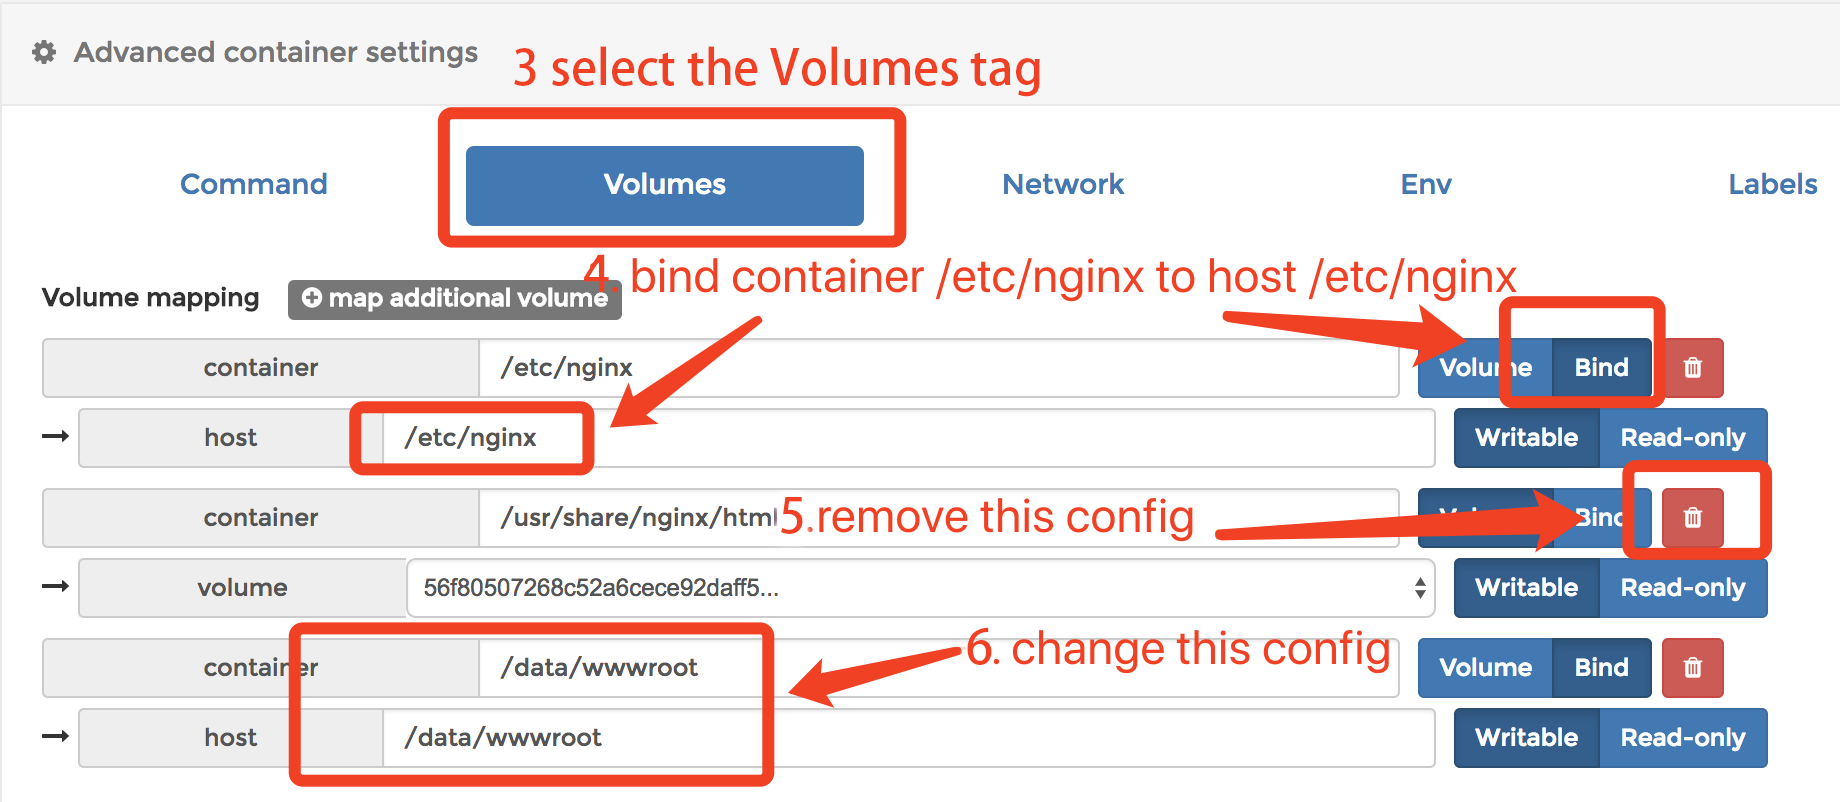
5.Click the Duplicate/Edit button

9.png

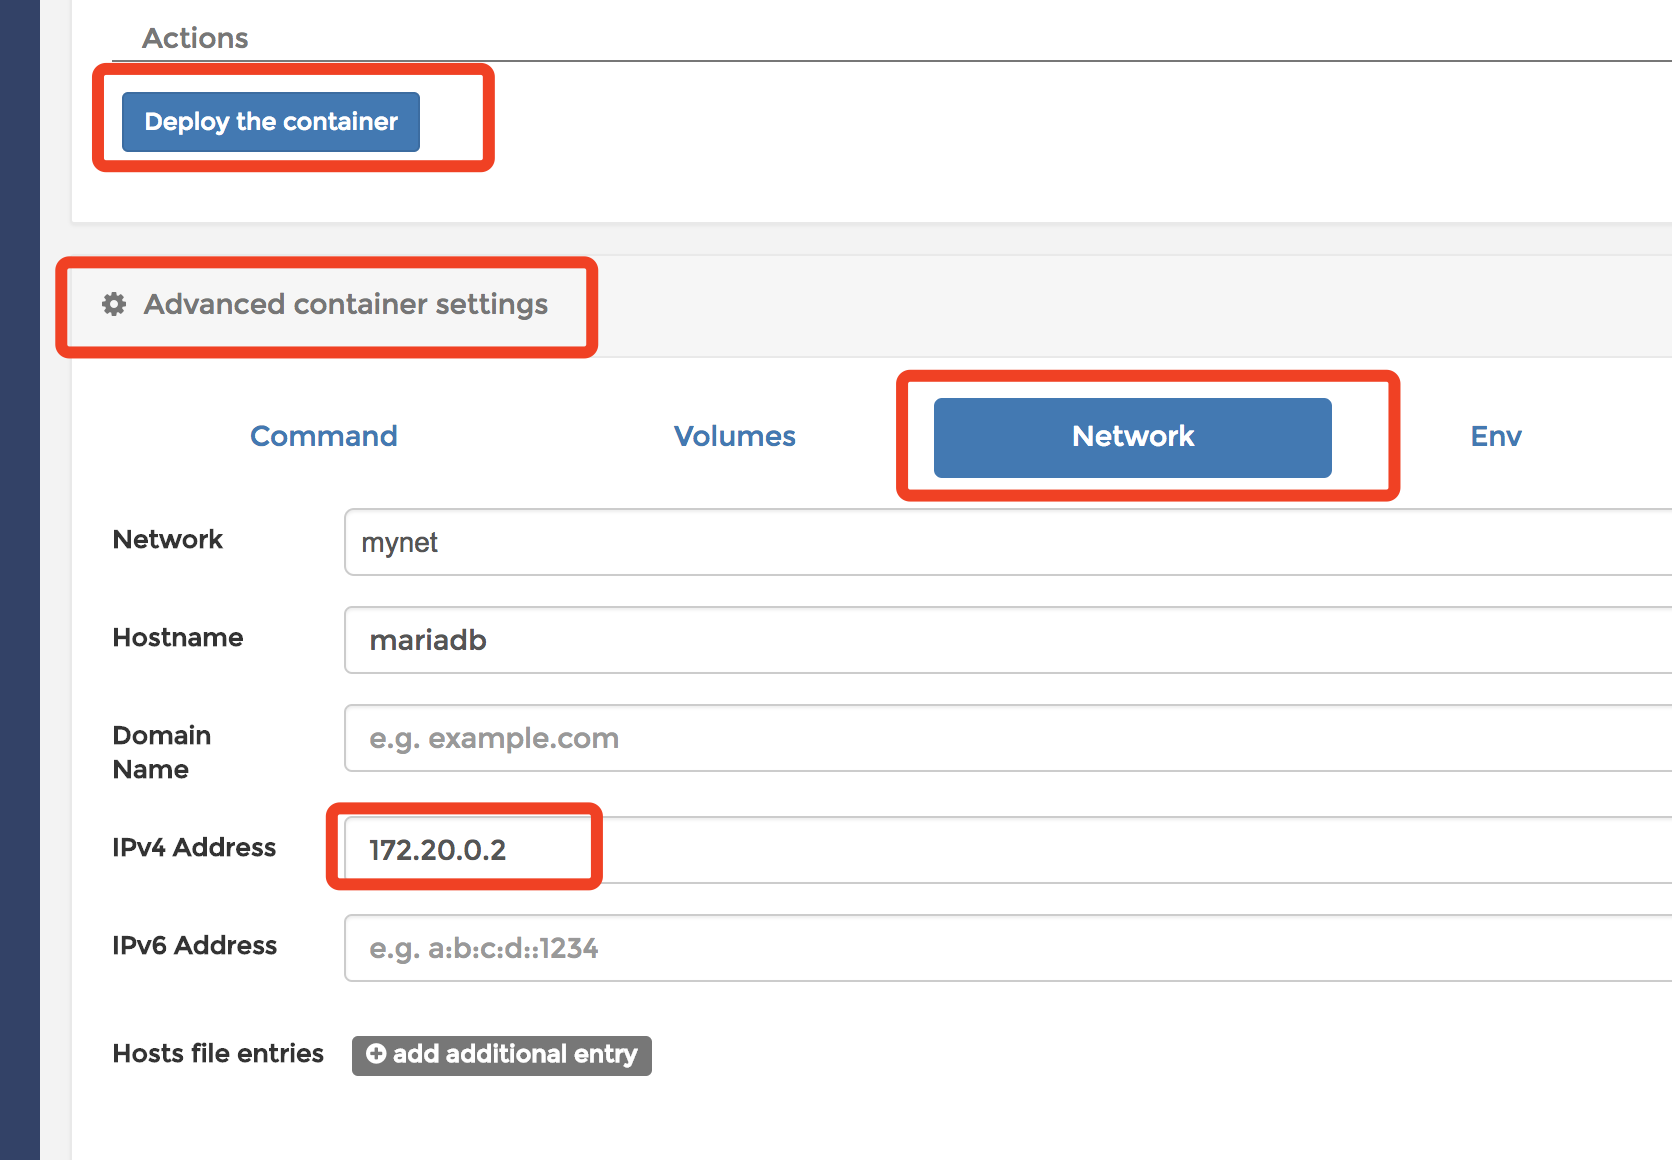
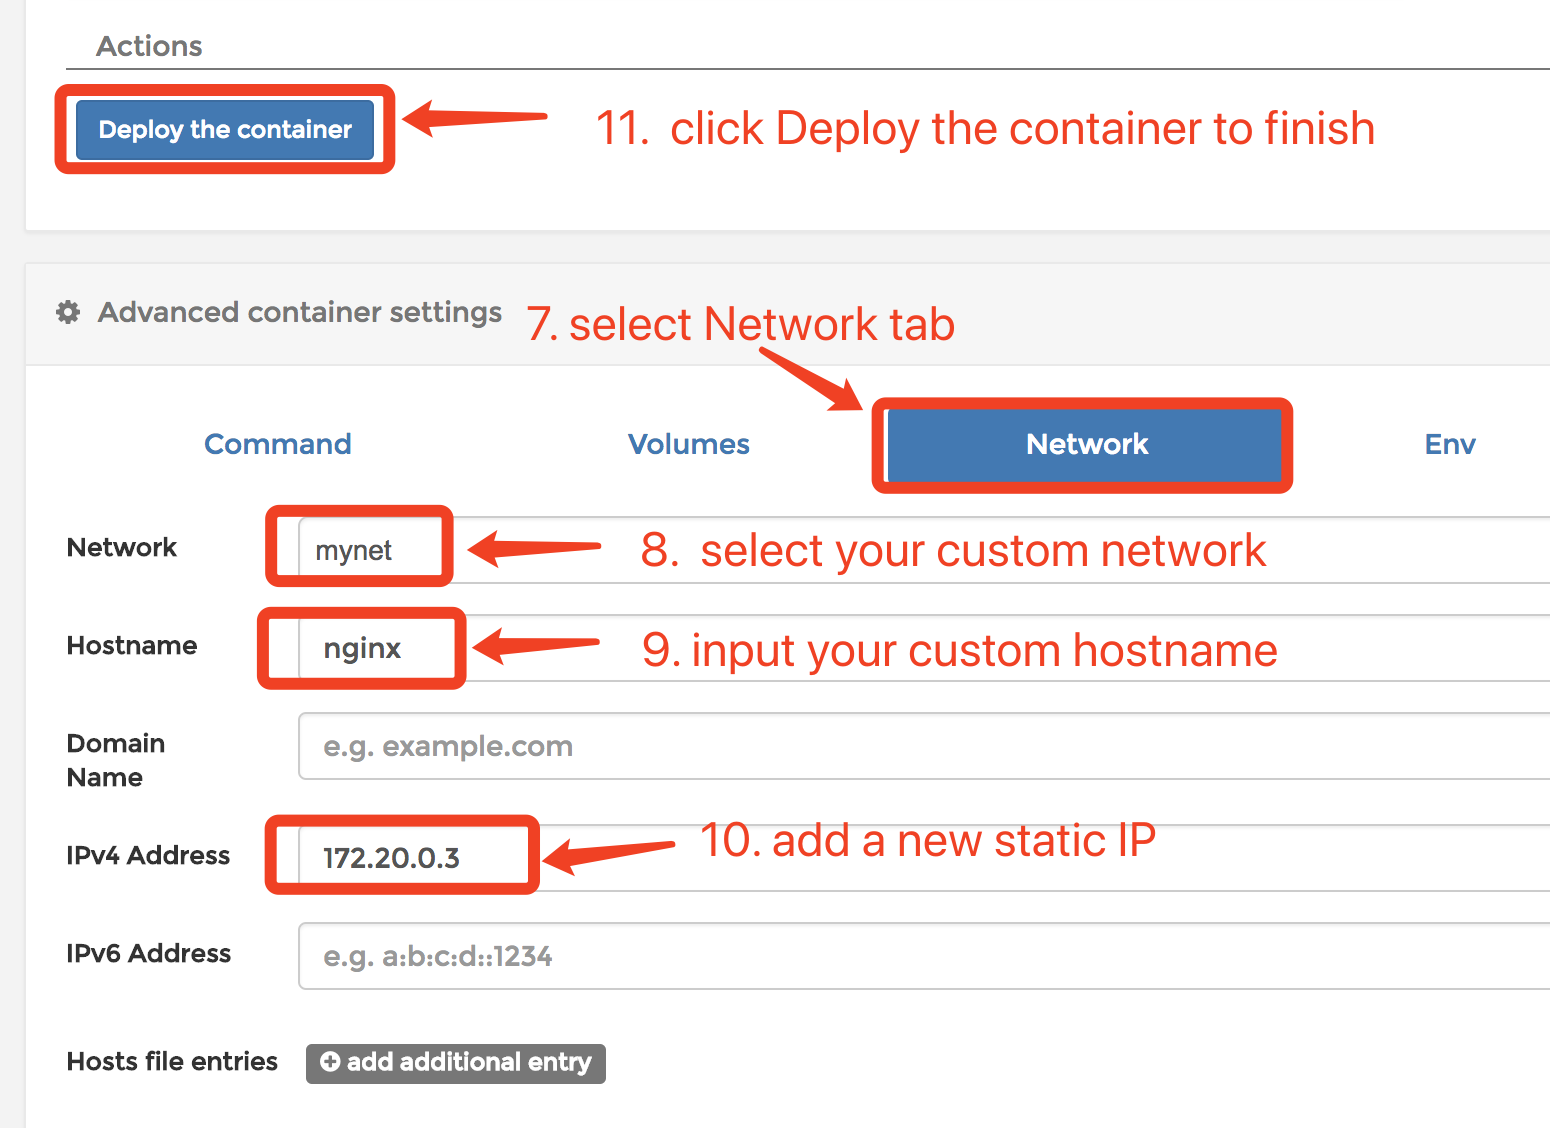
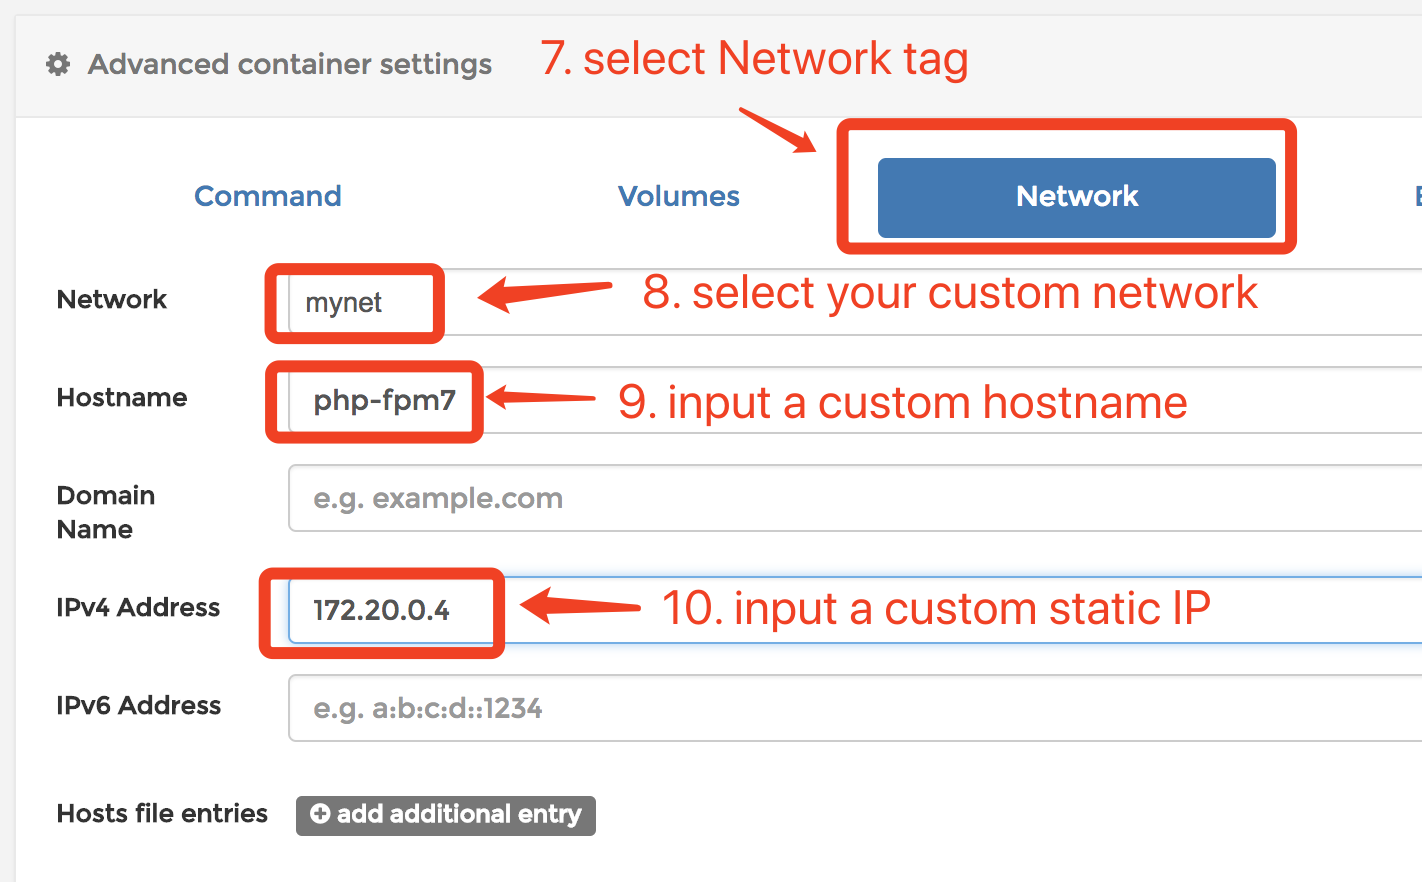
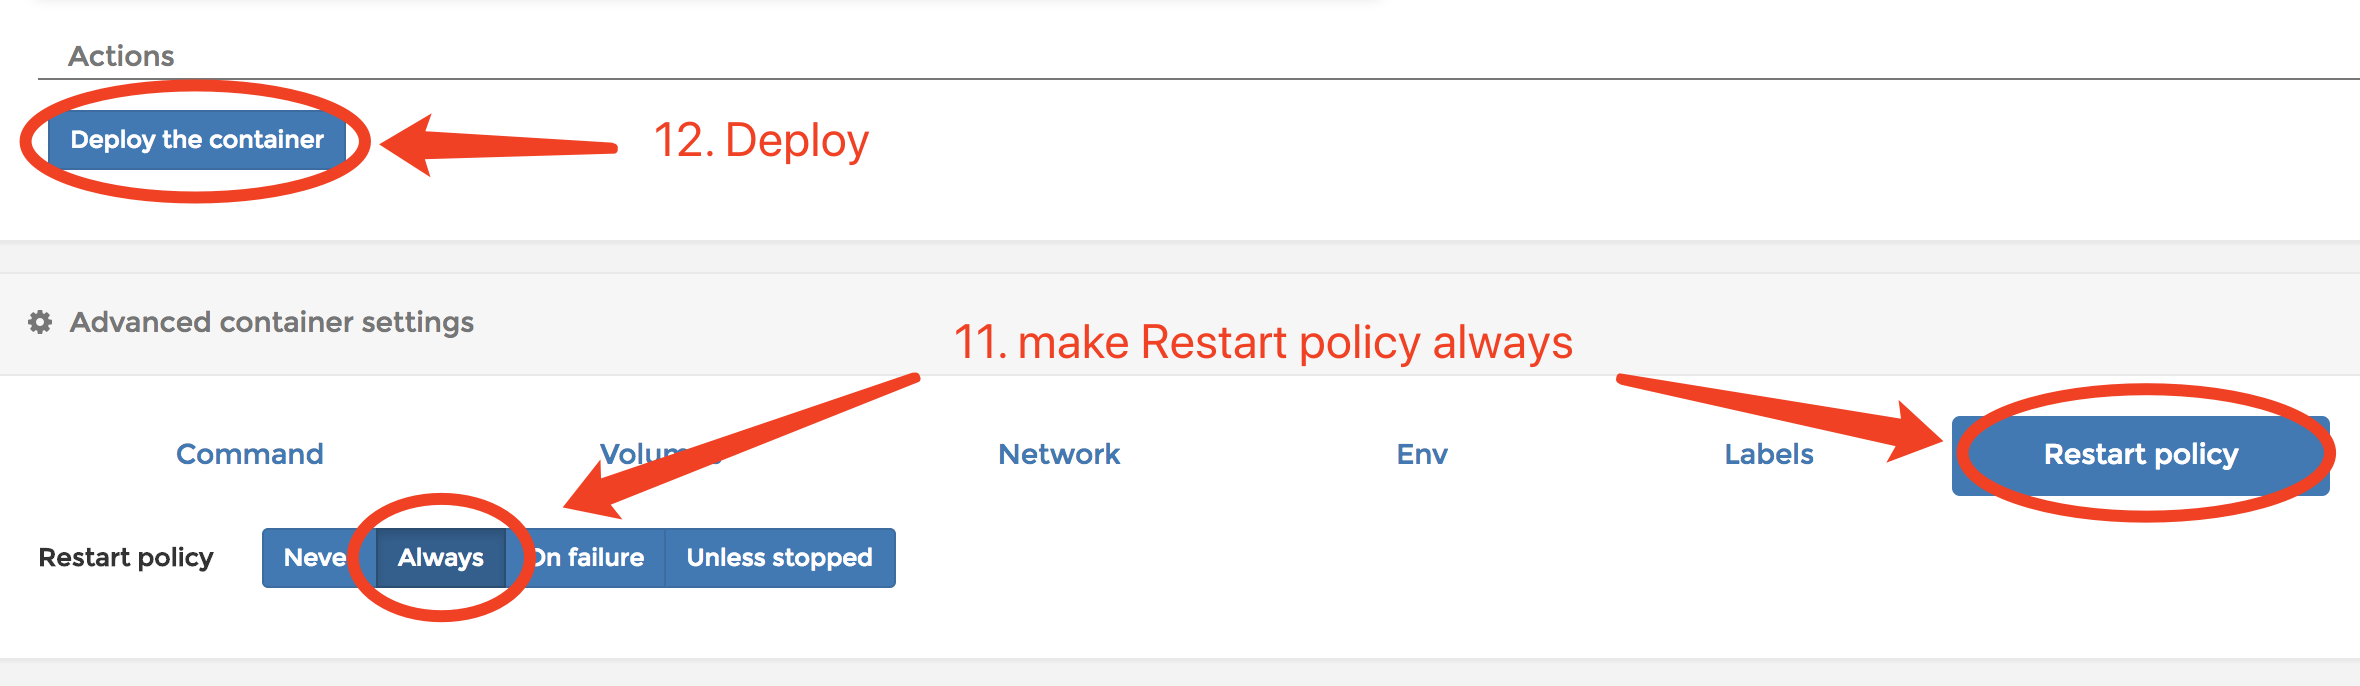
6.Find the Advanced container settings section, select the Network tab, input a static IP into the IPv4 address, click Deploy the container.

10.png

7.Portainer will mention you whether if to replace the original container. Click Replace.

11.png

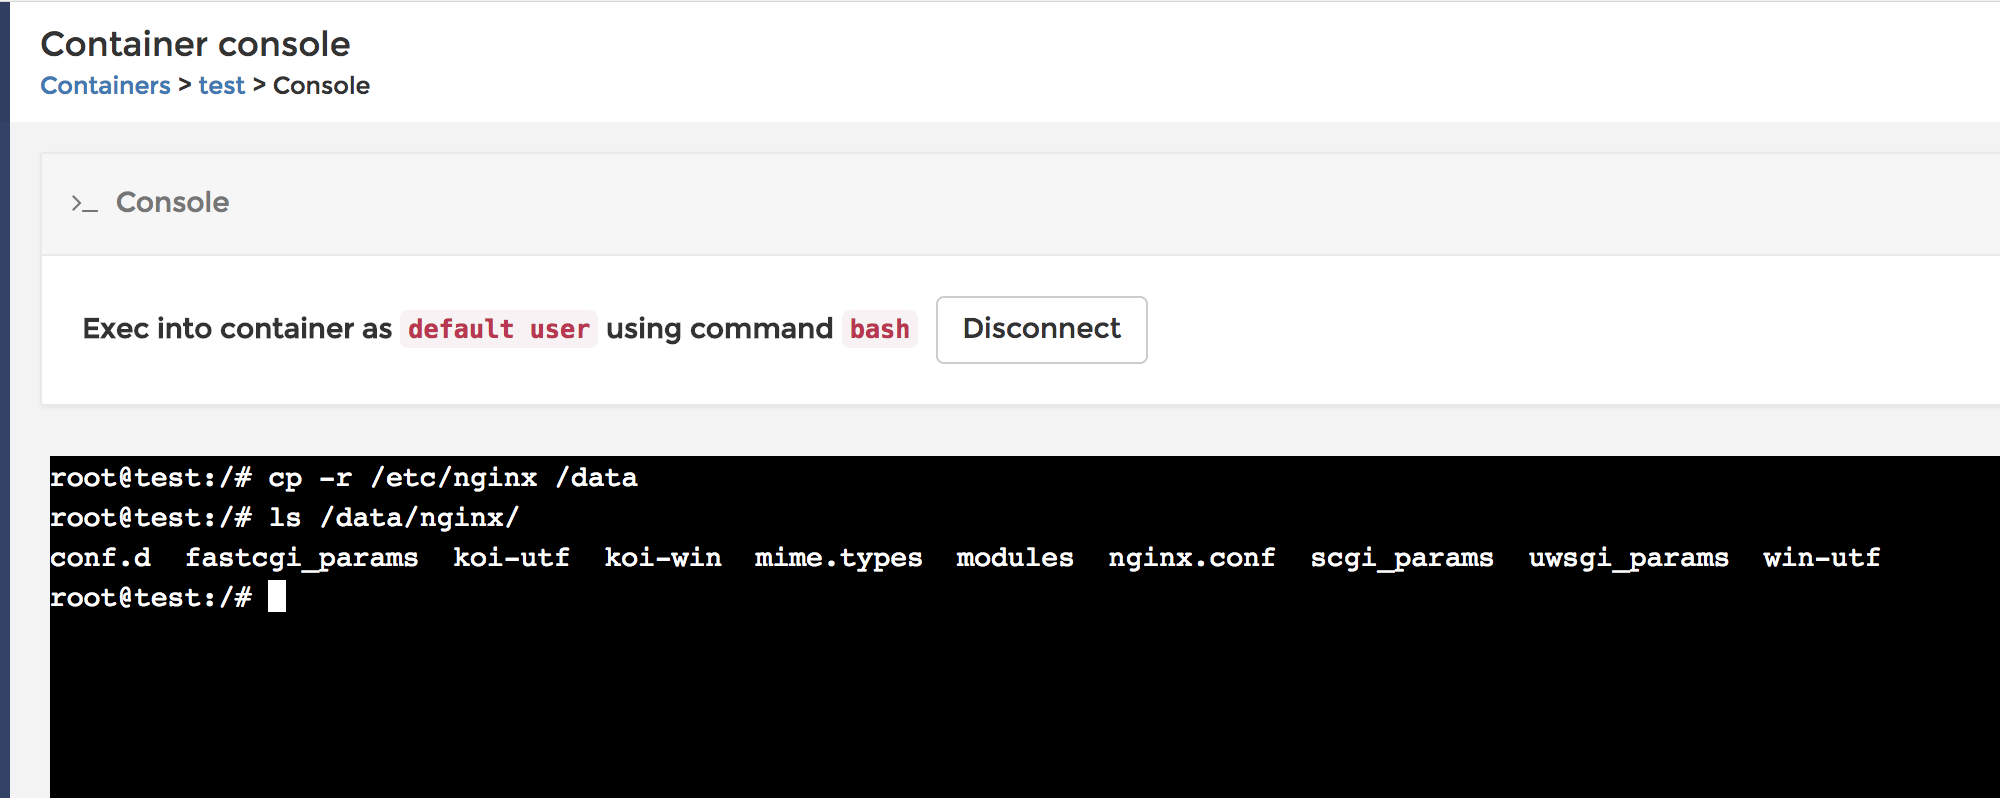
8.If we want to connect to the database on the host, we can run this command

1
$ docker run -it --rm --name mariadb_client --network mynet mariadb /usr/bin/mysql -h 172.20.0.2 -uroot -p
  • --network mynet is needed. You must put the client container into your MariaDB server container’s network.
  • --rm will destroy this client container when it ends.

OR

1
$ docker exec -it mariadb /usr/bin/mysql -h 172.20.0.2 -uroot -p

Add nginx container

In this example, we use the App Template to create the nginx container.

1.Deploy a nginx container from App Template and bind container /data to host /data.

12.png

2.Open the Containers list and find the container you just created and click the third icon to get in the container console.

13.png

3.Run this command to copy nginx configurations to your host.

1
# cp -r /etc/nginx /data

14.png

4.On the host terminal run this command

1
$ sudo cp -r /data/nginx /etc/nginx

5.Edit the exist nginx container with these snapshots

16.png

17.png

18.png

Add a php-fpm7 container

1.Create a php-fpm7 image
I refer to this repo to create the image. This image is based on Alpine so it’s light enough.

1
2
$ git clone https://github.com/Yavin/docker-alpine-php-fpm.git
$ cd docker-alpine-php-fpm

2.Edit the php-fpm.conf:

1
2
3
4
5
6
7
8
9
10
11
[www]
user = nobody
group = nobody
listen = [::]:9000
chdir = /data/wwwroot # Change the chdir
pm = dynamic
pm.max_children = 5
pm.start_servers = 2
pm.min_spare_servers = 1
pm.max_spare_servers = 3
catch_workers_output = Yes

3.Build image

1
$ docker build -t php-fpm7:latest .

4.Add a new container

19.png

5.Configure step by step with thees snapshots:

20.png

21.png

22.png

23.png

Final Config

1.At last, we need to edit the /etc/nginx/conf.d/default.conf on host like this:

1
2
3
4
5
6
7
8
9
10
11
12
13
14
15
16
17
18
19
20
21
$ sudo vim /etc/nginx/conf.d/default.conf

server {
listen 80;
server_name localhost;

location / {
root /data/wwwroot/default;
index index.html index.htm index.php;
}

# pass the PHP scripts to FastCGI server listening on 127.0.0.1:9000
location ~ \.php$ {
root /data/wwwroot/default;
fastcgi_pass 172.20.0.4:9000;
fastcgi_index index.php;
fastcgi_param SCRIPT_FILENAME $document_root$fastcgi_script_name;
include fastcgi_params;
}

}

2.Create index.php for testing

1
2
$ sudo mkdir /data/wwwroot/default
$ sudo echo "<?php phpinfo();?>" > /data/wwwroot/default/index.php

3.Restart nginx container

24.png

Visit the test page

25.png

Summary

Using dockerized apps is a trend. If you want to run dockerized apps on your personal VPS, Portainer is a good choice. It’s easy and light.


Portainer 是一个为 Docker 设计的简易 UI 管理界面. 通过 Portainer 可以轻松管理你的 Docker 的各种资源. 它是轻量级的, 你甚至可以在一台只有 512MB 内存的 VPS 上部署使用.

在这个教程中, 我们将通过使用 Portainer 部署一套 LNMP 环境, 来学习如何使用 Portainer.

将会学到?

  • 你将学到如何安装 Portainer
  • 你将学到如何在 Portainer 中创建自定义的网络
  • 你将学到如何用 Portainer 创建容器

准备工作

  • Ubuntu 16.04 (64-bit)
  • Bash 基础知识
  • Docker 基础知识
  • 曾搭建过普通环境的 LNMP

困难度

  • 中等

教程内容

安装 Portainer

1.创建一个卷来存储 Portainer 的数据, 你同样也可以使用主机的目录来存储

1
$ docker volume create portainer_data

2.使用 Docker 运行 Portainer.

1
$ docker run -d -p 9000:9000 --name portainer -v /var/run/docker.sock:/var/run/docker.sock -v portainer_data:/data --restart always portainer/portainer
  • -d 已后台方式运行
  • -p 9000:9000 映射容器9000端口.
  • -v /var/run/docker.sock:/var/run/docker.sock 映射出 docker socket 使 Portainer 容器可以管理 Docker.

3.使用浏览器访问 http://localhost:9000 进入安装界面, 输入用户名和密码完成管理员创建.

1.png

4.选择 Local 选项后点击 Connect 按钮完成安装.

2.png

5.当你看到管理主页的时候, 安装完成.

3.png

创建新的网络

container link 连接容器的方法已经过时了, 并且 Portainer 也不支持 link. 因此为了让容器间可以通讯, 我们需要建立自定义网络, 并手动分配静态IP给每个容器.

1.进入 Networks 页面并点击 Add network 按钮.

4.png

2.按照截图提示输入必要信息并点击 Create the network 按钮.

5.png

添加 MariaDB 容器

在这个教程中我们使用 App Template 来创建 MariaDB 容器.

1.创建一个目录来存储数据库数据

1
$ sudo mkdir -p /data/mariadb

2.进入 App Template 页面后选择 MariaDB 选项.

6.png

3.按照截图填写配置信息 (当你点击完 Deploy the container 按钮后, 你需要等待一段时间, 因为 Docker 正在后台帮你拉取镜像.)

7.png

4.由于 App Template 没有设置静态IP, 我们需要手动配置下. 打开容器的详情页:

8.png

5.点击 Duplicate/Edit 按钮

9.png

6.找到 Advanced container settings 部分, 选择 Network 选项卡, 在 IPv4 address 中输入一个静态IP, 点击 Deploy the container 完成.

10.png

7.Portainer 将会提示你是否替换原有容器. 点击 Replace.

11.png

8.如果想在主机上连接访问数据库, 可以执行下面的命令:

1
$ docker run -it --rm --name mariadb_client --network mynet mariadb /usr/bin/mysql -h 172.20.0.2 -uroot -p
  • --network mynet 这个选项是必须的, 你必须把客户端容器放置在服务端容器的网络中才可以访问到.
  • --rm 这个配置可以使这个容器在执行完毕后立即删除.

或者

1
$ docker exec -it mariadb /usr/bin/mysql -h 172.20.0.2 -uroot -p

创建 Nginx 容器

在本教程中我们使用 App Template 创建 Nginx 容器.

1.从 App Template 中部署一个 Nginx 容器, 并把容器中的 /data 绑定到主机的 /data 上.

12.png

2.打开 Containers 列表, 找到你刚才创建的容器并点击第三个图标, 进入容器的 console 界面.

13.png

3.执行下面的命令, 把容器中 Nginx 的配置文件复制到主机下.

1
# cp -r /etc/nginx /data

14.png

5.在主机上执行下面的命令

1
$ sudo cp -r /data/nginx /etc/nginx

6.按照截图的指示修改容器配置, 完成 Nginx 容器部署

16.png

17.png

18.png

创建 php-fpm7 容器

1.创建一个 php-fpm7 的镜像
我参考了这个 repo 来创建镜像. 这个镜像的好处是基于 Alpine 创建, 非常轻量.

1
2
$ git clone https://github.com/Yavin/docker-alpine-php-fpm.git
$ cd docker-alpine-php-fpm

2.修改 php-fpm.conf:

1
2
3
4
5
6
7
8
9
10
11
[www]
user = nobody
group = nobody
listen = [::]:9000
chdir = /data/wwwroot # 修改 chdir
pm = dynamic
pm.max_children = 5
pm.start_servers = 2
pm.min_spare_servers = 1
pm.max_spare_servers = 3
catch_workers_output = Yes

3.构建镜像

1
$ docker build -t php-fpm7:latest .

4.创建新容器

19.png

5.按照截图一步一步操作, 完成容器创建:

20.png

21.png

22.png

23.png

最后的配置

1.最后我们需要修改下主机上的 Nginx 配置文件 /etc/nginx/conf.d/default.conf:

1
2
3
4
5
6
7
8
9
10
11
12
13
14
15
16
17
18
19
20
21
$ sudo vim /etc/nginx/conf.d/default.conf

server {
listen 80;
server_name localhost;

location / {
root /data/wwwroot/default;
index index.html index.htm index.php;
}

# pass the PHP scripts to FastCGI server listening on 127.0.0.1:9000
location ~ \.php$ {
root /data/wwwroot/default;
fastcgi_pass 172.20.0.4:9000;
fastcgi_index index.php;
fastcgi_param SCRIPT_FILENAME $document_root$fastcgi_script_name;
include fastcgi_params;
}

}

2.创建一个测试首页 index.php

1
2
$ sudo mkdir /data/wwwroot/default
$ sudo echo "<?php phpinfo();?>" > /data/wwwroot/default/index.php

3.重启 Nginx 容器

24.png

在浏览器中访问测试页面

25.png

总结

使用 Docker 化应用是一个趋势. 如果你想在你的个人 VPS 上运行 Docker 化的应用, Portainer 是一个不错的选择, 因为它使用简单并且轻量.

简介

VundleVim Bundle 的简称,是为了使 Vim 的插件更便于管理,如果你使用过 Vim ,那么你也一定对于 Vim 的插件管理很头疼。现在可以体验下 Vundle 给我们带来的使用便利。

快速全新安装(Mac or Linux)

1. 清除掉原有配置,如果需要备份,请先备份

1
~ » rm -rf .vim .viminfo .vimrc

2. 安装 Vundle

1
~ » git clone https://github.com/VundleVim/Vundle.vim.git ~/.vim/bundle/Vundle.vim

3. 创建 .vimrc 并添加以下 Vundle 的配置信息

1
2
3
4
5
6
7
8
9
10
11
12
13
14
15
16
17
18
19
20
21
22
23
24
25
26
27
28
set nocompatible              " be iMproved, required
filetype off " required

" set the runtime path to include Vundle and initialize
set rtp+=~/.vim/bundle/Vundle.vim
call vundle#begin()
" alternatively, pass a path where Vundle should install plugins
"call vundle#begin('~/some/path/here')

" let Vundle manage Vundle, required
Plugin 'VundleVim/Vundle.vim'

" Add your plugins to this place 在这里添加你的插件

" 在这行前添加你的插件
call vundle#end() " required
filetype plugin indent on " required
" To ignore plugin indent changes, instead use:
"filetype plugin on
"
" 以下是常用命令
" :PluginList - lists configured plugins
" :PluginInstall - installs plugins; append `!` to update or just :PluginUpdate
" :PluginSearch foo - searches for foo; append `!` to refresh local cache
" :PluginClean - confirms removal of unused plugins; append `!` to auto-approve removal
"
" see :h vundle for more details or wiki for FAQ
" 在该行后添加自己的配置信息

4. 安装插件

启动 Vim 然后运行 :PluginInstall,底部状态栏显示 Done 即为安装完毕,如图
setup_success

使用说明

1. 想要安装新的插件

.vimrc 中的 Plugin 'VundleVim/Vundle.vim'call vundle#end() 之间插入你想要增加的插件信息,常见的几种语法如下:

1
2
3
4
5
6
7
8
" 插件托管在 Github 上的
Plugin 'tpope/vim-fugitive'
" 插件托管在 http://vim-scripts.org/vim/scripts.html 上的
" Plugin 'L9'
" 插件托管在非 github 上的
Plugin 'git://git.wincent.com/command-t.git'
" 插件是在自己本地的
Plugin 'file:///home/gmarik/path/to/plugin'

比如我要安装 NERDTree 插件,它的 Github 地址是 https://github.com/scrooloose/nerdtree,那么添加的配置信息如下:

1
Plugin 'scrooloose/nerdtree'

然后启动 Vim ,执行 PluginInstall 即可完成安装。

2. 增加自己的配置信息

如果想要增加自己的配置信息的话,只要在 Vundle 的配置信息之后增加即可,以下是我的自定义配置信息:

1
2
3
4
5
6
7
8
9
10
11
12
13
14
15
16
17
18
19
20
21
22
23
24
25
26
27
28
29
30
31
32
33
34
35
36
37
38
39
40
41
42
43
44
45
46
47
48
49
colorscheme peachpuff
set guifont=Monaco:h10 " 字体 && 字号
set expandtab " 设置tab键换空格
set tabstop=4 " 设置tab键的宽度
set shiftwidth=4 " 换行时行间交错使用4个空格
set autoindent " 自动对齐
set backspace=2 " 设置退格键可用
set cindent shiftwidth=4 " 自动缩进4空格
set smartindent " 智能自动缩进
set ai! " 设置自动缩进
set nu! " 显示行号
set showmatch " 显示括号配对情况
"set mouse=a " 启用鼠标
set ruler " 右下角显示光标位置的状态行
set incsearch " 查找book时,当输入/b时会自动找到
set hlsearch " 开启高亮显示结果
set incsearch " 开启实时搜索功能
set nowrapscan " 搜索到文件两端时不重新搜索
set nocompatible " 关闭兼容模式
set vb t_vb= " 关闭提示音
"set cursorline " 突出显示当前行
hi CursorLine cterm=NONE ctermbg=darkred ctermfg=white
hi CursorColumn cterm=NONE ctermbg=darkred ctermfg=white
set hidden " 允许在有未保存的修改时切换缓冲区


syntax enable " 打开语法高亮
syntax on " 开启文件类型侦测
filetype indent on " 针对不同的文件类型采用不同的缩进格式
filetype plugin on " 针对不同的文件类型加载对应的插件
filetype plugin indent on " 启用自动补全

set writebackup " 设置无备份文件
set nobackup
set autochdir " 设定文件浏览器目录为当前目录
set nowrap " 设置不自动换行
set foldmethod=syntax " 选择代码折叠类型
set foldlevel=100 " 禁止自动折叠

set laststatus=2 " 开启状态栏信息
set cmdheight=2 " 命令行的高度,默认为1,这里设为2


" 设置编码
set fenc=utf-8
set encoding=utf-8
set fileencodings=utf-8,gbk,cp936,latin-1
" 解决consle输出乱码
language messages zh_CN.utf-8

3. 对自己的 .vimrc 进行版本管理

大致配置好以后,可以把自己的 .vimrc 加入到自己的某个 Github 库中进行版本管理。然后做 ln 到自己的家目录。

有时候为了发送一定量的邮件,而使用类似QQ邮箱这样厂商的产品就会受到各种限制。
为此,需要自己搭建个简易的发邮件的服务器。需求很简单:服务器只需要能发邮件,
不需要接收邮件,且发邮件可以使用 smtp 登陆验证来使用。

安装MTA服务器

我的VPS是 centos7 ,系统自带了 postfix,然后还需要安装 sasl
这个是为了实现 smtp 验证必备的软件。

1
yum install cyrus*

如果你的服务器上没有 postfix ,而是 sendmail,你需要先卸载再安装。

1
2
rpm -e sendmail
yum install postfix

配置DNS

我用的是DNSPOD,要配置的域名为 mypi.win,也就是我希望发邮件的地址是
username@mypi.win。需要在DNSPOD做以下三条配置

dns配置

其中 SPF 配置中的内容为 v=spf1 a mx ip4:x.x.x.x -all,把其中的
x.x.x.x 换成你的服务器IP,也就是你的主域名指向的IP。

SPF 的作用是为了降低邮件被识别为垃圾邮件的概率,配置好以后,可以去这里
测试下是否配置正确了。

配置postfix

修改 /etc/postfix/main.cf 的内容。

1
2
3
4
5
6
7
8
9
10
11
12
13
14
15
16
17
18
19
20
21
22
23
24
25
26
27
28
29
30
31
32
33
34
35
36
37
38
39
40
41
42
43
44
45
46
47
##将下面的配置项注释取消,后面填上合适值##
myhostname = mypi.win
#大约在75行,postfix主机名,修改成你的域名 此项需要添加A记录并指向postfix所在主机公网IP
mydomain = mypi.win
#大约在83行,后面为主机域名
myorigin = $mydomain
#大约在100行,设置postfix邮箱的域名后缀为$mydomain,即mypi.win
inet_interfaces = localhost
#大约在117行
#指定postfix系统监听的网络接口 此处必须是localhost或127.0.0.1或内网ip
#若注释或填入公网ip 服务器的25端口将对公网开放
#默认值为all 即监听所有网络接口
#此项指定localhost后 本机postfix就只能发邮件不能接收邮件
inet_protocols = ipv4
#大约在120行,指定网络协议
mydestination = $myhostname, localhost.$mydomain, localhost, $mydomain
#大约在165行
#指定postfix接收邮件时收件人的域名,换句话说,也就是你的postfix系统要接收什么样的邮件。
#此项配置中$myhostname表示postfix接受@$myhostname为后缀的邮箱的邮件 逗号分割支持指多项
#此项默认值使用myhostname
local_recipient_maps =
#此项制定接收邮件的规则 可以是hash文件 此项对本次配置无意义 可以直接注释
mynetworks = x.x.x.x, 172.17.0.1, 127.0.0.1
#大约在266行
#指定你所在的网络的网络地址
#本服务器的公网IP x.x.x.x、内网ip 172.17.0.1、以及localhost的ip127.0.0.1
#请依据实际情况修改
smtpd_banner = ETY001 Steemit Mention Server
#大约在571行
#指定MUA通过smtp连接postfix时返回的header头信息

#SMTP Config
broken_sasl_auth_clients = yes
#指定postfix兼容MUA使用不规则的smtp协议--主要针对老版本的outlook 此项对于本次配置无意义
smtpd_client_restrictions = permit_sasl_authenticated
#指定可以向postfix发起SMTP连接的客户端的主机名或ip地址
#此处permit_sasl_authenticated意思是允许通过sasl认证(也就是smtp链接时通过了账号、密码效验的用户)的所有用户
smtpd_recipient_restrictions = permit_mynetworks, permit_sasl_authenticated, reject_unauth_destination
#发件人在执行RCPT TO命令时提供的地址进行限制规则 此处照搬复制即可
smtpd_sasl_auth_enable = yes
#指定postfix使用sasl验证 通俗的将就是启用smtp并要求进行账号、密码效验
smtpd_sasl_local_domain = $mydomain
#指定SMTP认证的本地域名 本次配置可以使用 smtpd_sasl_local_domain = '' 或干脆注释掉 默认为空
smtpd_sasl_security_options = noanonymous
#取消smtp的匿名登录 此项默认值为noanonymous smtp若能匿名登录危害非常大 此项请务必指定为noanonymous
message_size_limit = 5242880
#指定通过postfix发送邮件的体积大小 此处表示5M

配置 SMTP

配置 postfix 启用 sasldb2 的账号密码验证方式:

1
2
3
4
5
6
vim /etc/sasl2/smtpd.conf
#向这个文件写入如下的内容(这个文件的路径为64位系统的,如果是32位系统应该在/usr/lib/sasl2/smtpd.cof)

pwcheck_method: auxprop
auxprop_plugin: sasldb
mech_list: plain login CRAM-MD5 DIGEST-MD5

接下来新建一个连接stmp服务的用户名和密码:

1
[root@mypi ~]# saslpasswd2 -c -u `postconf -h mydomain` steemit

这条命令会新建一个 steemit@mypi.win 的用户,接着会让你输入密码,假设密码为 123456789

新建完成后,可以使用 sasldblistusers2 命令 来查看 已经添加了哪些用户(密码使用userPassword代替):

1
2
[root@mypi ~]# sasldblistusers2
steemit@mypi.win: userPassword

修改 sasldb 的权限,让 postfix 可以读取其中的内容

1
2
[root@mypi ~]# chgrp postfix /etc/sasldb2
[root@mypi ~]# chmod 640 /etc/sasldb2

启动 postfix 并添加开机启动

如果是 centos7 ,执行下面的命令

1
2
systemctl start postfix
systemctl enable postfix

测试smtp

在另外的电脑上执行下面的命令

1
2
3
4
5
6
7
8
/ # nc mypi.win 25
220 ETY001 Steemit Mention Server
auth login
334 VXNlcm5hbWU6
c3RlZW1pdEBteXBpLndpbg==
334 UGFzc3dvcmQ6
MTIzNDU2Nzg5
235 2.7.0 Authentication successful

其中 auth login 为登陆验证指令, c3RlZW1pdEBteXBpLndpbg== 是邮箱地址
steemit@mypi.winbase64 编码后字符串,MTIzNDU2Nzg5 是密码
123456789base64 编码后字符串。

使用 yaourt 安装 frp 的时候,报告以下的错误:

1
2
3
4
5
6
7
==> Validating source files with sha256sums...
frps.service ... FAILED
frpc.service ... FAILED
frps@.service ... FAILED
frpc@.service ... FAILED
==> ERROR: One or more files did not pass the validity check!
:: failed to verify frp integrity

解决方案,重新自己生成 PKGBUILD 文件:

1
2
3
4
5
$ yaourt -G frp
$ cd frp
$ makepkg -g >> PKGBUILD
$ makepkg
$ sudo pacman -S frp-0.14.0-2-x86_64.pkg.tar.xz

使用方法:

1
2
3
4
5
6
7
8
9
To start the client, simply modify /etc/frp/frpc.ini, and start the service by:

systemctl start frpc

or create your own config file, for example myconf.ini, and start the service by:

systemctl start frpc@myconf

You can also start frps the same way

具体配置参数见 https://github.com/fatedier/frp

今天配置服务器的https,结果配置完后,浏览器访问报错,显示

1
2
This site can’t provide a secure connection
1hour.win sent an invalid response.

openssl 看了下,发现报错如下

1
2
3
4
5
6
7
8
9
10
11
12
13
14
15
16
17
18
19
20
21
22
23
24
25
26
27
28
29
30
31
32
33
34
[root@host wwwroot]# openssl s_client -connect 1hour.win:443 -debug
CONNECTED(00000003)
write to 0x1d66480 [0x1e64440] (247 bytes => 247 (0xF7))
0000 - 16 03 01 00 f2 01 00 00-ee 03 03 59 77 63 d6 28 ...........Ywc.(
0010 - 1e d6 5a c6 ba ef 29 51-7a 37 7f 93 4b 6d 05 e1 ..Z...)Qz7..Km..
0020 - 1c 45 37 ba c2 11 3e 12-1d 36 2a 00 00 84 c0 30 .E7...>..6*....0
0030 - c0 2c c0 28 c0 24 c0 14-c0 0a 00 a3 00 9f 00 6b .,.(.$.........k
0040 - 00 6a 00 39 00 38 00 88-00 87 c0 32 c0 2e c0 2a .j.9.8.....2...*
0050 - c0 26 c0 0f c0 05 00 9d-00 3d 00 35 00 84 c0 2f .&.......=.5.../
0060 - c0 2b c0 27 c0 23 c0 13-c0 09 00 a2 00 9e 00 67 .+.'.#.........g
0070 - 00 40 00 33 00 32 00 9a-00 99 00 45 00 44 c0 31 .@.3.2.....E.D.1
0080 - c0 2d c0 29 c0 25 c0 0e-c0 04 00 9c 00 3c 00 2f .-.).%.......<./
0090 - 00 96 00 41 c0 12 c0 08-00 16 00 13 c0 0d c0 03 ...A............
00a0 - 00 0a 00 07 c0 11 c0 07-c0 0c c0 02 00 05 00 04 ................
00b0 - 00 ff 01 00 00 41 00 0b-00 04 03 00 01 02 00 0a .....A..........
00c0 - 00 08 00 06 00 19 00 18-00 17 00 23 00 00 00 0d ...........#....
00d0 - 00 20 00 1e 06 01 06 02-06 03 05 01 05 02 05 03 . ..............
00e0 - 04 01 04 02 04 03 03 01-03 02 03 03 02 01 02 02 ................
00f0 - 02 03 00 0f 00 01 01 .......
read from 0x1d66480 [0x1e699a0] (7 bytes => 7 (0x7))
0000 - 48 54 54 50 2f 31 2e HTTP/1.
140304408045472:error:140770FC:SSL routines:SSL23_GET_SERVER_HELLO:unknown protocol:s23_clnt.c:769:
---
no peer certificate available
---
No client certificate CA names sent
---
SSL handshake has read 7 bytes and written 247 bytes
---
New, (NONE), Cipher is (NONE)
Secure Renegotiation IS NOT supported
Compression: NONE
Expansion: NONE
---

unknown protocol? 这是啥情况,仔细比对配置,发现原来是在 listen 配置项中掉了 ssl
正确配置应该是

1
listen 443 ssl;

之前写成了

1
listen 443;

在服务器端部署代码的时候,新版本的 composer 不再支持 root 用户来运行。因为会带来潜在的安全问题,
这导致 composer update 之后,不会再执行 scripts 里的脚本命令。

但是一般服务器上的web服务都是运行在 www 之类的用户下面的,且这些用户是不允许登陆的,那么我们该咋整?

经过搜索和实验后,发现 runuser 不好使,可以使用 sudo,具体命令如下:

1
sudo -u www /usr/local/bin/composer update
注意要执行的命令需要完整路径。

最近需要做一个快速上线的项目,要求使用 Symfony 框架。

久闻 SymfonyBundle 很丰富,于是搜索了下现成的后台系统。
首先发现的是 Sonata Admin Panel,是个老牌的系统了,可惜经过研究发现,
它对于 Symfony3 下的新版本的 FOS Bundle(一个用户系统) 不支持。于是又找了一个,
名字是 EasyAdminBundle

这篇博客会用最短最快的方式,让你建立一个简易的博客后台,其中的各个步骤则不解释。

体验环境:MacOS X 或 Linux (注意 phppdo_mysql.so 请打开)

  • 安装 Symfony

    1
    2
    3
    $ sudo mkdir -p /usr/local/bin
    $ sudo curl -LsS https://symfony.com/installer -o /usr/local/bin/symfony
    $ sudo chmod a+x /usr/local/bin/symfony
  • 创建 Symfony 项目 并启动服务

    1
    2
    3
    $ symfony new blog
    $ cd blog
    $ php bin/console server:start

访问下 http://127.0.0.1:8000 看是否正常启动。

  • 如需停止服务,执行下面的命令

    1
    $ php bin/console server:stop
  • 下载安装 EasyAdmin

    1
    $ composer require javiereguiluz/easyadmin-bundle
  • 激活插件

    1
    2
    3
    4
    5
    6
    7
    8
    9
    10
    11
    12
    13
    14
    <?php
    // app/AppKernel.php
    // ...
    class AppKernel extends Kernel
    {
    public function registerBundles()
    {
    $bundles = array(
    // ...
    new JavierEguiluz\Bundle\EasyAdminBundle\EasyAdminBundle(),
    );
    }
    // ...
    }
  • 载入路由

    1
    2
    3
    4
    5
    # app/config/routing.yml
    easy_admin_bundle:
    resource: "@EasyAdminBundle/Controller/"
    type: annotation
    prefix: /admin
  • 载入静态资源

    1
    2
    # Symfony 3
    php bin/console assets:install --symlink
  • app/config/parameters.yml 中配置数据库连接

  • 创建 Entity

    1
    2
    $ php bin/console doctrine:generate:entity --entity="AppBundle:Category" --fields="name:string(255) enabled:boolean" --no-interaction
    $ php bin/console doctrine:generate:entity --entity="AppBundle:Posts" --fields="title:string(255) contents:text() enabled:boolean" --no-interaction
  • src/AppBundle/Entity/PostsEntity.php 中增加关联关系

    1
    2
    3
    4
    5
    6
    7
    8
    9
    10
    11
    <?php
    // ...
    class Posts
    {
    // ...
    /**
    * @ORM\ManyToOne(targetEntity="Category", inversedBy="posts")
    * @ORM\JoinColumn(name="category_id", referencedColumnName="id")
    */
    private $category;
    }
  • src/AppBundle/Entity/Category.php 中增加对应的关联关系(新增代码如下)

    1
    2
    3
    4
    5
    6
    7
    8
    9
    10
    11
    12
    13
    14
    15
    16
    17
    18
    19
    // src/AppBundle/Entity/Category.php

    // ...
    use Doctrine\Common\Collections\ArrayCollection;

    class Category
    {
    // ...

    /**
    * @ORM\OneToMany(targetEntity="Posts", mappedBy="category")
    */
    private $posts;

    public function __construct()
    {
    $this->posts = new ArrayCollection();
    }
    }
  • 执行以下命令,完善对应属性的方法

    1
    2
    $ composer update
    $ php bin/console doctrine:generate:entities AppBundle --no-backup
  • 执行以下命令,生成数据表

    1
    $ php bin/console doctrine:schema:update --force
  • 配置后台

    1
    2
    3
    4
    5
    6
    7
    8
    9
    10
    11
    12
    13
    14
    15
    # app/config/config.yml
    easy_admin:
    entities:
    Category:
    class: AppBundle\Entity\Category
    form:
    fields:
    - name
    Posts:
    class: AppBundle\Entity\Posts
    form:
    fields:
    - title
    - { property: 'category', type: 'easyadmin_autocomplete' }
    - contents
  • 配置语言

    1
    2
    3
    # app/config/config.yml
    framework:
    translator: { fallbacks: ['%locale%'] }

这时,访问 http://127.0.0.1:8000/admin,就能看到我们的后台了。

下面是集成 FOS Bundle 的操作。

  1. 安装 FOS

    1
    $ composer require friendsofsymfony/user-bundle "~2.0"
  2. 启用 FOS

    1
    2
    3
    4
    5
    6
    7
    8
    9
    10
    11
    <?php
    // app/AppKernel.php

    public function registerBundles()
    {
    $bundles = array(
    // ...
    new FOS\UserBundle\FOSUserBundle(),
    // ...
    );
    }
  3. 创建 User Class

    1
    2
    3
    4
    5
    6
    7
    8
    9
    10
    11
    12
    13
    14
    15
    16
    17
    18
    19
    20
    21
    22
    23
    24
    25
    26
    27
    <?php
    // src/AppBundle/Entity/User.php

    namespace AppBundle\Entity;

    use FOS\UserBundle\Model\User as BaseUser;
    use Doctrine\ORM\Mapping as ORM;

    /**
    * @ORM\Entity
    * @ORM\Table(name="fos_user")
    */
    class User extends BaseUser
    {
    /**
    * @ORM\Id
    * @ORM\Column(type="integer")
    * @ORM\GeneratedValue(strategy="AUTO")
    */
    protected $id;

    public function __construct()
    {
    parent::__construct();
    // your own logic
    }
    }
  4. 增加防火墙配置(全部替换原有内容)

    1
    2
    3
    4
    5
    6
    7
    8
    9
    10
    11
    12
    13
    14
    15
    16
    17
    18
    19
    20
    21
    22
    23
    24
    25
    26
    27
    28
    29
    30
    # app/config/security.yml
    security:
    encoders:
    FOS\UserBundle\Model\UserInterface: bcrypt

    role_hierarchy:
    ROLE_ADMIN: ROLE_USER
    ROLE_SUPER_ADMIN: ROLE_ADMIN

    providers:
    fos_userbundle:
    id: fos_user.user_provider.username

    firewalls:
    main:
    pattern: ^/
    form_login:
    provider: fos_userbundle
    csrf_token_generator: security.csrf.token_manager
    # if you are using Symfony < 2.8, use the following config instead:
    # csrf_provider: form.csrf_provider

    logout: true
    anonymous: true

    access_control:
    - { path: ^/login$, role: IS_AUTHENTICATED_ANONYMOUSLY }
    - { path: ^/register, role: IS_AUTHENTICATED_ANONYMOUSLY }
    - { path: ^/resetting, role: IS_AUTHENTICATED_ANONYMOUSLY }
    - { path: ^/admin/, role: ROLE_ADMIN }
  5. 配置 FOS

    1
    2
    3
    4
    5
    6
    7
    8
    # app/config/config.yml
    fos_user:
    db_driver: orm # other valid values are 'mongodb' and 'couchdb'
    firewall_name: main
    user_class: AppBundle\Entity\User
    from_email:
    address: "%mailer_user%"
    sender_name: "%mailer_user%"
  6. app/config/parameters.yml 中配置第5步中的 mailer_user 参数

  7. 导入 FOS 的路由配置

    1
    2
    3
    # app/config/routing.yml
    fos_user:
    resource: "@FOSUserBundle/Resources/config/routing/all.xml"
  8. 更新数据库

    1
    $ php bin/console doctrine:schema:update --force
  9. 创建新的控制器

    1
    2
    3
    4
    5
    6
    7
    8
    9
    10
    11
    12
    13
    14
    15
    16
    17
    18
    19
    20
    21
    22
    // src/AppBundle/Controller/AdminController.php
    namespace AppBundle\Controller;

    use JavierEguiluz\Bundle\EasyAdminBundle\Controller\AdminController as BaseAdminController;

    class AdminController extends BaseAdminController
    {
    public function createNewUserEntity()
    {
    return $this->get('fos_user.user_manager')->createUser();
    }

    public function prePersistUserEntity($user)
    {
    $this->get('fos_user.user_manager')->updateUser($user, false);
    }

    public function preUpdateUserEntity($user)
    {
    $this->get('fos_user.user_manager')->updateUser($user, false);
    }
    }
  10. 在 config.yml 中增加 User 的配置

    1
    2
    3
    4
    5
    6
    7
    8
    9
    10
    11
    12
    13
    easy_admin:
    entities:
    User:
    class: AppBundle\Entity\User
    form:
    fields:
    - username
    - email
    - enabled
    - lastLogin
    # if administrators are allowed to edit users' passwords and roles, add this:
    - { property: 'plainPassword', type: 'text', type_options: { required: false } }
    - { property: 'roles', type: 'choice', type_options: { multiple: true, choices: { 'ROLE_USER': 'ROLE_USER', 'ROLE_ADMIN': 'ROLE_ADMIN' } } }

此时你再访问的时候,就会弹出来一个很丑的登陆界面(因为FOS默认不带皮肤)。
使用下面的命令创建一个管理员账号

1
$ php bin/console fos:user:create admin --super-admin

按照提示,即可完成管理员创建的工作。回到网页上,登陆即可。

至此,一个简单的后台就搭建完毕了。

接下来还有很多的工作可以做,这个以后再来完善补充。

  1. composer 更新代码

    1
    php composer.phar install --no-dev --optimize-autoloader
  2. Symfony 清空cache

    1
    php bin/console cache:clear --env=prod --no-debug
  3. 生成 Assets

    1
    php bin/console assetic:dump --env=prod --no-debug

其他的总结

1
2
rm -rf bin/cache/* #手动清空缓存
php bin/console route:debug # 查看哪些路由已经注册

最近好几个服务器,ssh登录的时候,都有同一个报错,

1
setlocale: LC_CTYPE: cannot change locale (UTF-8): No such file or directory

经过搜索,找到了解决方案

1
2
3
4
5
6
7
8
9
# tee /etc/environment <<- 'EOF'
LANG=en_US.utf-8
LC_ALL=en_US.utf-8
EOF

# source /etc/environment

/* 生成 en_US.UTF-8 locale文件 CentOS没有locale-gen命令*/
# localedef -v -c -i en_US -f UTF-8 en_US.UTF-8
0%