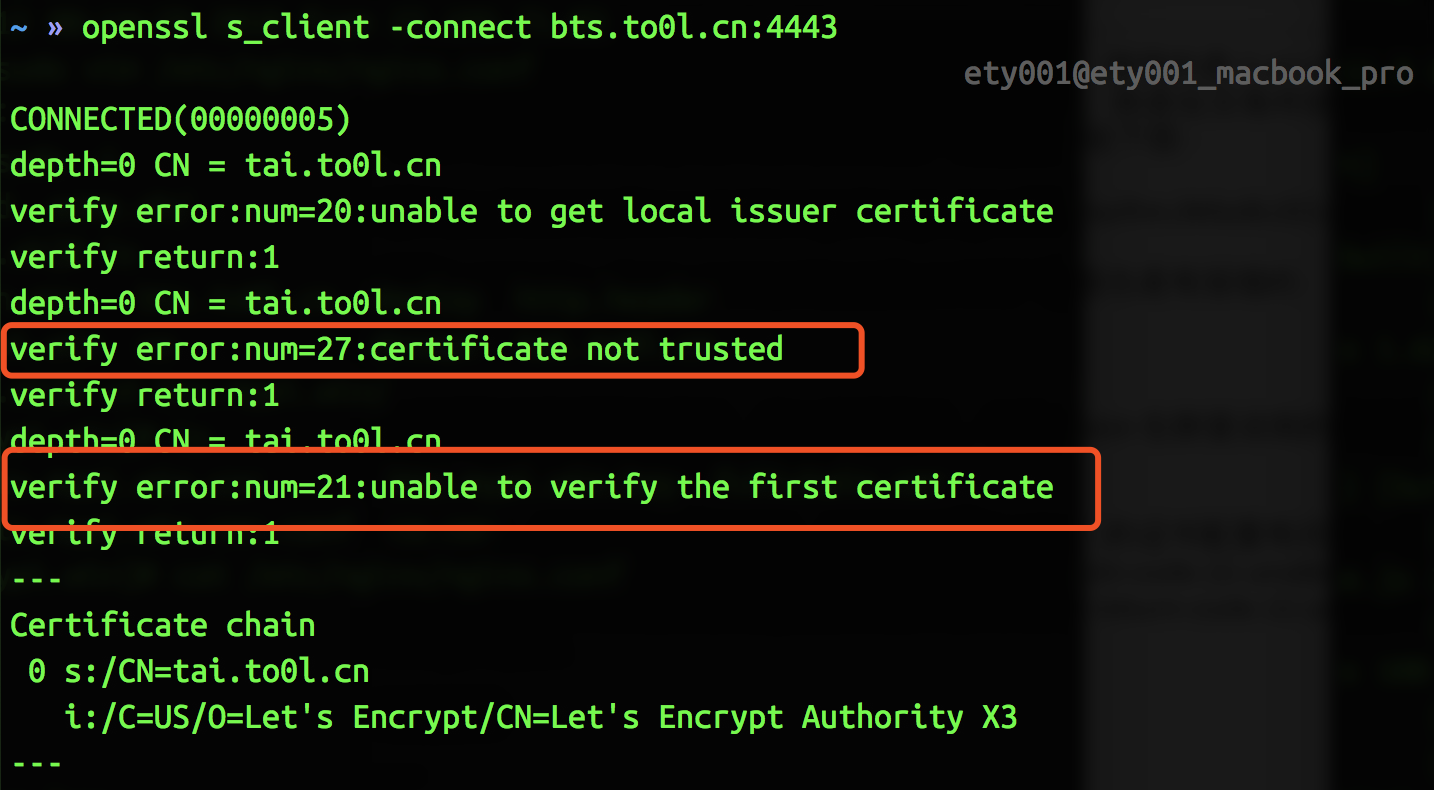
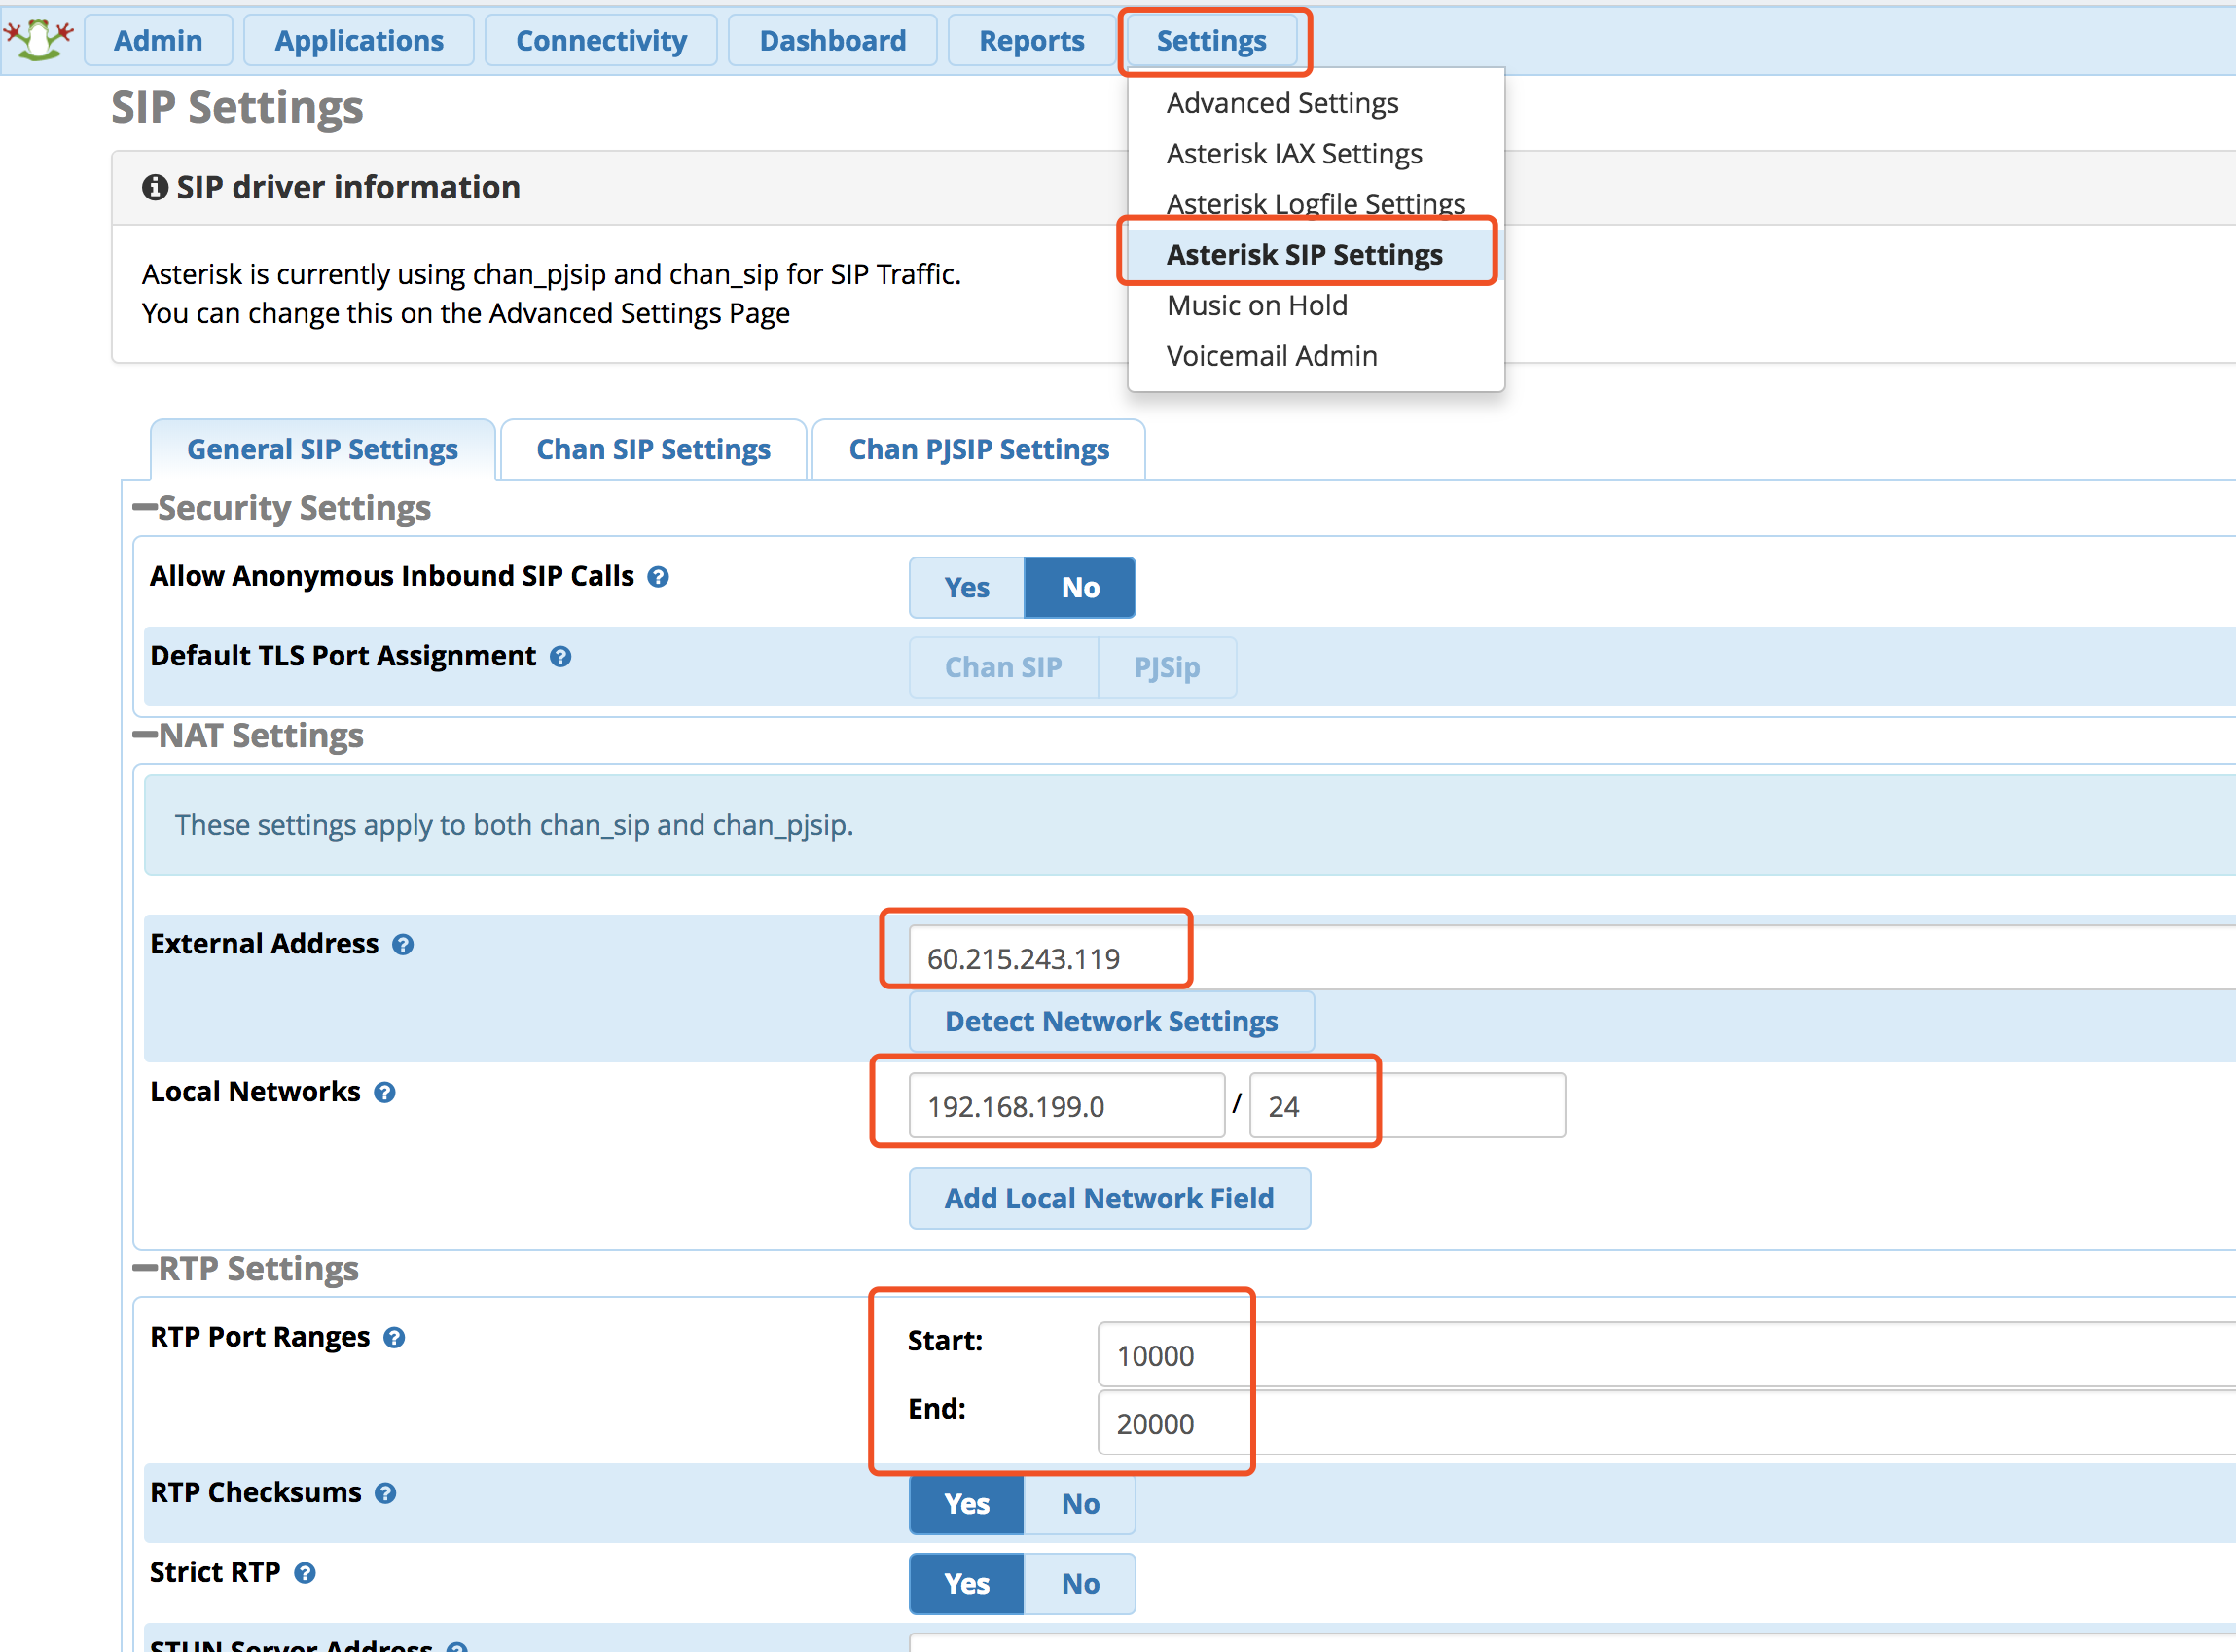
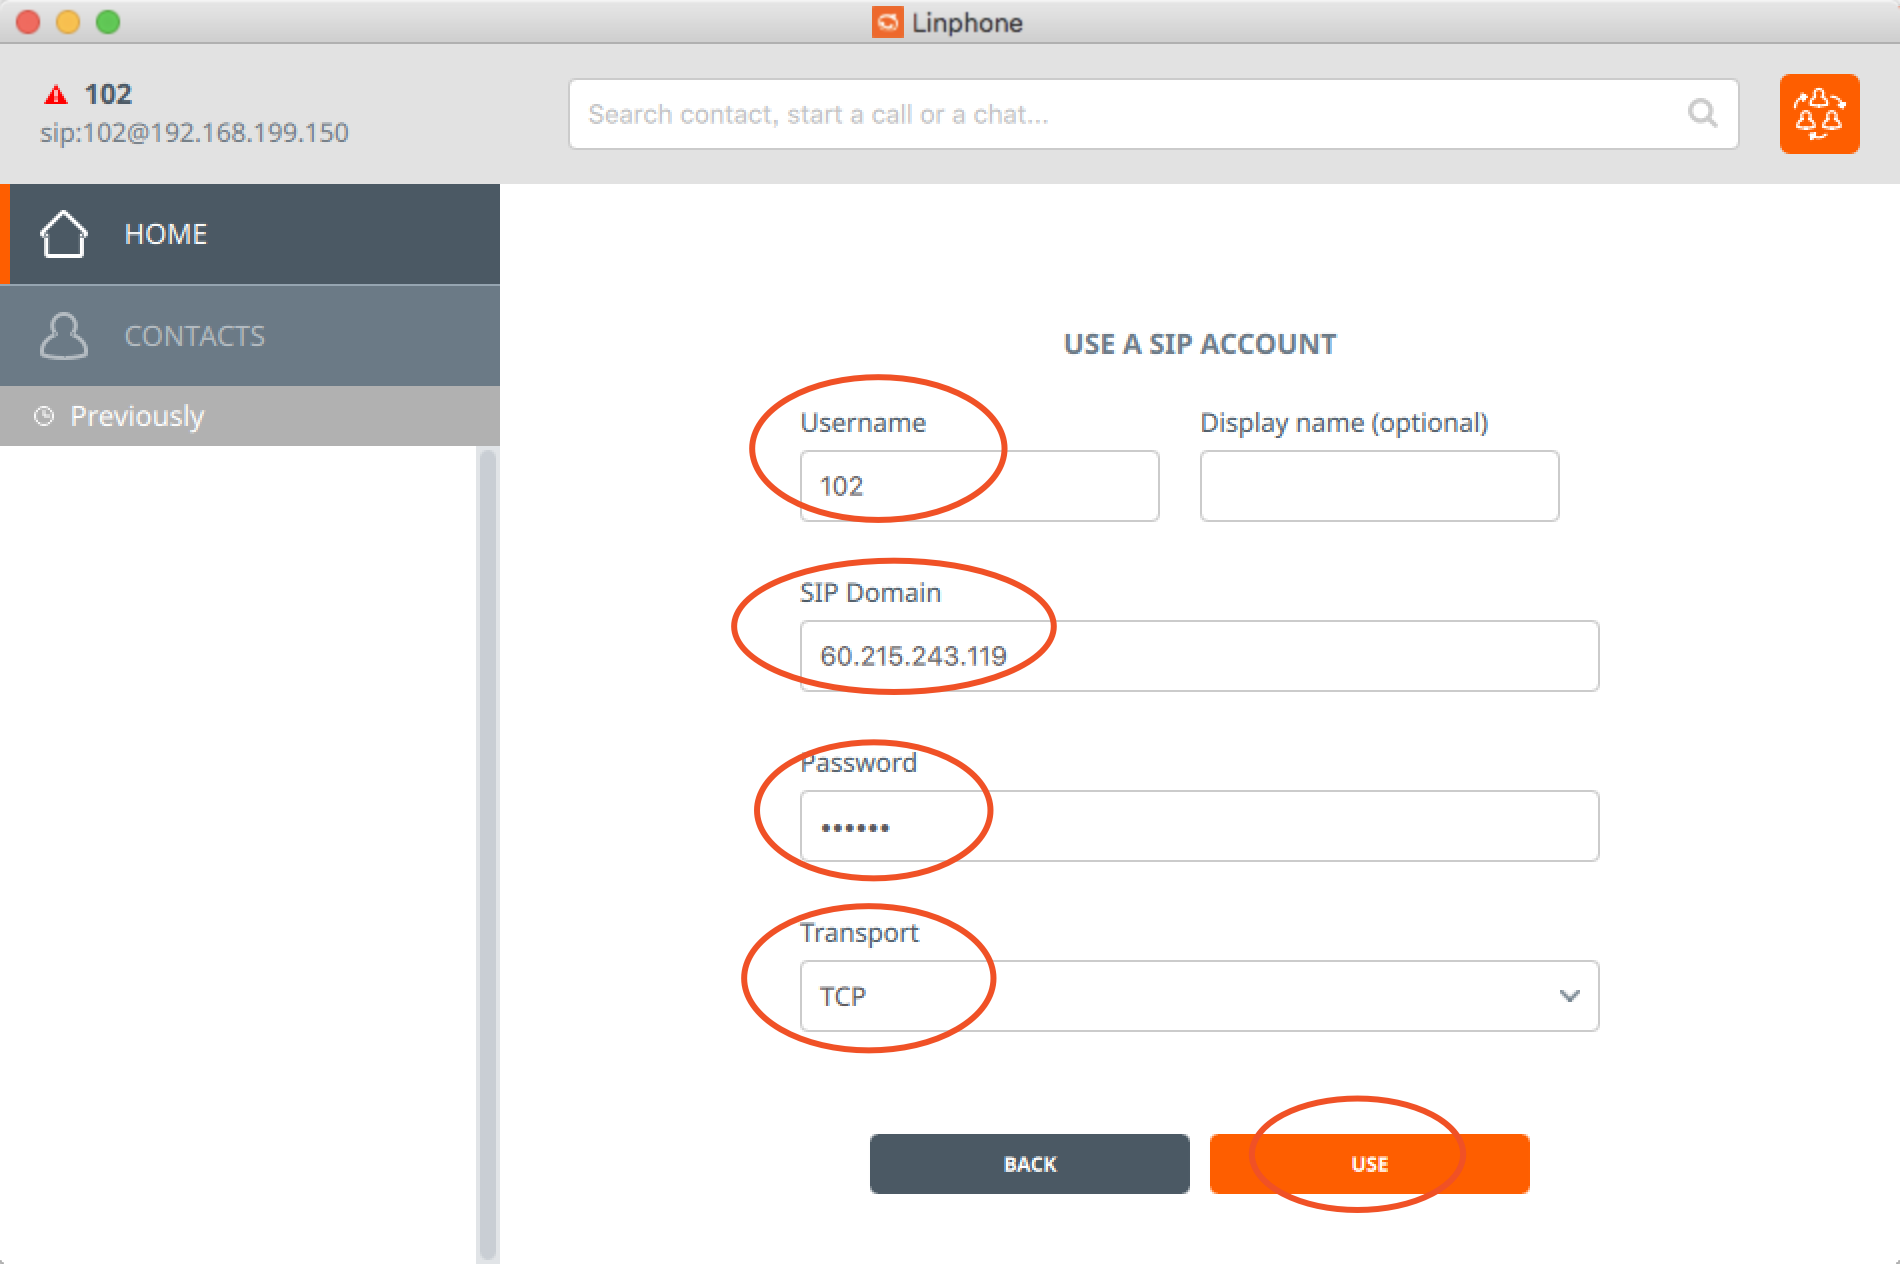
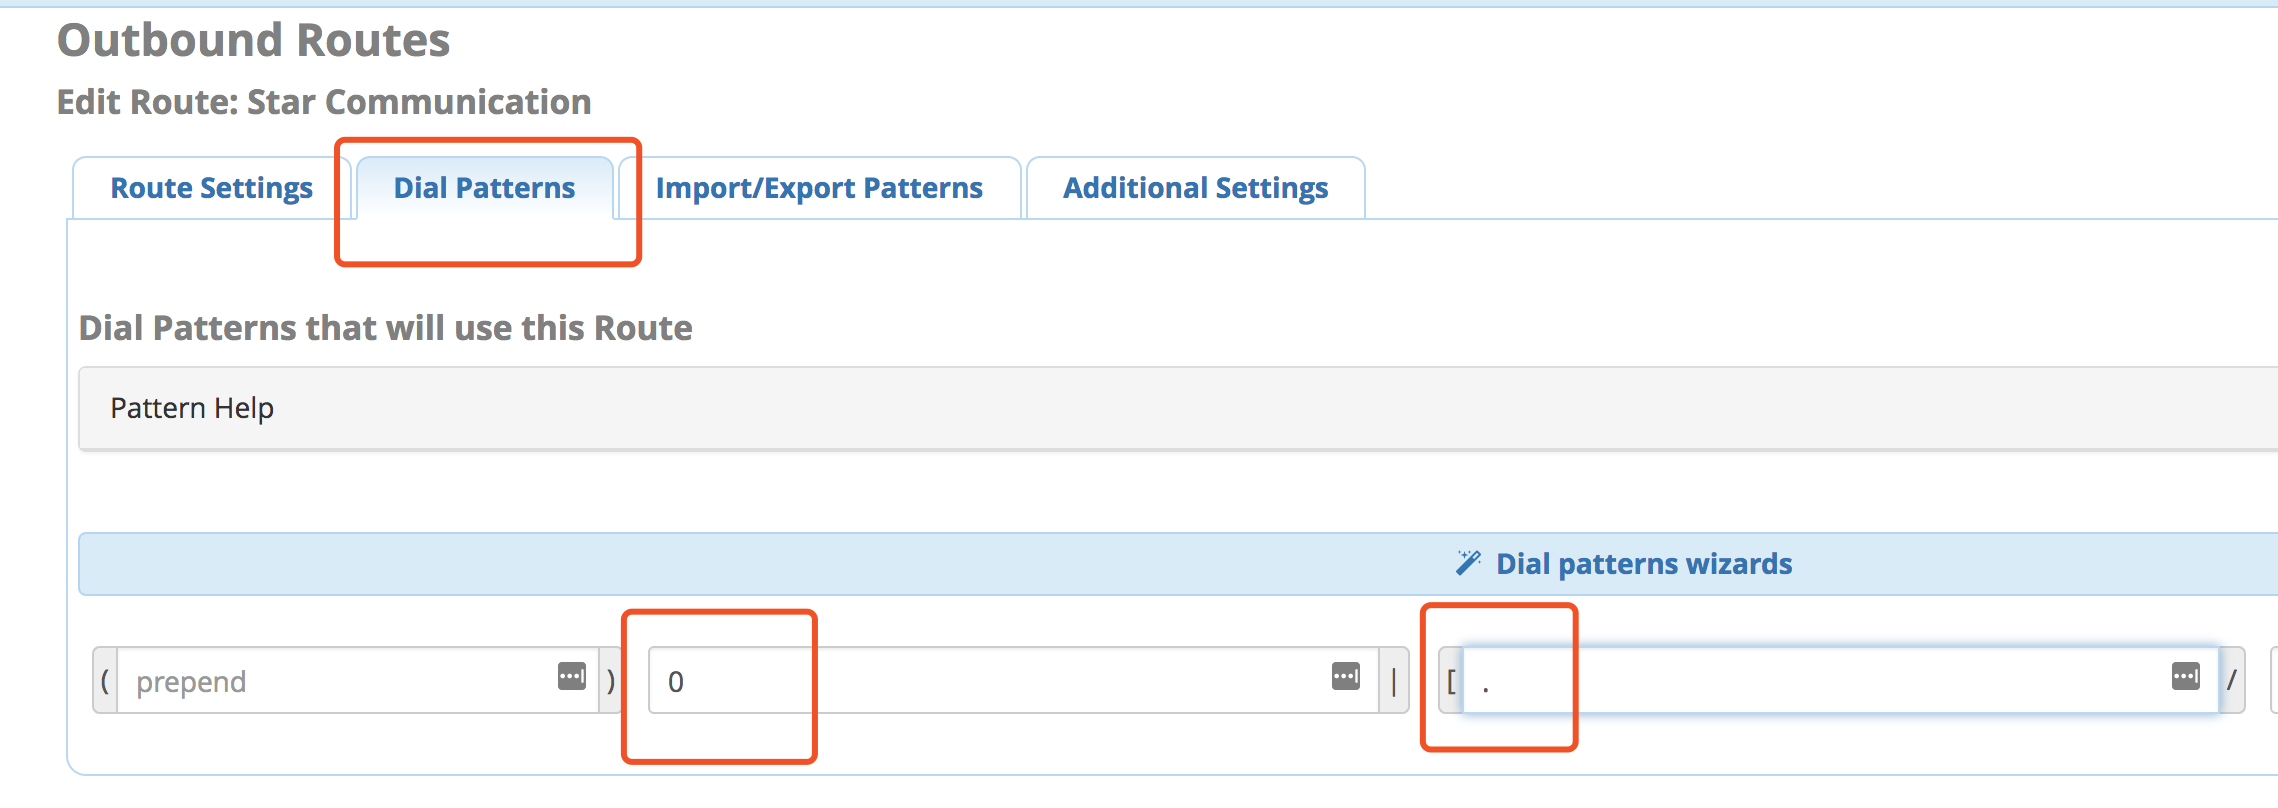
之前在家里的服务器上搭建了一个 BTS 的 API 节点,使用的是 Let’s Encrypt 的证书服务。搭建好以后,一直有一个奇怪的问题没有解决,就是在交易所使用没有问题,但是用 wscat 连接就会报 Error: unable to verify the first certificate 的错误,如下图:
git clone https://github.com/ety001/yoyow-witness-watcher.git cd yoyow-witness-watcher
2.部署 yoyow_client,并提供 RPC 服务。
1
./init.sh
首先提示你输入 yoyow_client 的下载地址:
1 2 3 4 5 6 7 8
********************************************* Welcome to use YOYOW witness watcher. This tool is made by ETY001. (https://github.com/ety001) My YOYOW ID is 485699321. It's pleasure to get your votes! *********************************************
Please input current yoyow_client download URL (https://github.com/yoyow-org/yoyow-core/releases/latest): https://github.com/yoyow-org/yoyow-core/releases/download/v0.2.1-180313/yoyow-client-v0.2.1-ubuntu-20180313.tgz
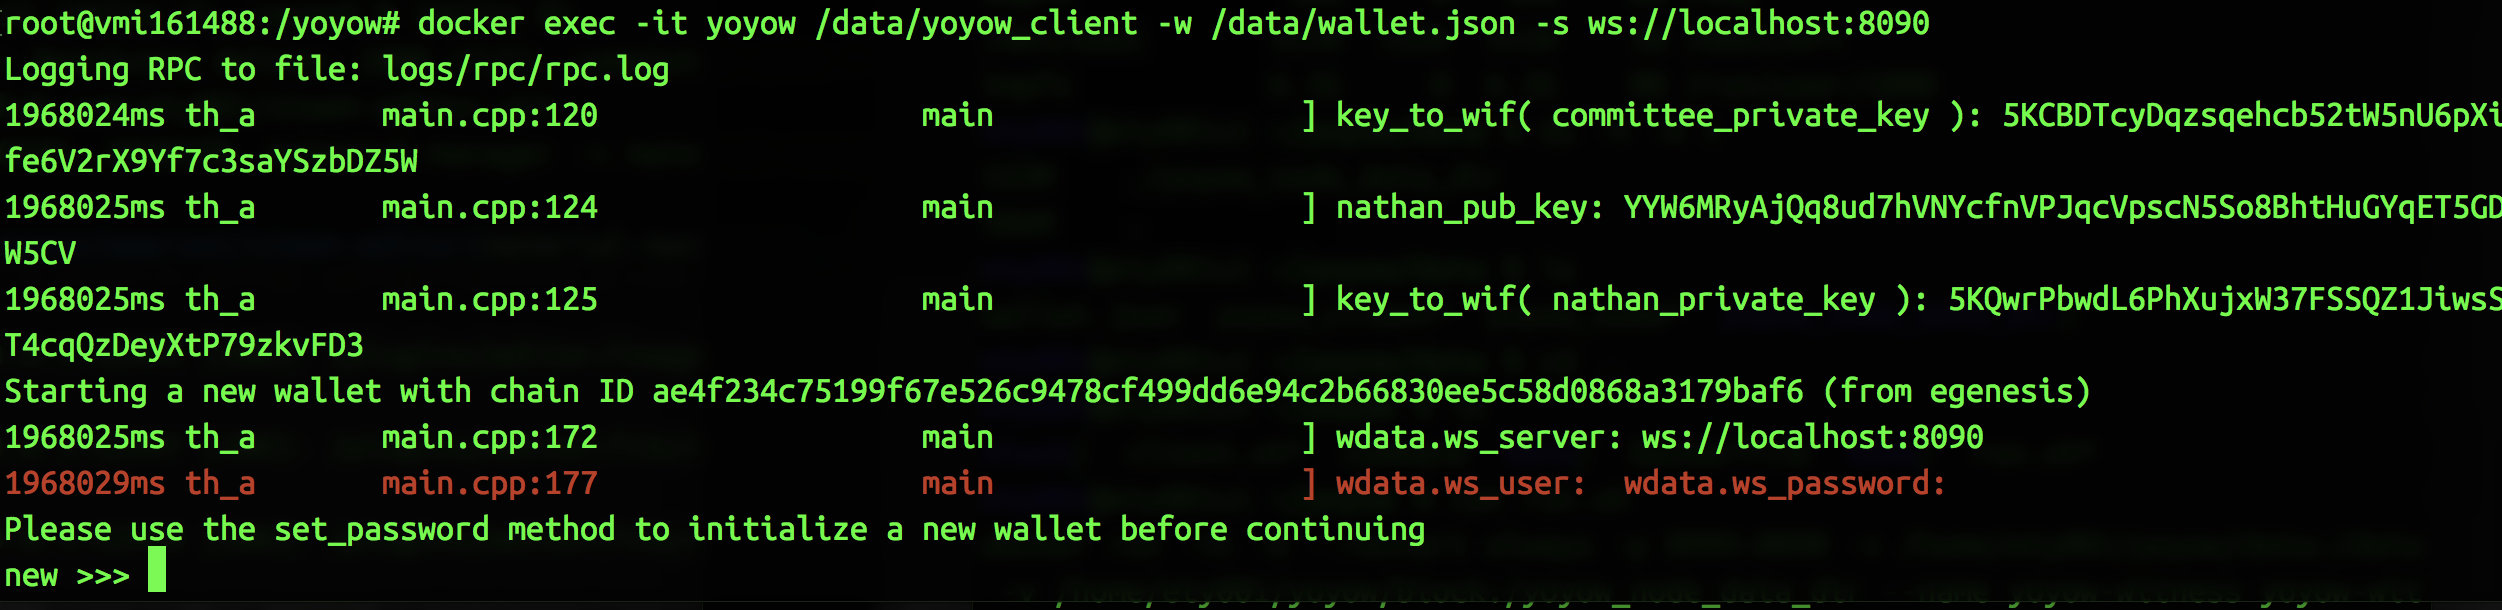
当看到出现 Listening for incoming HTTP RPC requests on 0.0.0.0:9999 以及 new >>> 的时候说明 yoyow_client 的 docker 镜像已经做好,现在开始创建钱包并导入你的账号
1 2 3 4 5 6 7 8 9 10 11
Create wallet Logging RPC to file: logs/rpc/rpc.log 3505859ms th_a main.cpp:120 main ] key_to_wif( committee_private_key ): 5KCBDTcyDqzsqehcb52tW5nU6pXife6V2rX9Yf7c3saYSzbDZ5W 3505862ms th_a main.cpp:124 main ] nathan_pub_key: YYW6MRyAjQq8ud7hVNYcfnVPJqcVpscN5So8BhtHuGYqET5GDW5CV 3505862ms th_a main.cpp:125 main ] key_to_wif( nathan_private_key ): 5KQwrPbwdL6PhXujxW37FSSQZ1JiwsST4cqQzDeyXtP79zkvFD3 Starting a new wallet with chain ID ae4f234c75199f67e526c9478cf499dd6e94c2b66830ee5c58d0868a3179baf6 (from egenesis) 3505863ms th_a main.cpp:172 main ] wdata.ws_server: wss://wallet.yoyow.org/ws 3506840ms th_a main.cpp:177 main ] wdata.ws_user: wdata.ws_password: Please use the set_password method to initialize a new wallet before continuing 3509652ms th_a main.cpp:243 main ] Listening for incoming HTTP RPC requests on 0.0.0.0:9999 new >>>
Please input Your Public Key: If you have multiple public keys, separate them with commas eg. YYW7TSRLZ9EXZps37Kt31qa7qi,YYW7TSRLZ9EXZpZqk25atoL2s37 YYW7TSRLZ9EXZpZqk25atoL2s37Kt31qa7qi78ZR368kCN969rFiT,YYW733FxEEaAFTHxdTJdowZyQzJ3JnPocsVmdq4aSsm1gSd1VkYDC
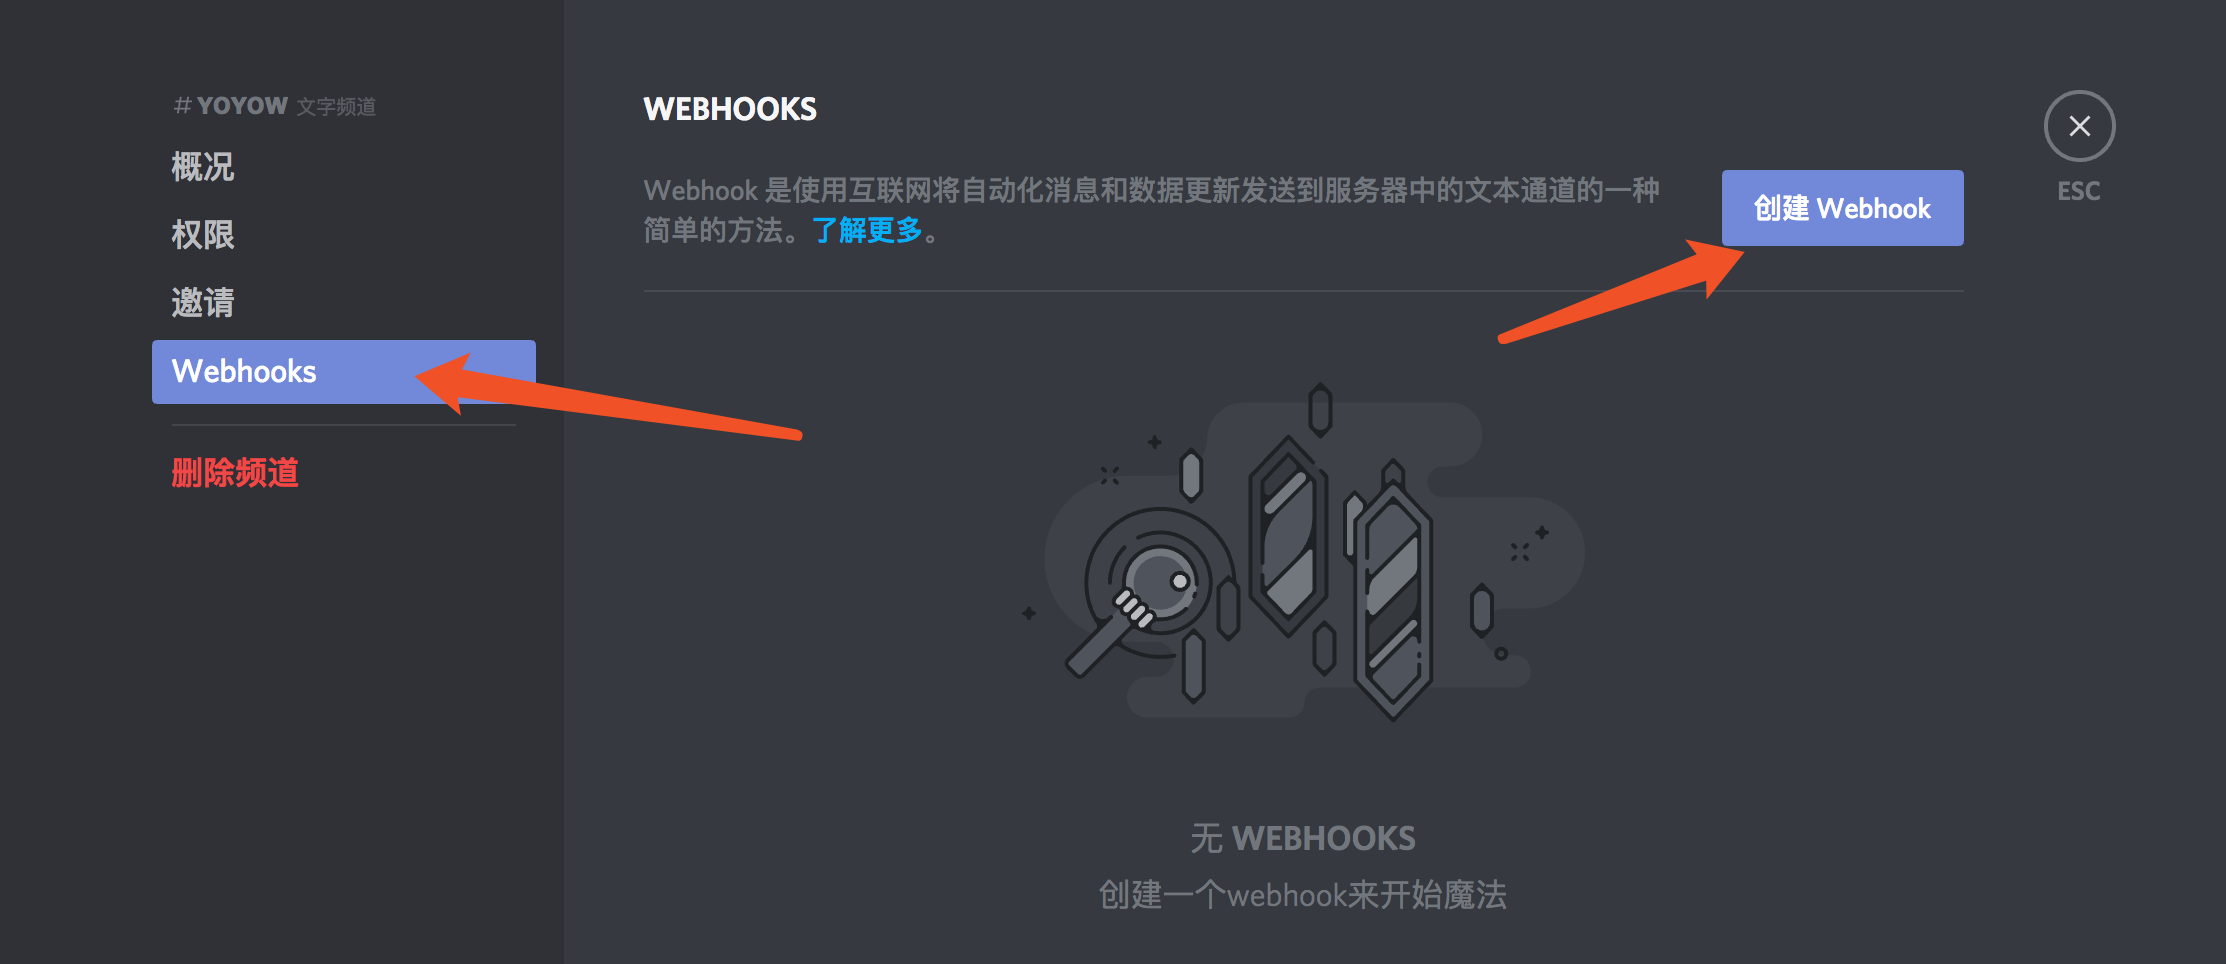
Please input Discord webhook for notify (If you don't need it, leave empty.): https://discordapp.com/api/webhooks/433204170/X2RWo7-qiFlnMtQeQkk_sSgb5Vn0rQVWZCF5f
当你看到类似以下信息的时候,就已经完成了所有部署工作。
1 2 3 4 5 6 7 8 9 10 11 12 13 14 15 16 17 18 19
Get status string(20) "global value in init" array(2) { [0]=> string(53) "YYW7TSRLZ9EXZpZqk25atoL2s37Kt31qa7qi78ZR368kCN969rFiT" [1]=> string(53) "YYW733FxEEaAFTHxdTJdowZyQzJ3JnPocsVmdq4aSsm1gSd1VkYDC" } string(9) "485699321" string(27) "http://172.20.99.2:9999/rpc" int(3) send_notify:"" witness_info: [{"id":"1.5.118","account":485699321,"name":"yoyo485699321","sequence":1,"is_valid":true,"signing_key":"YYW7TSRLZ9EXZpZqk25atoL2s37Kt31qa7qi78ZR368kCN969rFiT","pledge":"4800000000","pledge_last_update":"2018-04-09T16:27:36","average_pledge":"4769814330","average_pledge_last_update":"2018-04-10T09:29:36","average_pledge_next_update_block":6208938,"total_votes":"1012502907669","by_pledge_position":"0","by_pledge_position_last_update":"13192707760156474609520154309632187","by_pledge_scheduled_time":"13192779100955781906176323330356157","by_vote_position":"0","by_vote_position_last_update":"8327365446400524735205121087916251","by_vote_scheduled_time":"8327365782480909634055199728870765","last_confirmed_block_num":6208607,"last_aslot":6220862,"total_produced":1143,"total_missed":3,"url":"https:\/\/github.com\/ety001"}] total_produced: 1143, total_missed: 3 2018-04-10 10:23:38
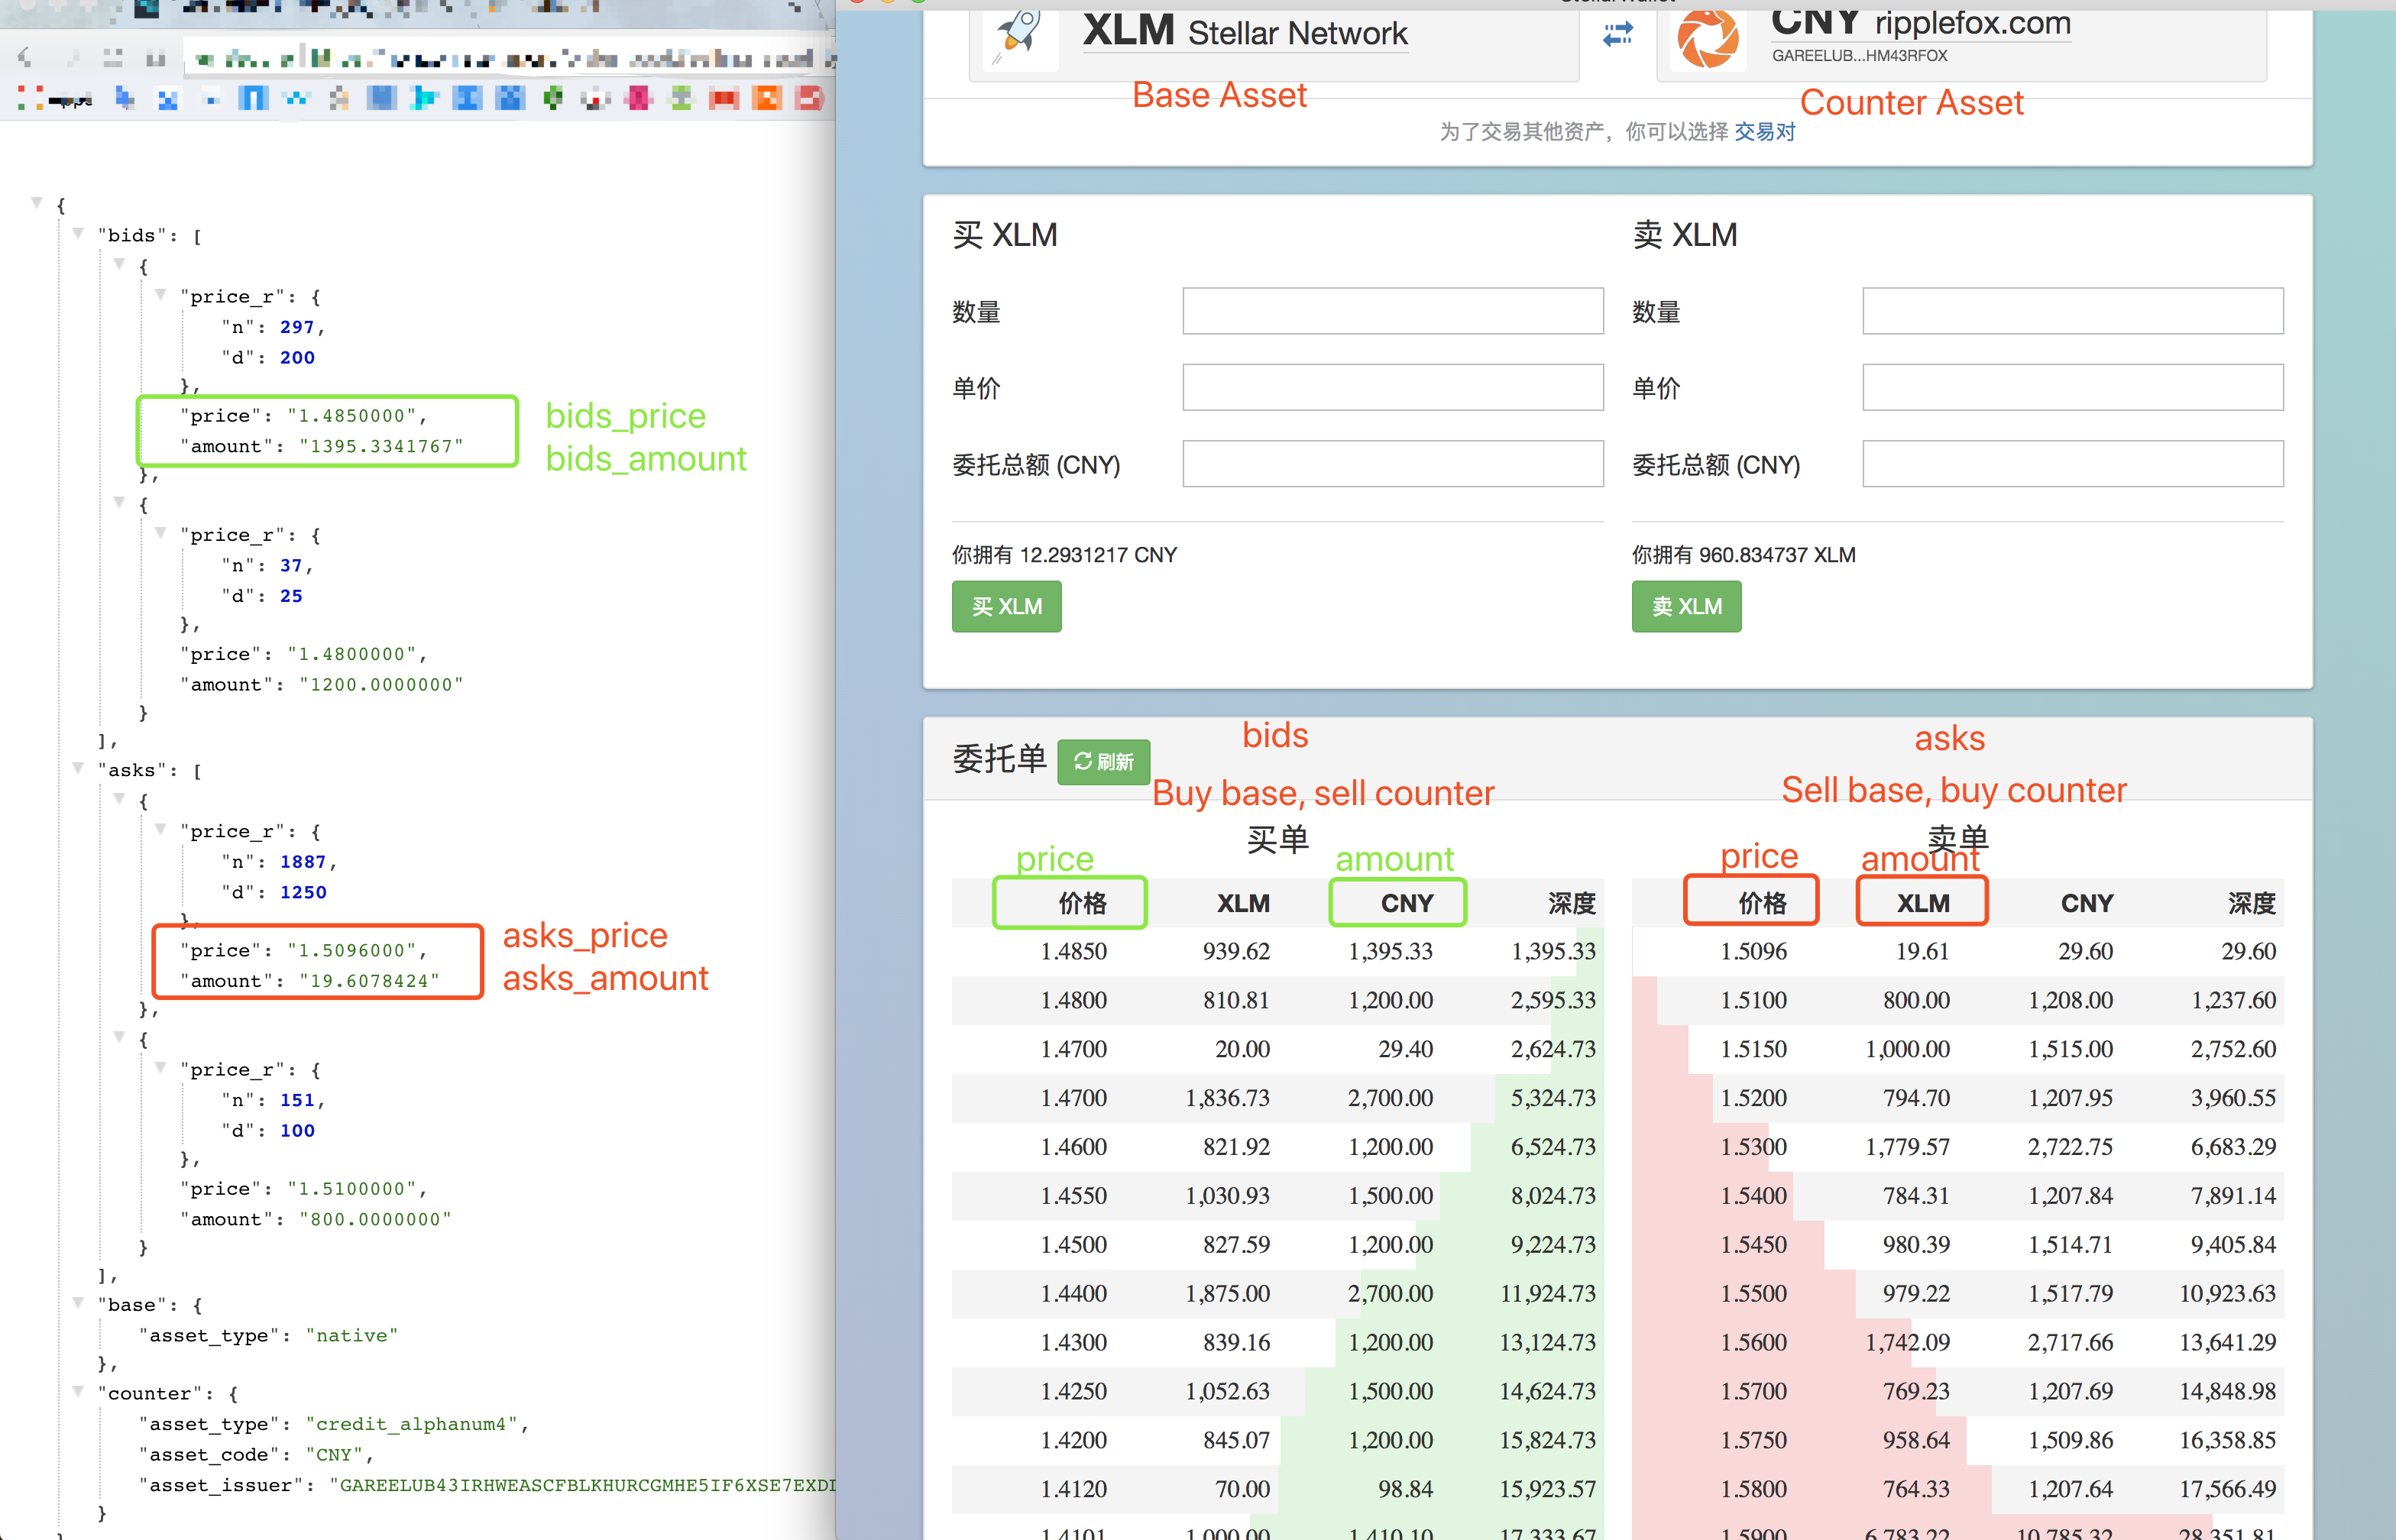
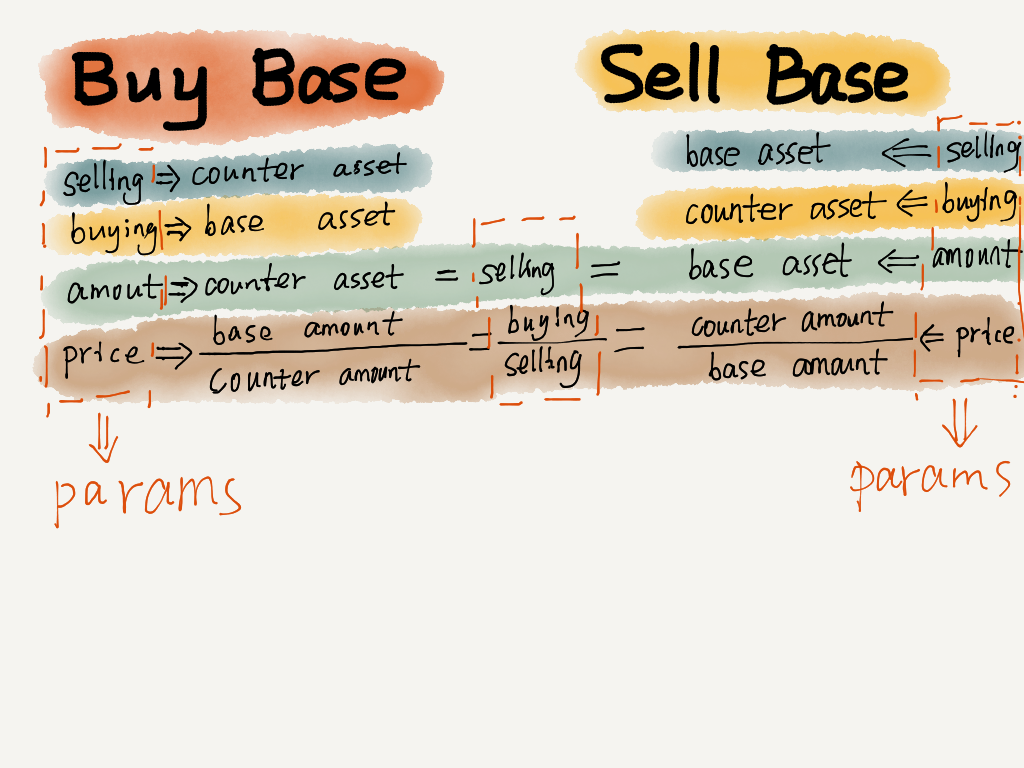
GET /order_book?selling_asset_type={selling_asset_type}&selling_asset_code={selling_asset_code}&selling_asset_issuer={selling_asset_issuer}&buying_asset_type={buying_asset_type}&buying_asset_code={buying_asset_code}&buying_asset_issuer={buying_asset_issuer}&limit={limit}
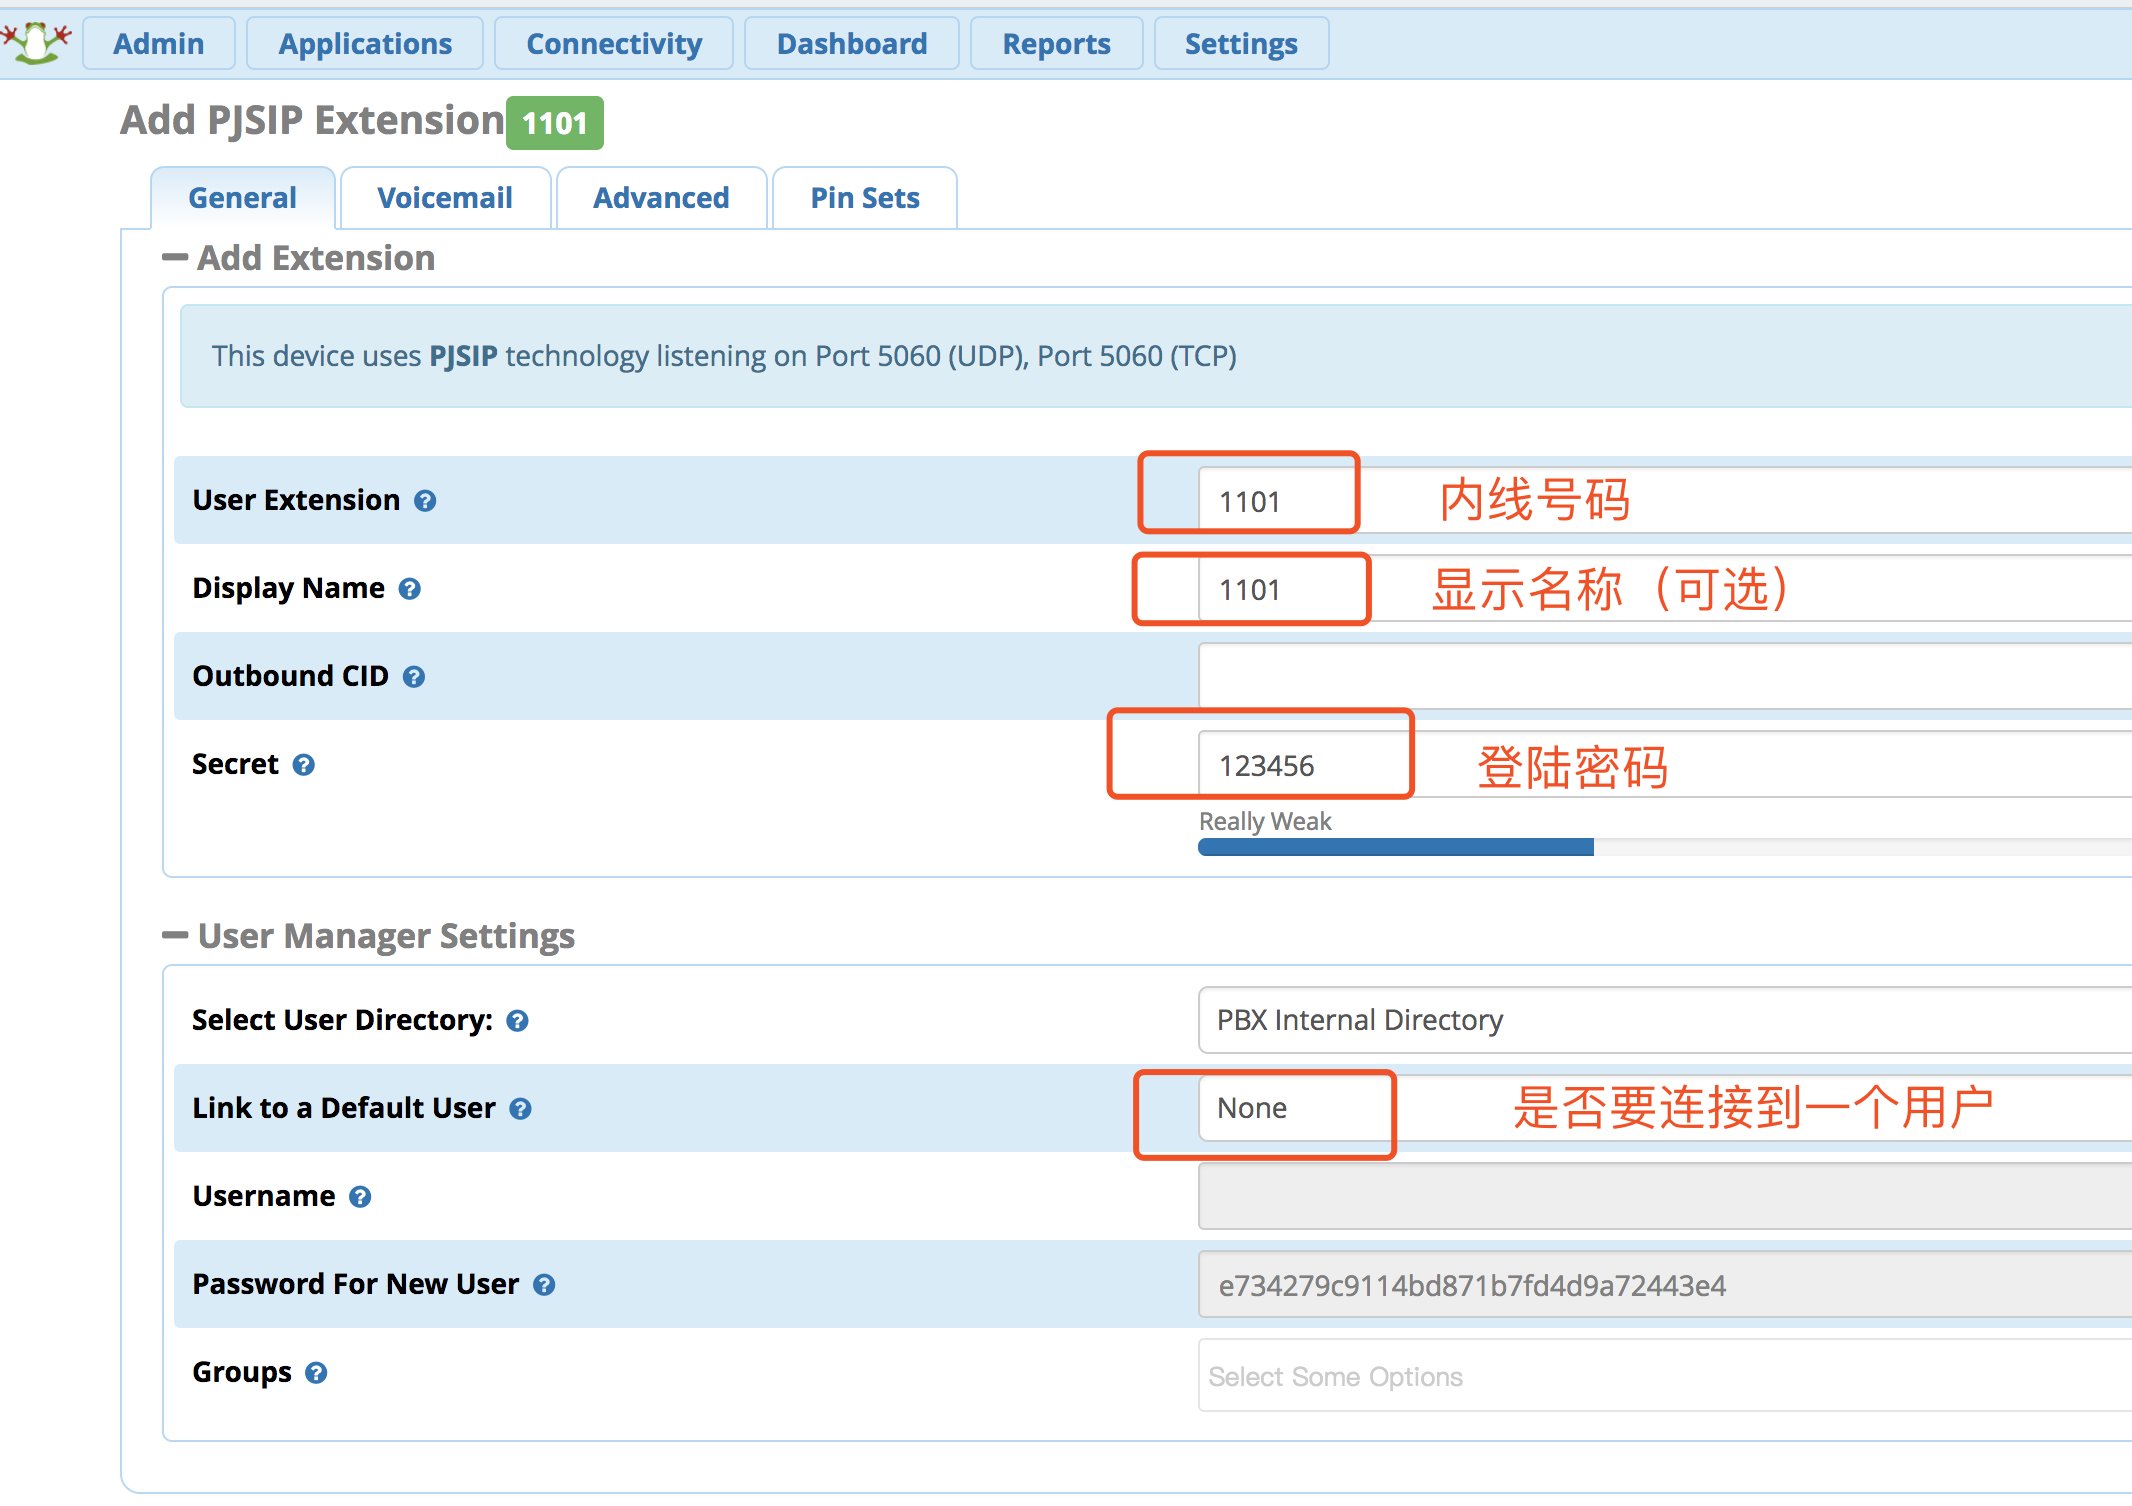
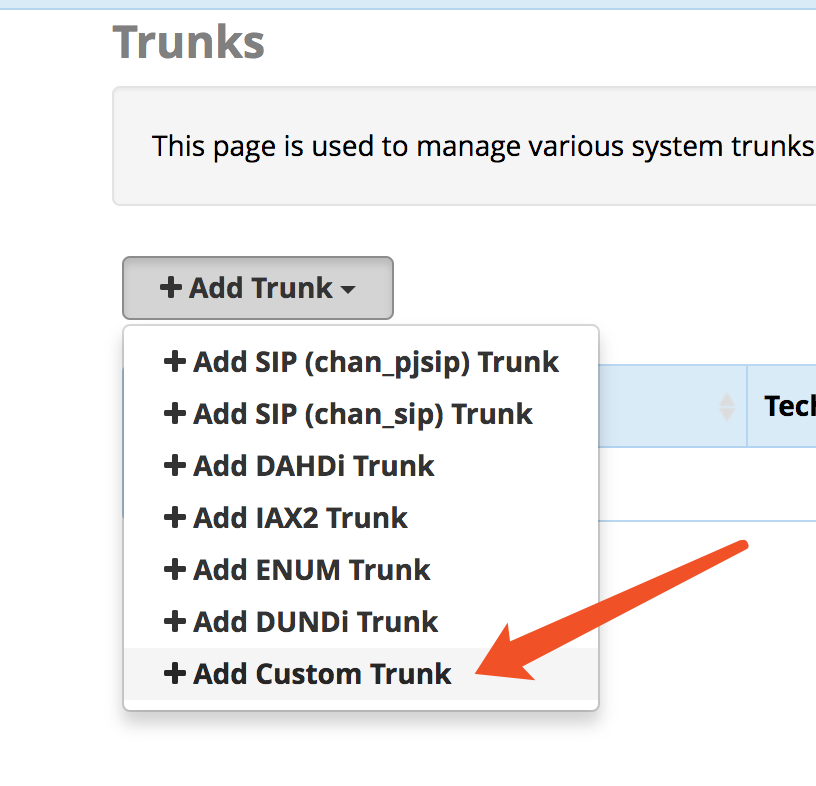
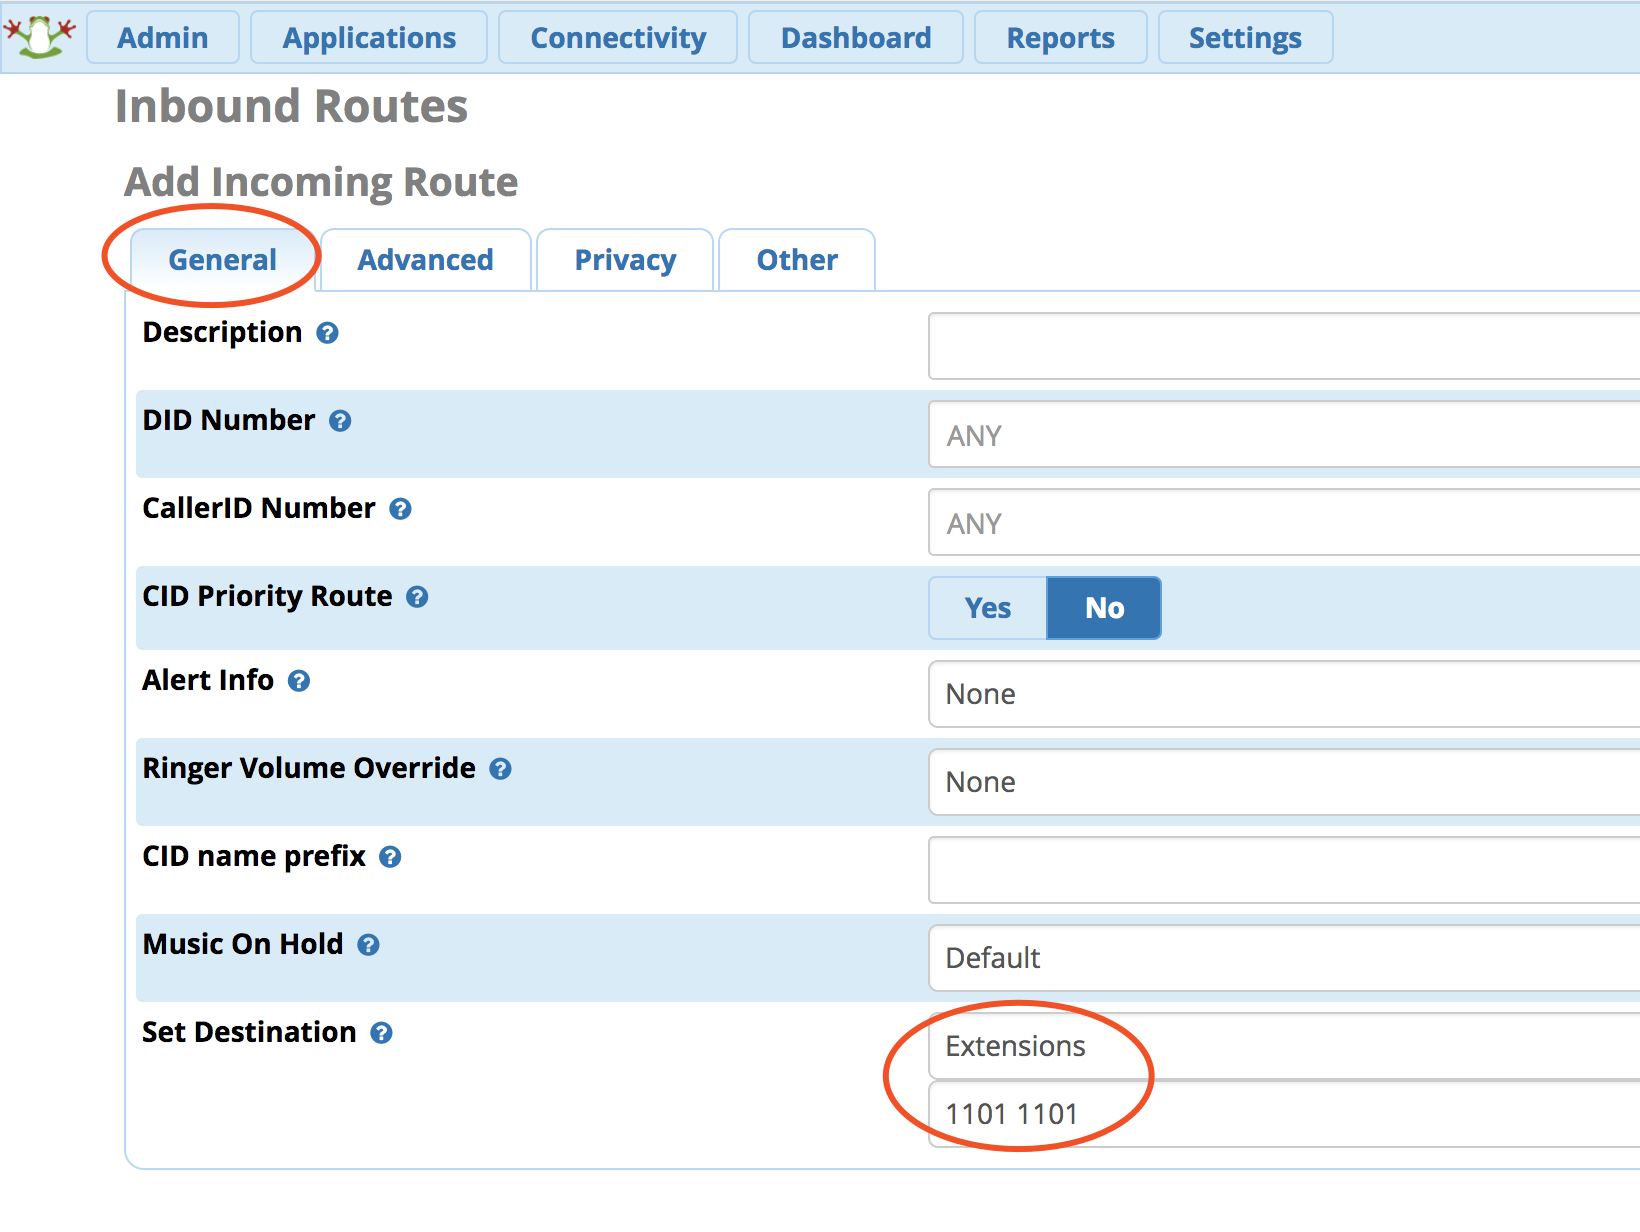
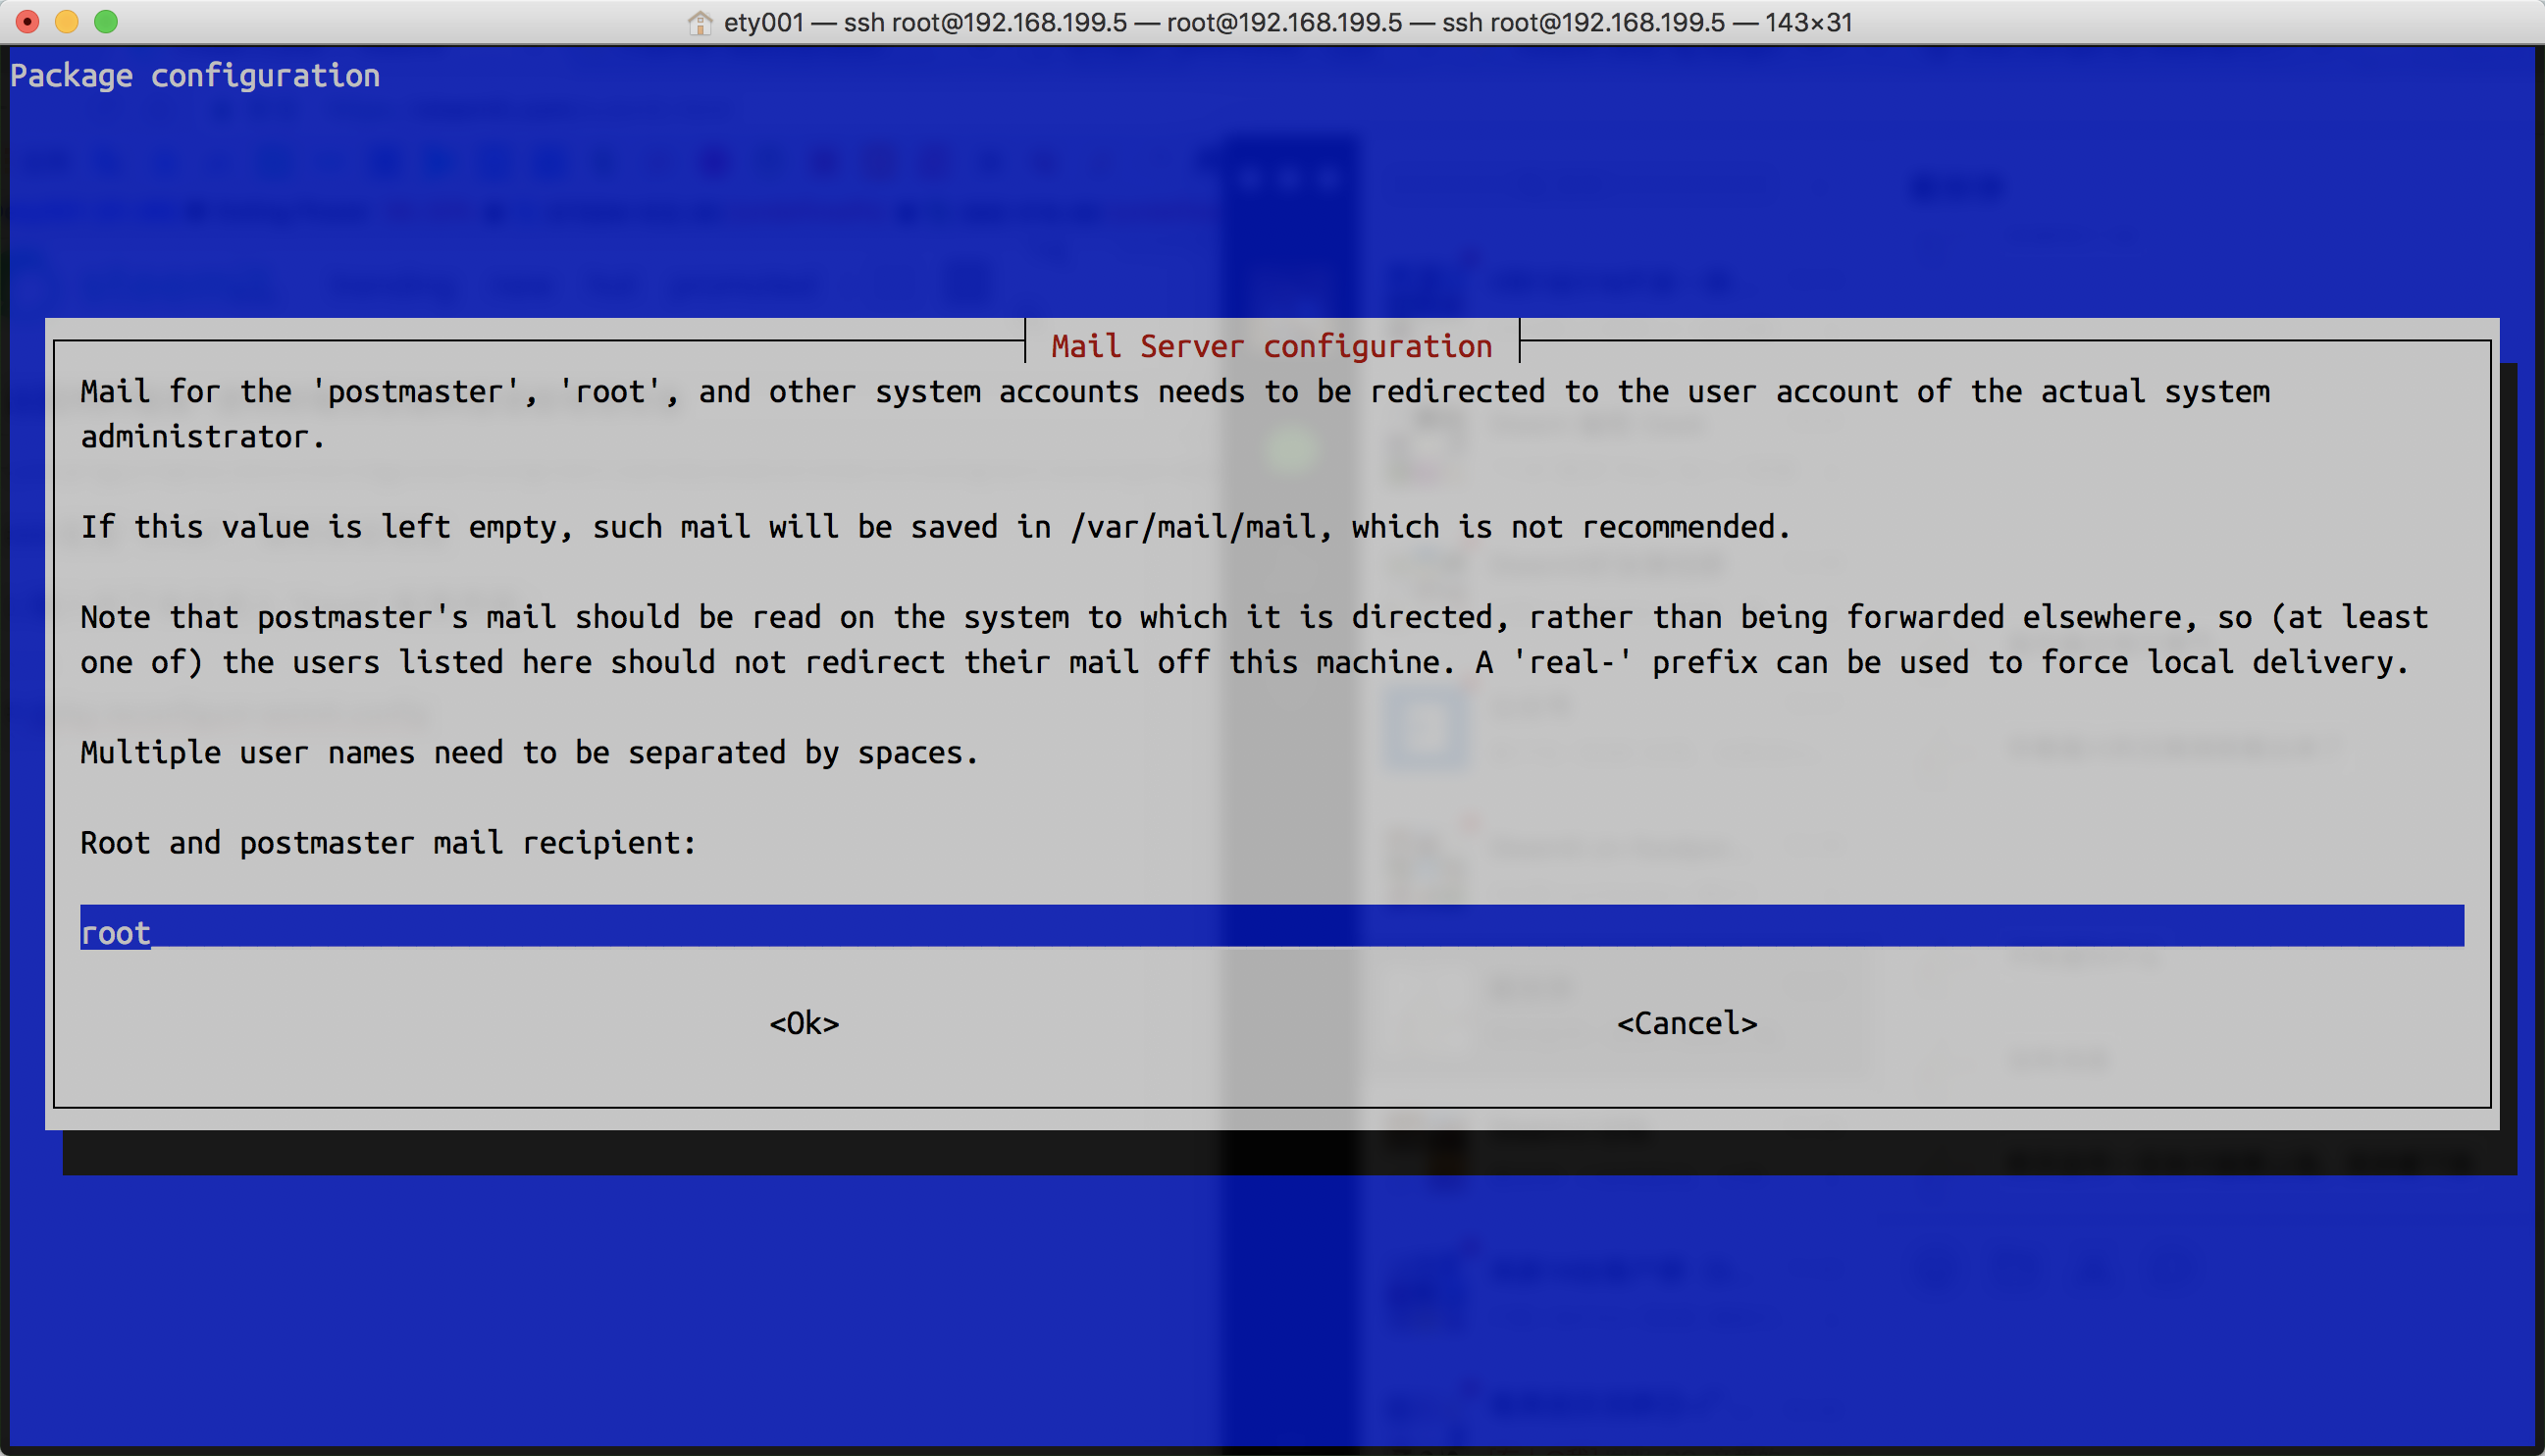
10.需要填写的项目有 User Extension,DisplayName,Secret,Link to a Default User.
其中 User Extension 是你的内线号码,用于呼叫和登陆客户端; DisplayName 是用于呼叫时的显示,可选填; Secret 是你在客户端登陆时需要填写的密码,请使用健壮的密码,详见最后的 安全 章节; Link to Default User 是让用户自己管理自己的号码,如果不需要,则选 None。
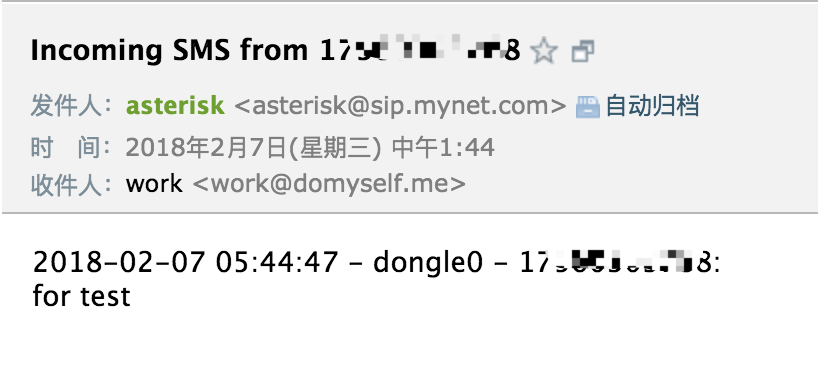
root@raspbx:~# asterisk -rx "dongle show devices" ID Group State RSSI Mode Submode Provider Name Model Firmware IMEI IMSI Number dongle0 0 Free 6 5 4 CHN-CUGSM E1750 11.126.10.00.00 359767033517971 460090019804894 +8617xxxxxxx44
这里输入一个你自己的密码,用于加密你本地的钱包,假如这里我们设置的是 123456。 当再次弹出 Private Key (wif) [Enter to quit]: 时表明添加成功,直接回车退出。
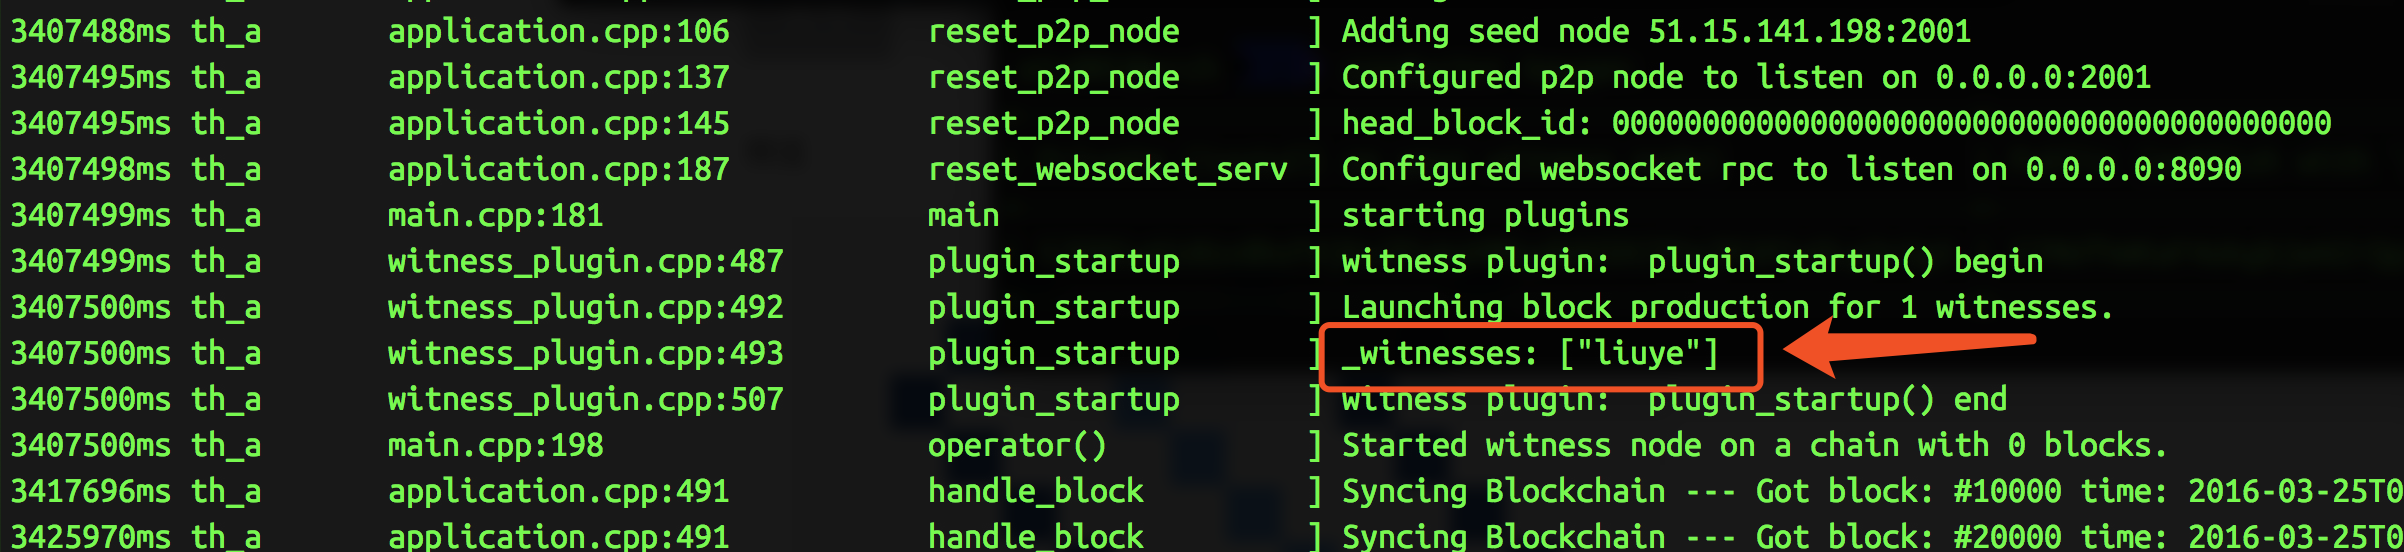
5.初始化见证人
1
conductor init
回车后会依次让你输入下面的内容
1
2
3
4
5
6
7
8
What is your witness account name?: liuye
Witness liuye does not exist. Would you like to create it? [y/N]: y
What should be your witness URL? [https://steemdb.com/witnesses]: https://steemit.com/@liuye
How much do you want the account creation fee to be (STEEM)? [0.500 STEEM]: 0.200 STEEM
What should be the maximum block size? [65536]:
What should be the SBD interest rate? [0]:
BIP38 Wallet Password:
Witness liuye created!
Error response from daemon: You cannot remove a running container c083355ec3960722bee080cff5c1bb13c225f5b9a3e0ae8ea63b4f73ce531992. Stop the container before attempting removal or force remove
执行下面的命令后再执行 ./run.sh deplay,其中 c08 是报错中提到的那个 container id 的头几位
Portainer is a simple UI management for docker. It’s easy to use and all your resources will show you friendly. It’s very light especially using a VPS which has only 512MB RAM.
In this tutorial, we will make a LNMP server over the docker container by Portainer.
What Will I Learn?
You will learn how to setup portainer
You will learn how to create a custom network with the docker
You will learn how to create a container
Requirements
Ubuntu 16.04 (64-bit)
Base bash knowledge
Base docker knowledge
Built a normal LNMP environment before
Difficulty
Intermediate
Tutorial Contents
Setup Portainer
1.Create a volume to save the portainer data. You also can bind a folder.
-p 9000:9000 means making a port map. Portainer needs port 9000 opening.
-v /var/run/docker.sock:/var/run/docker.sock This parameter is important if you want portainer to manage your local docker.
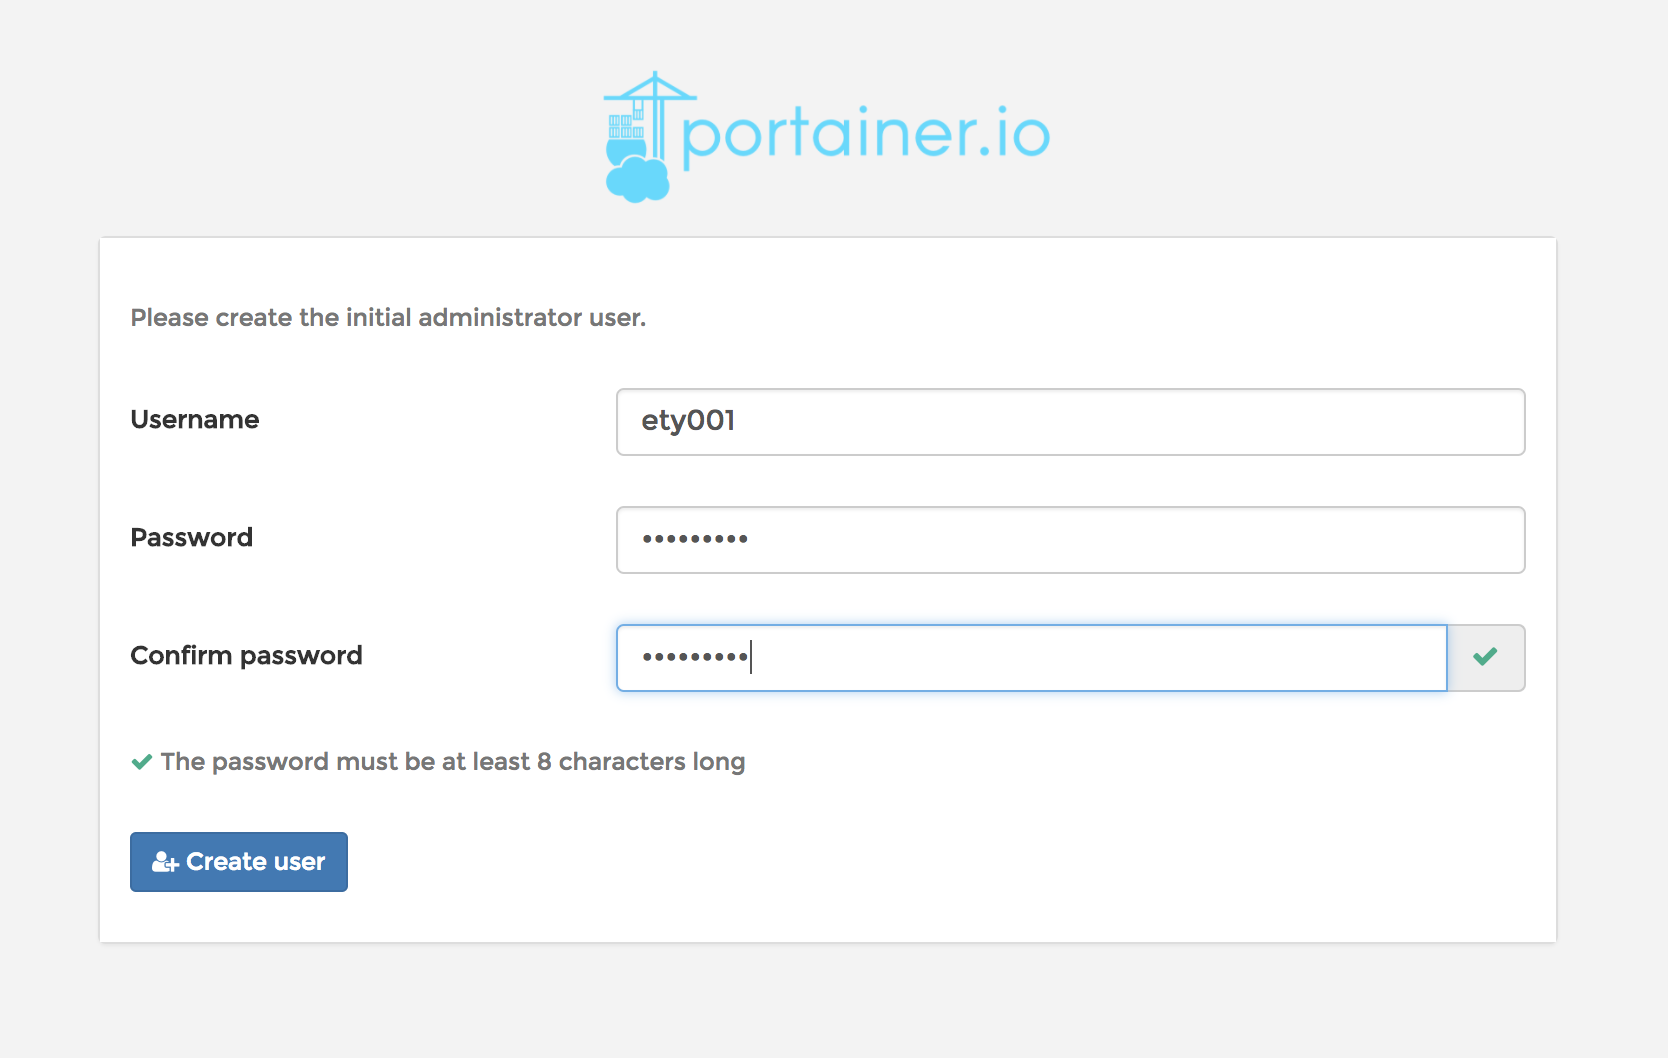
3.Visit http://localhost:9000 in your browser and input your username and password to create the administrator user.
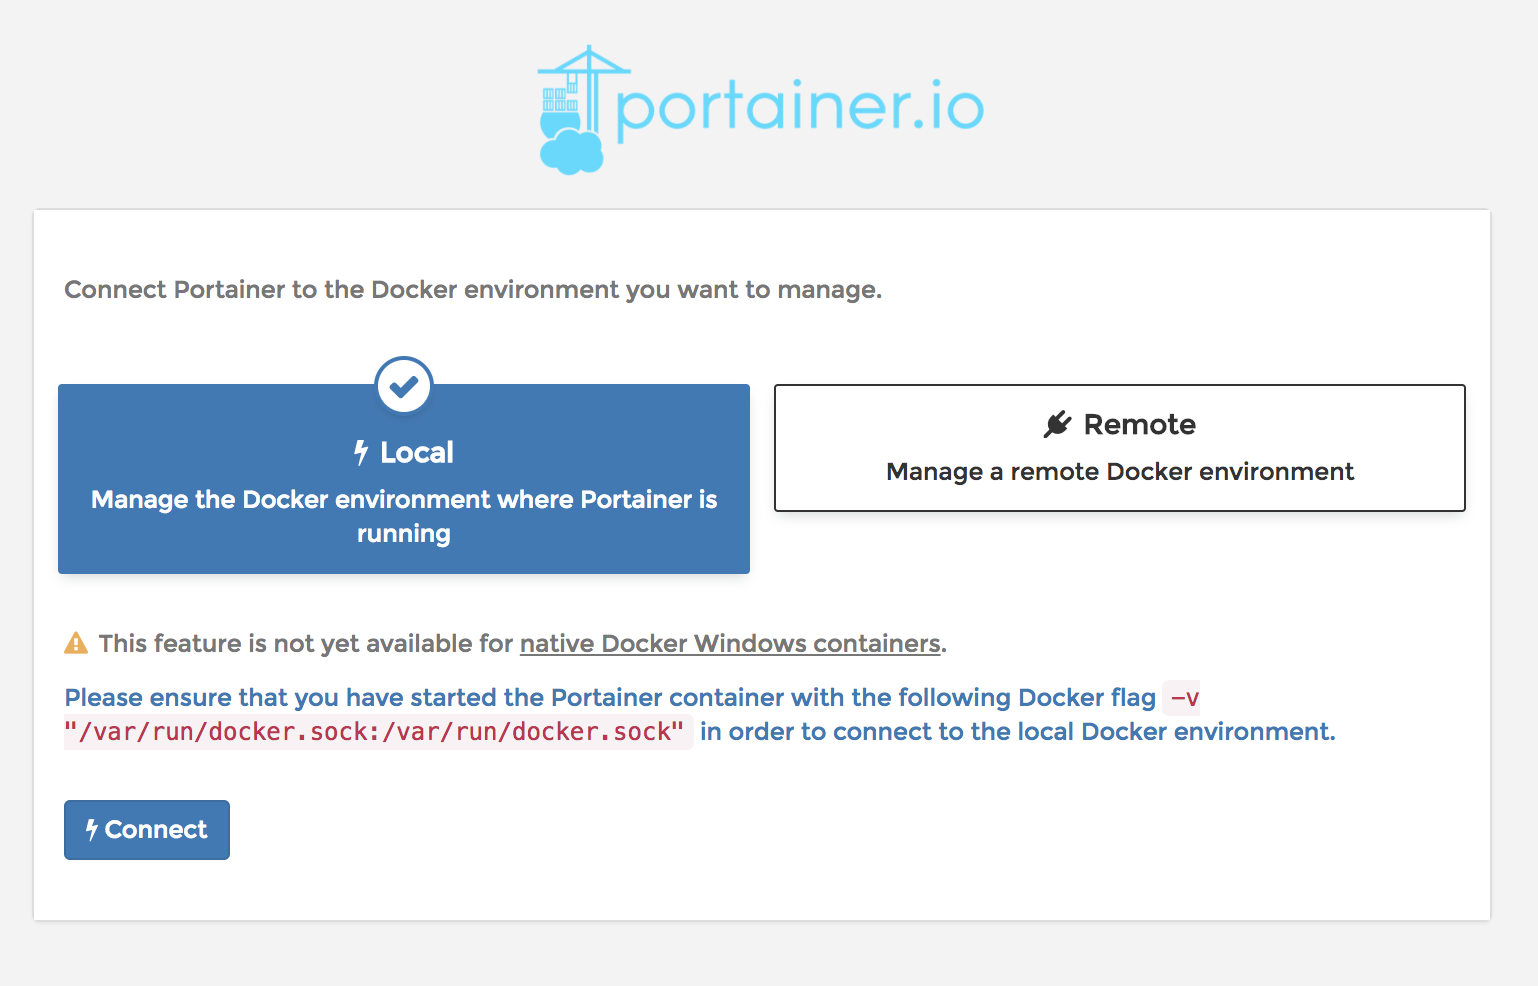
4.In next step select the Local option and press Connect button to finish setup.
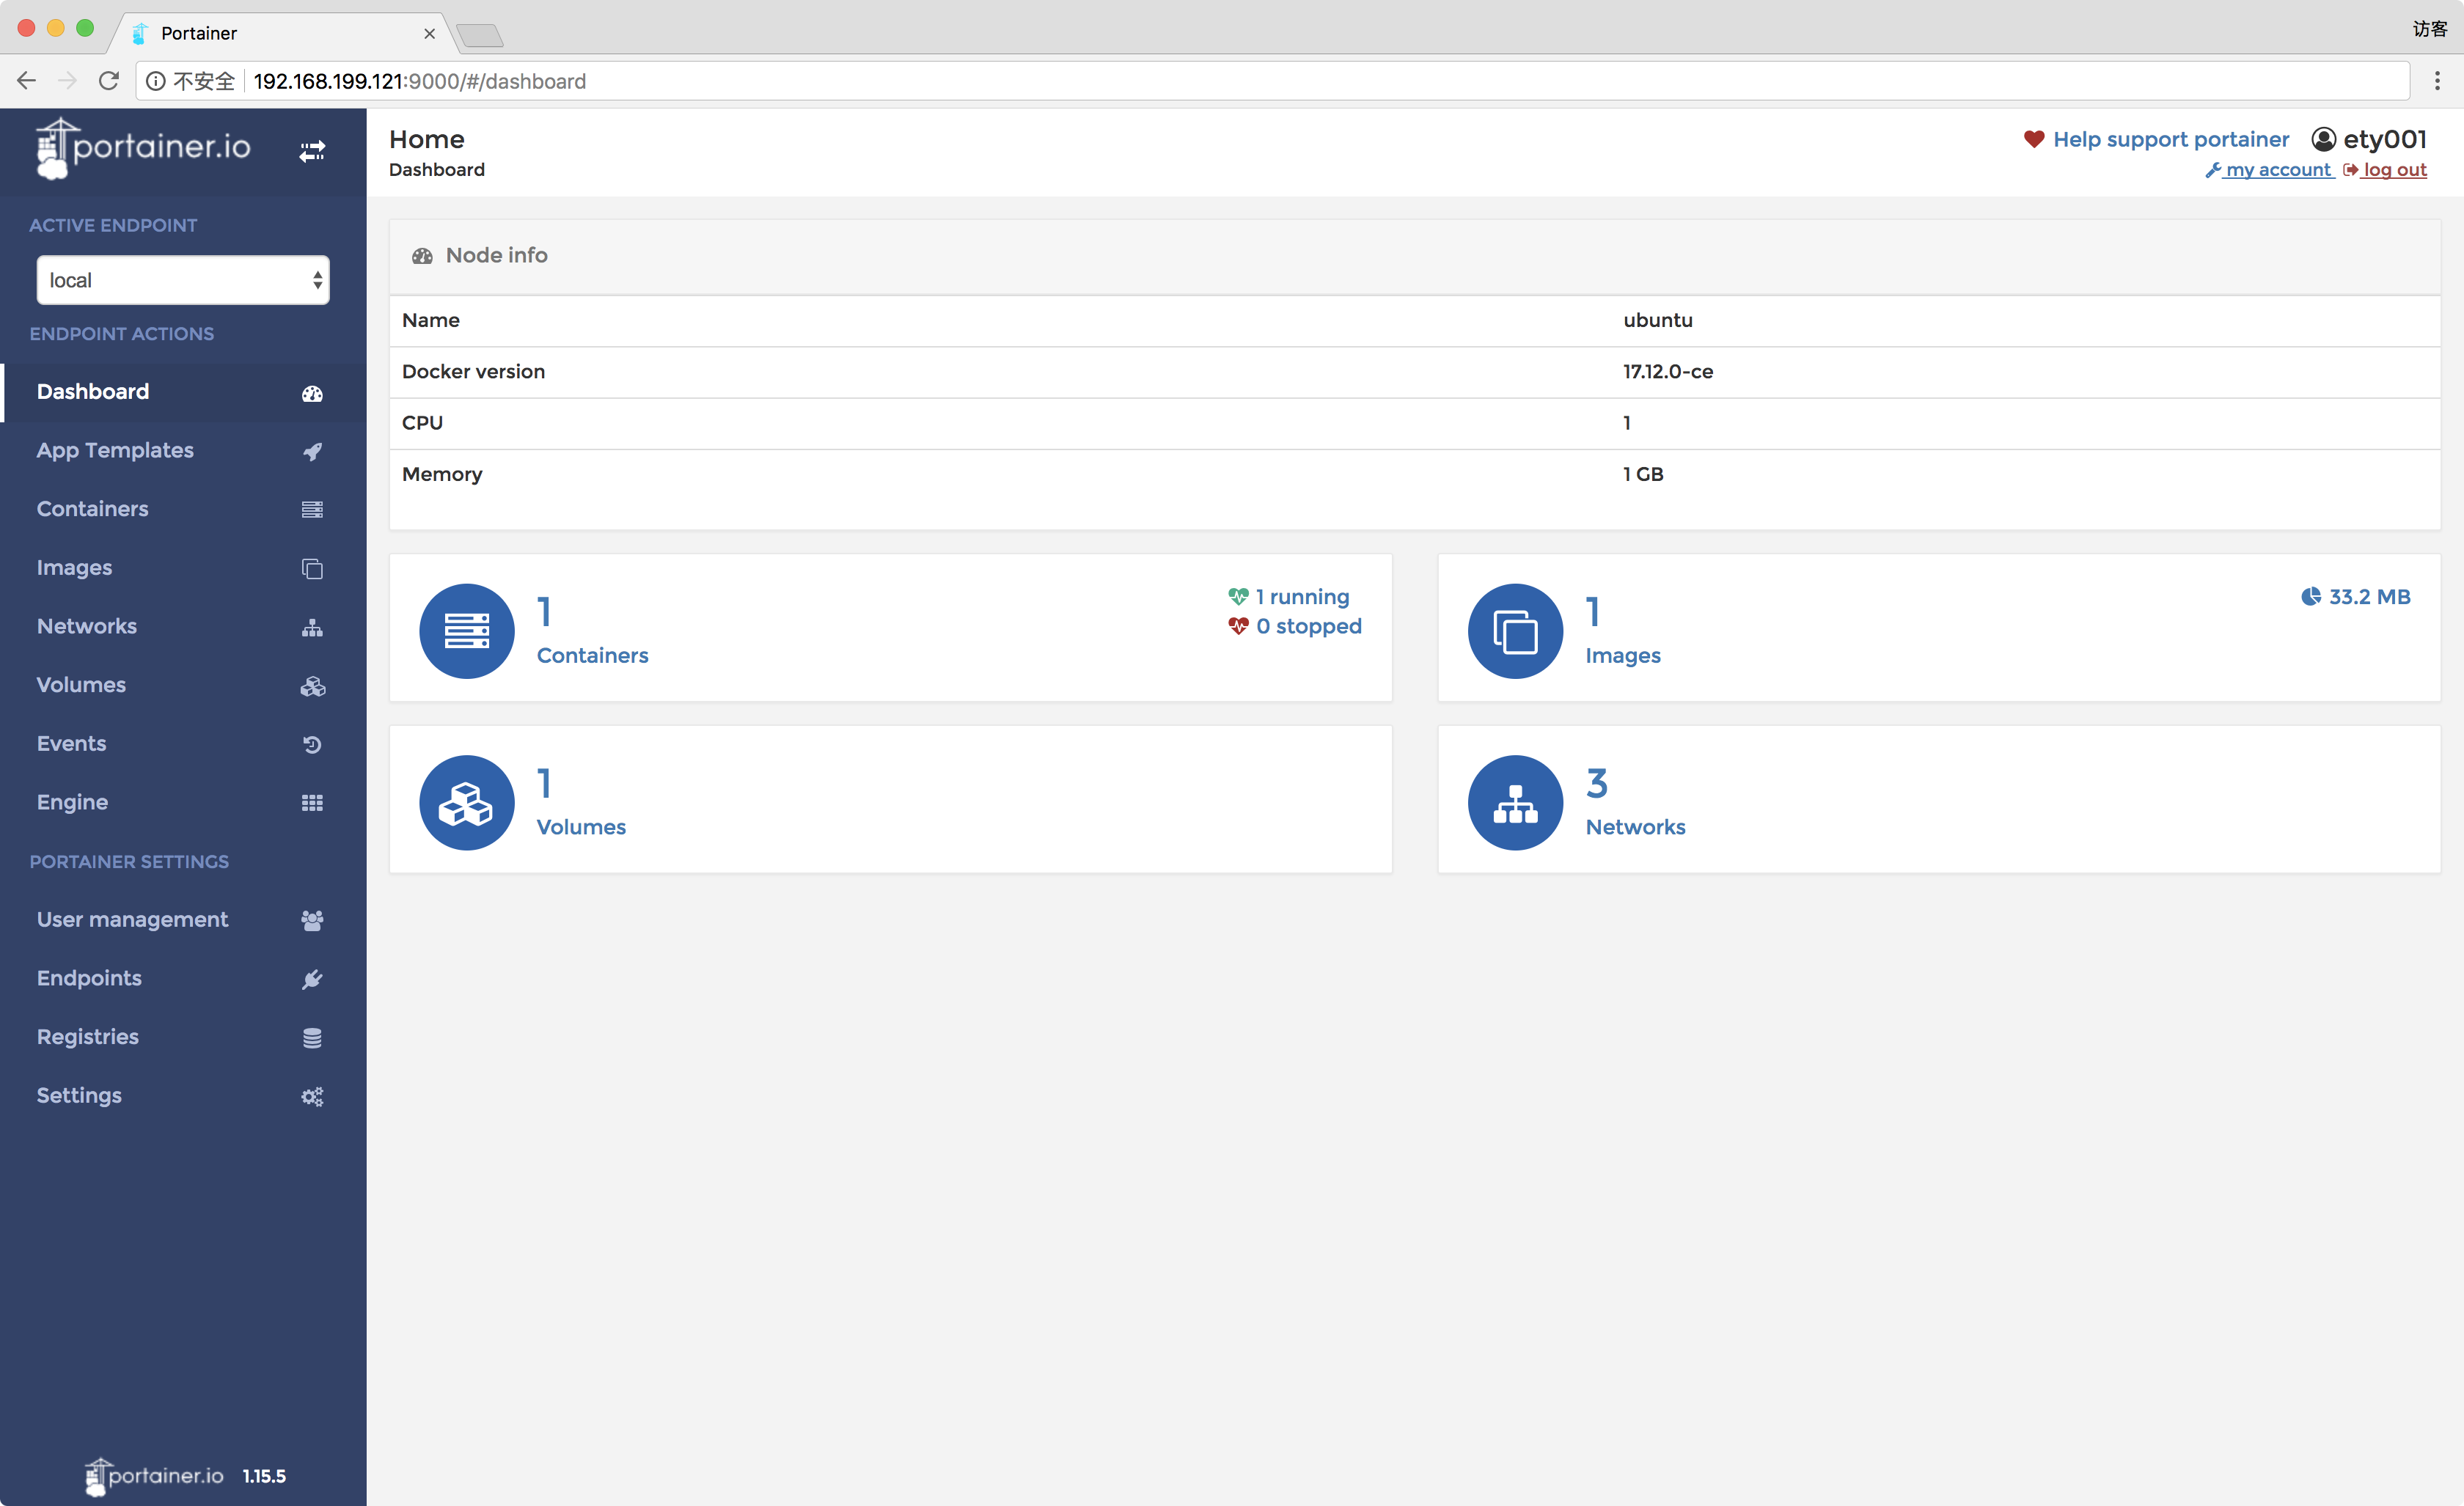
5.When you see the main page, the installation is over.
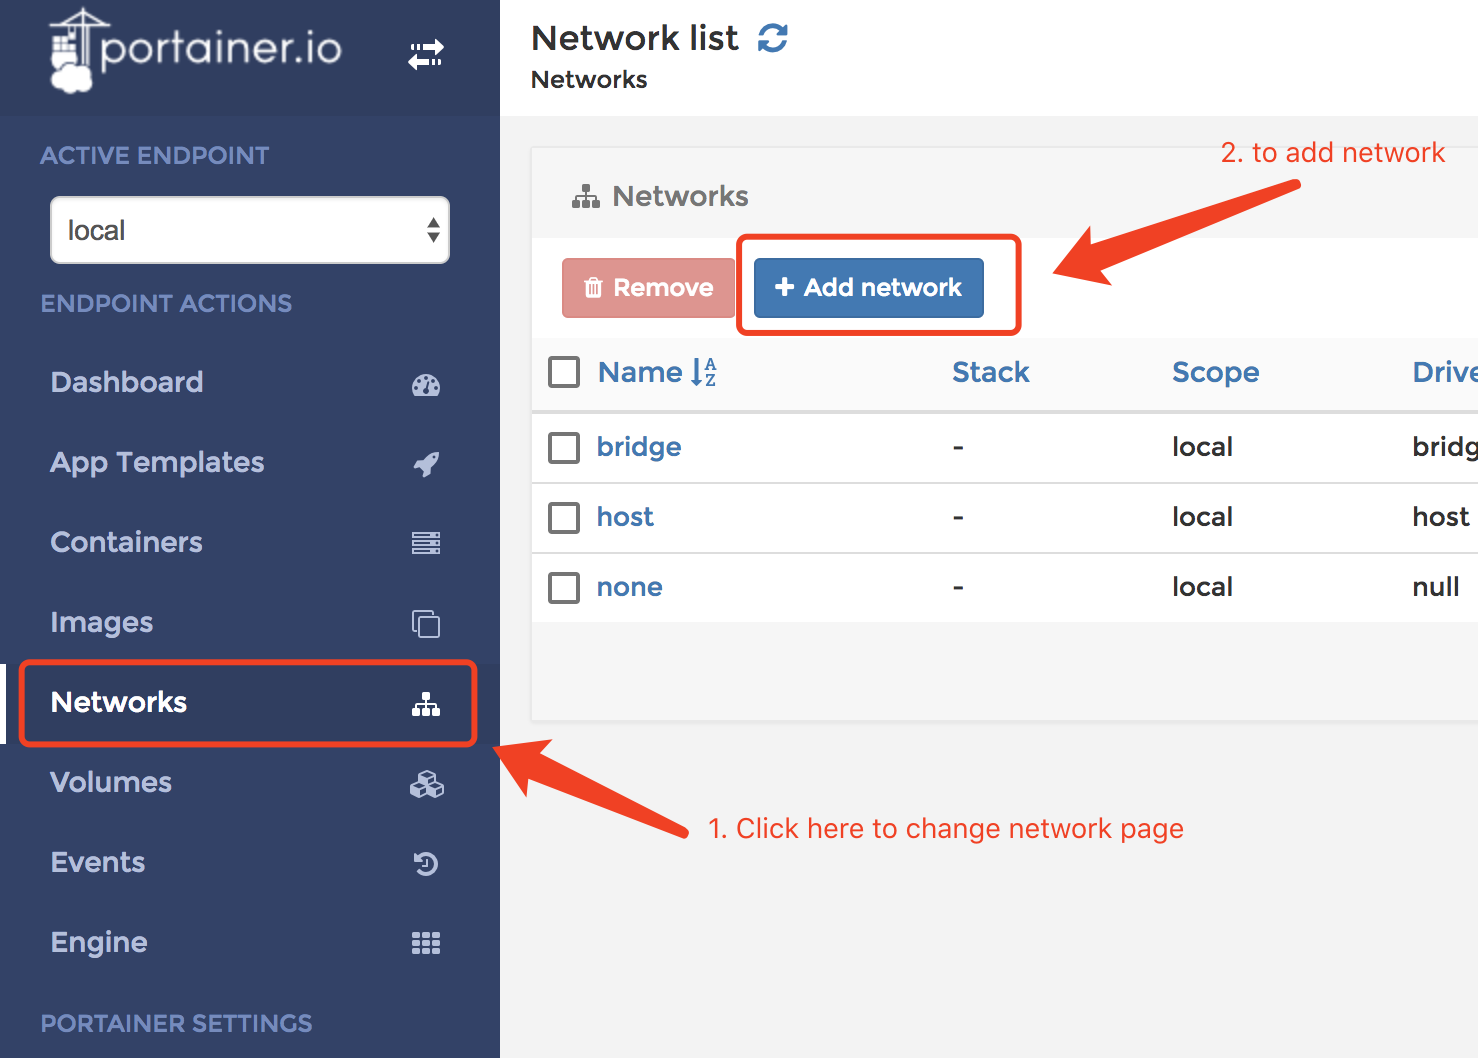
Create a new network
The container link is out of date now. The portainer doesn’t support the container link any more. So we need to create a new bridge network and bind static IPs to every container we create. Then each container can communicate with each other through the static IPs.
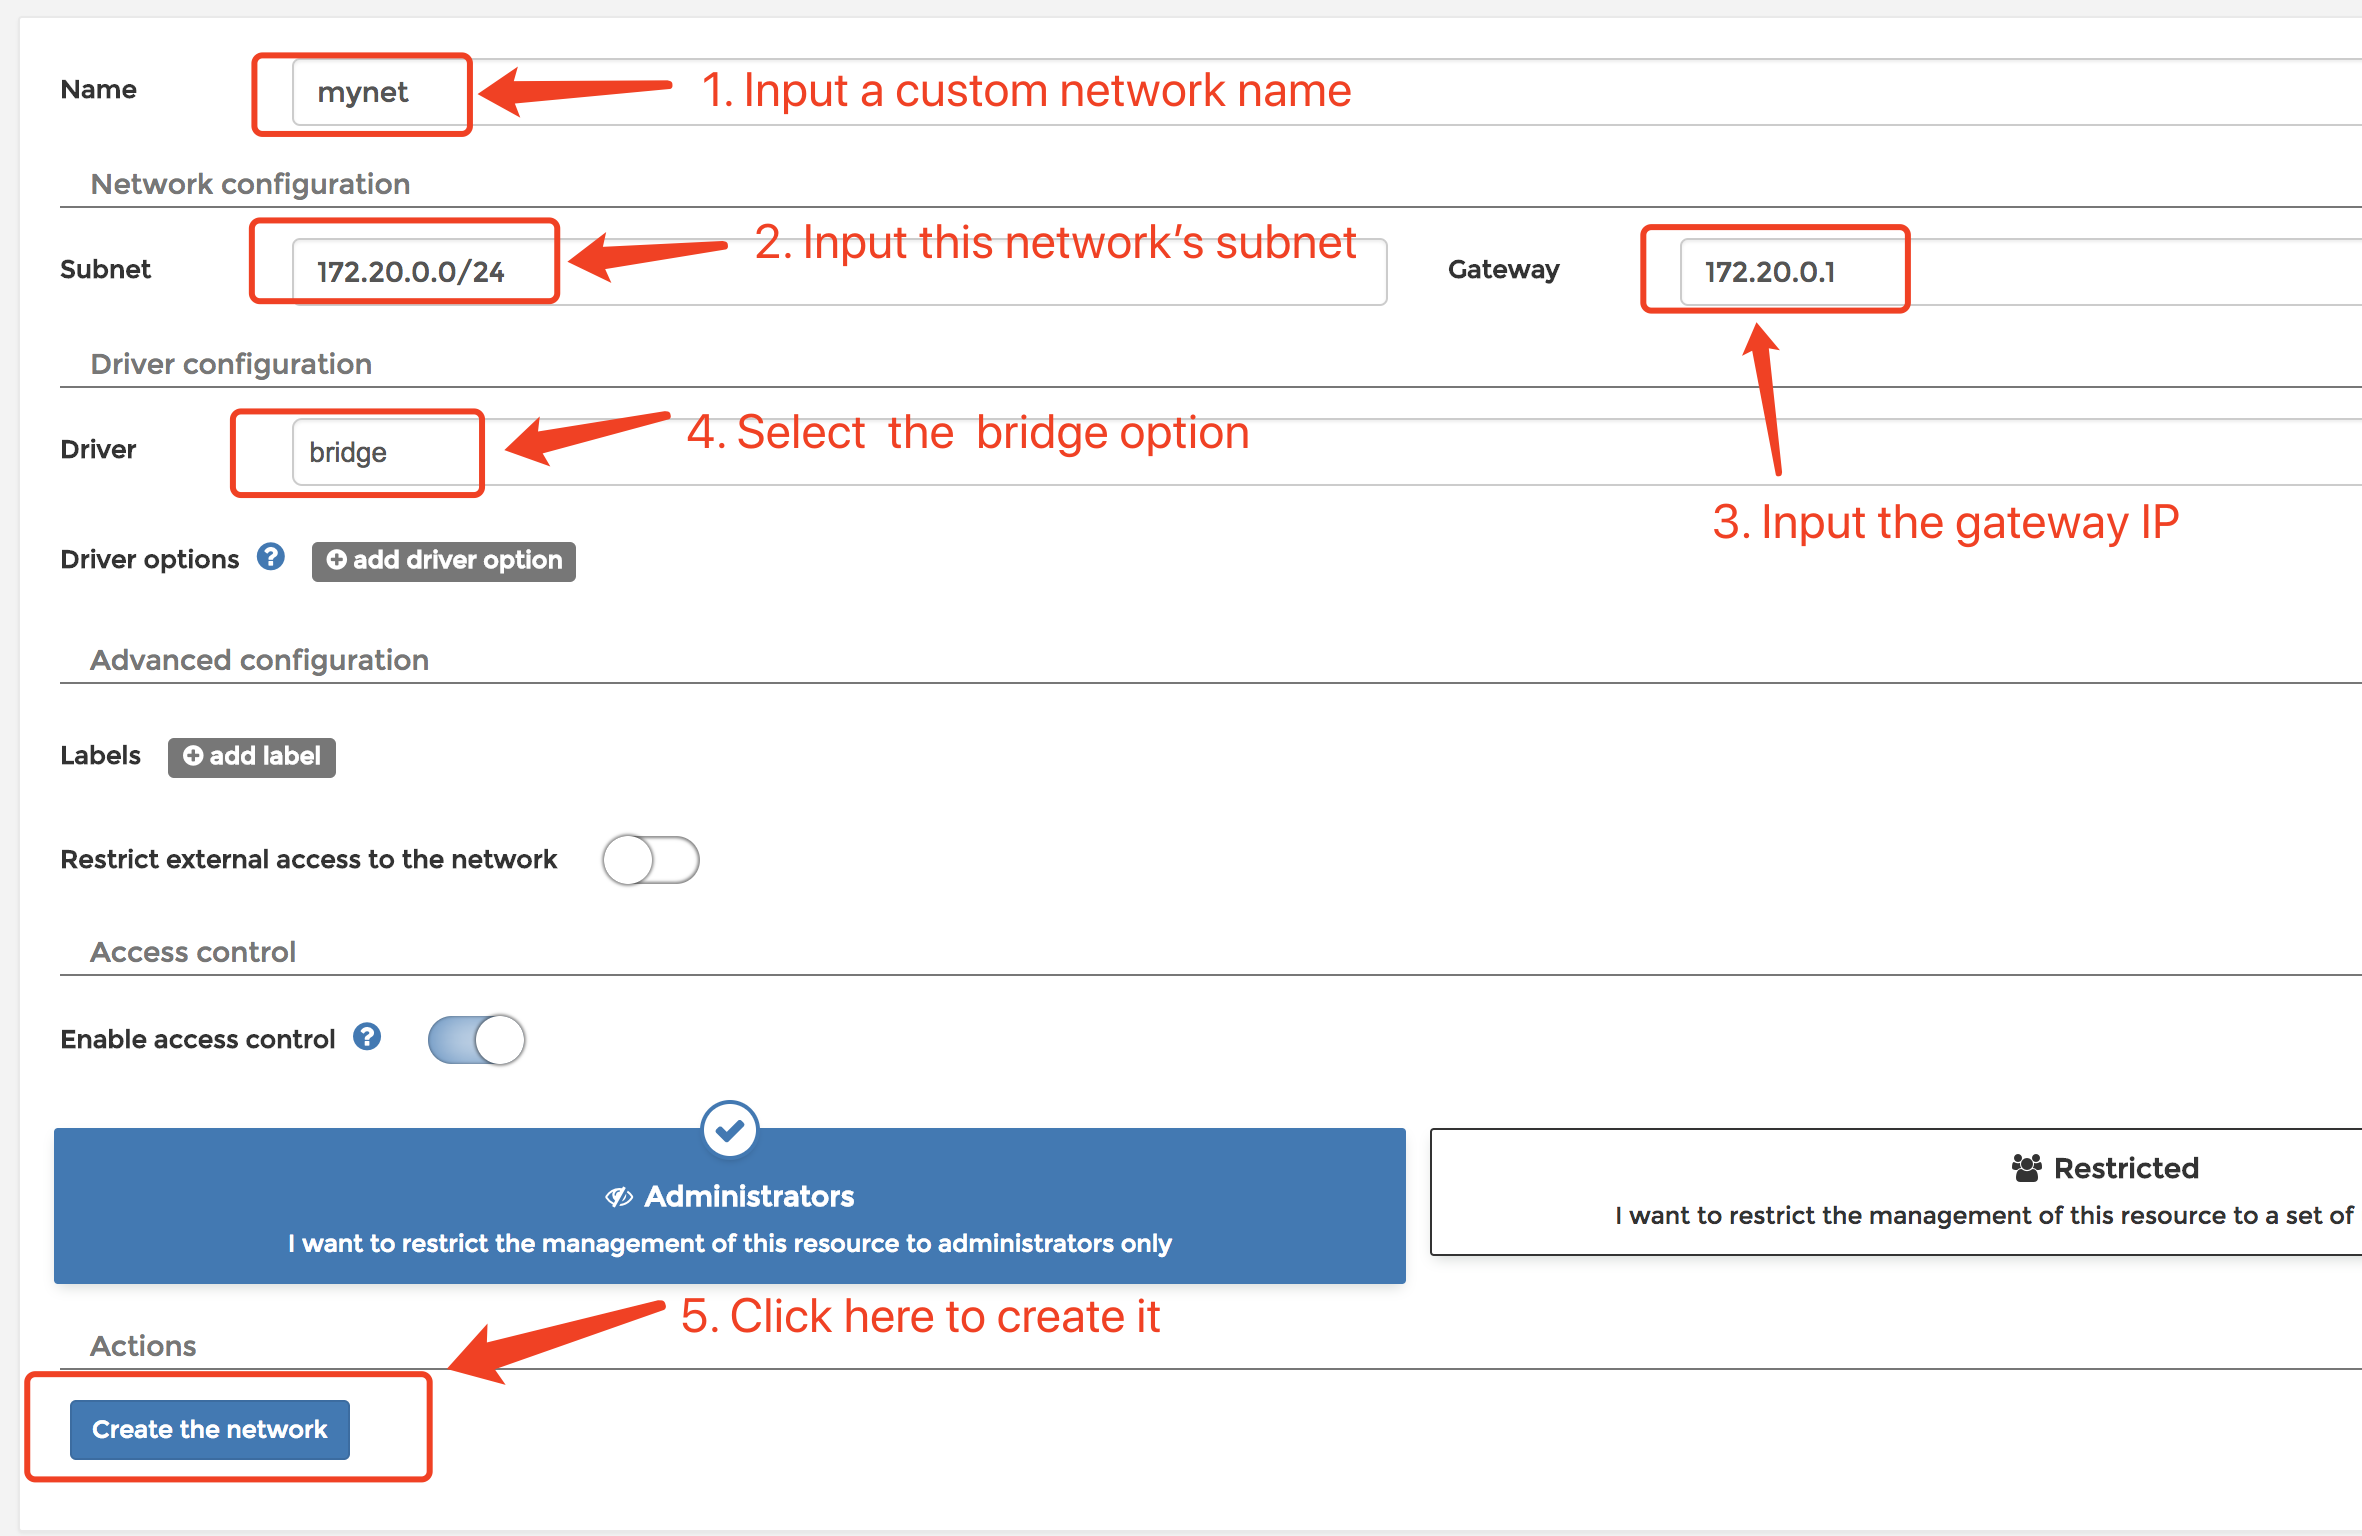
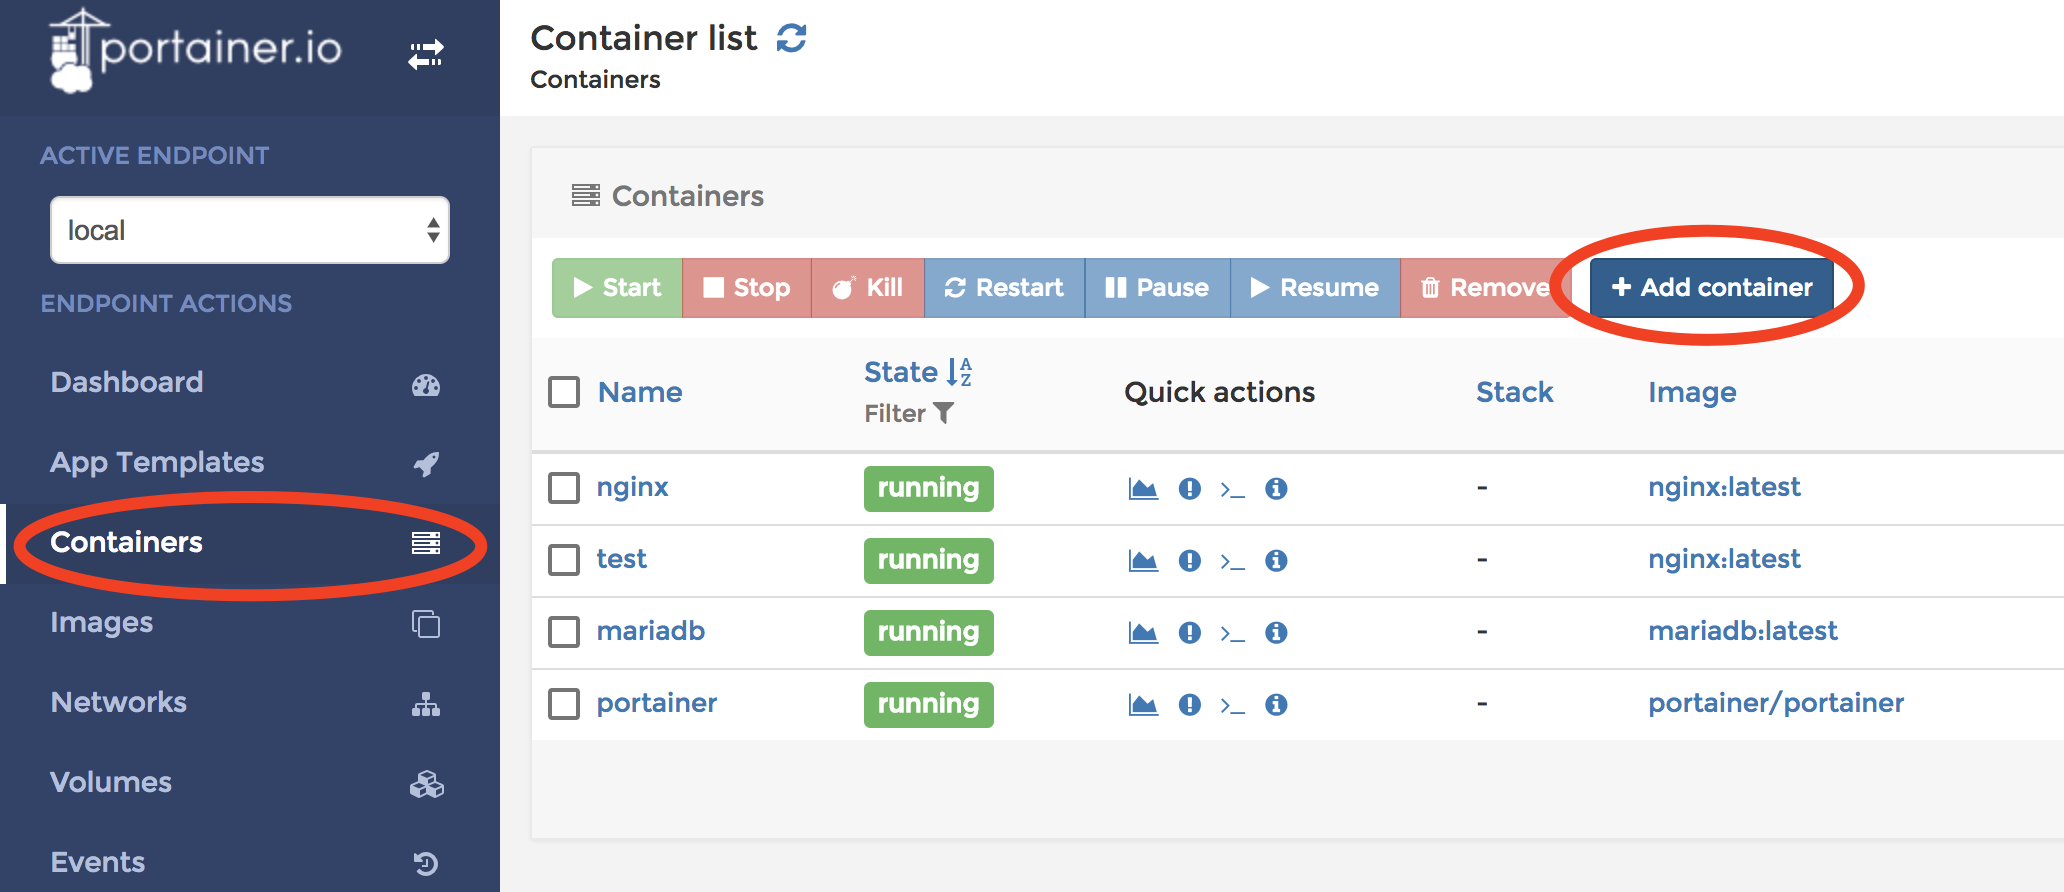
1.Get in the Networks page and click the Add network button.
2.Input the required information like the snapshot and then click the Create the network button.
Add MariaDB container
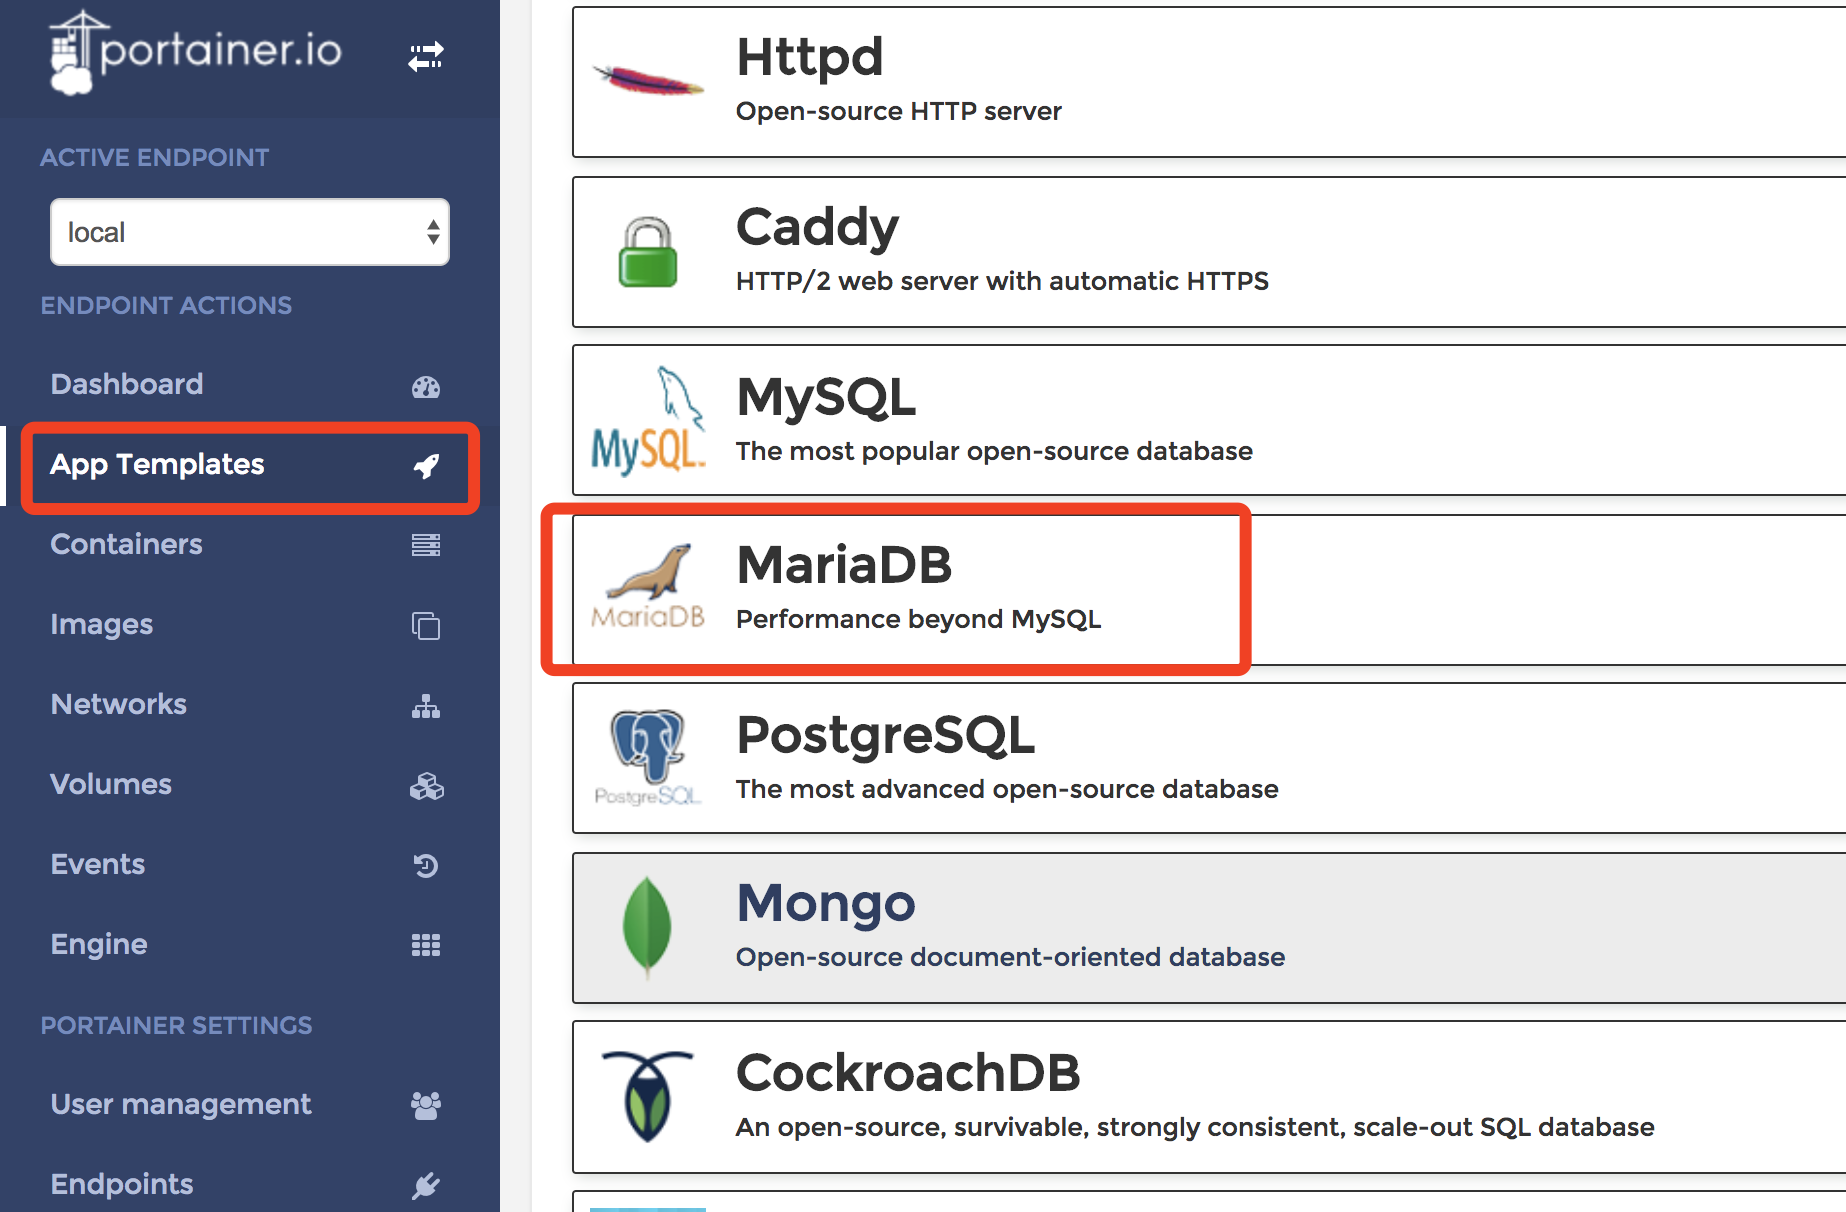
In this tutorial, we use the App Template to create the MariaDB container.
1.Create a folder to storage the MariaDB database file
1
$ sudo mkdir -p /data/mariadb
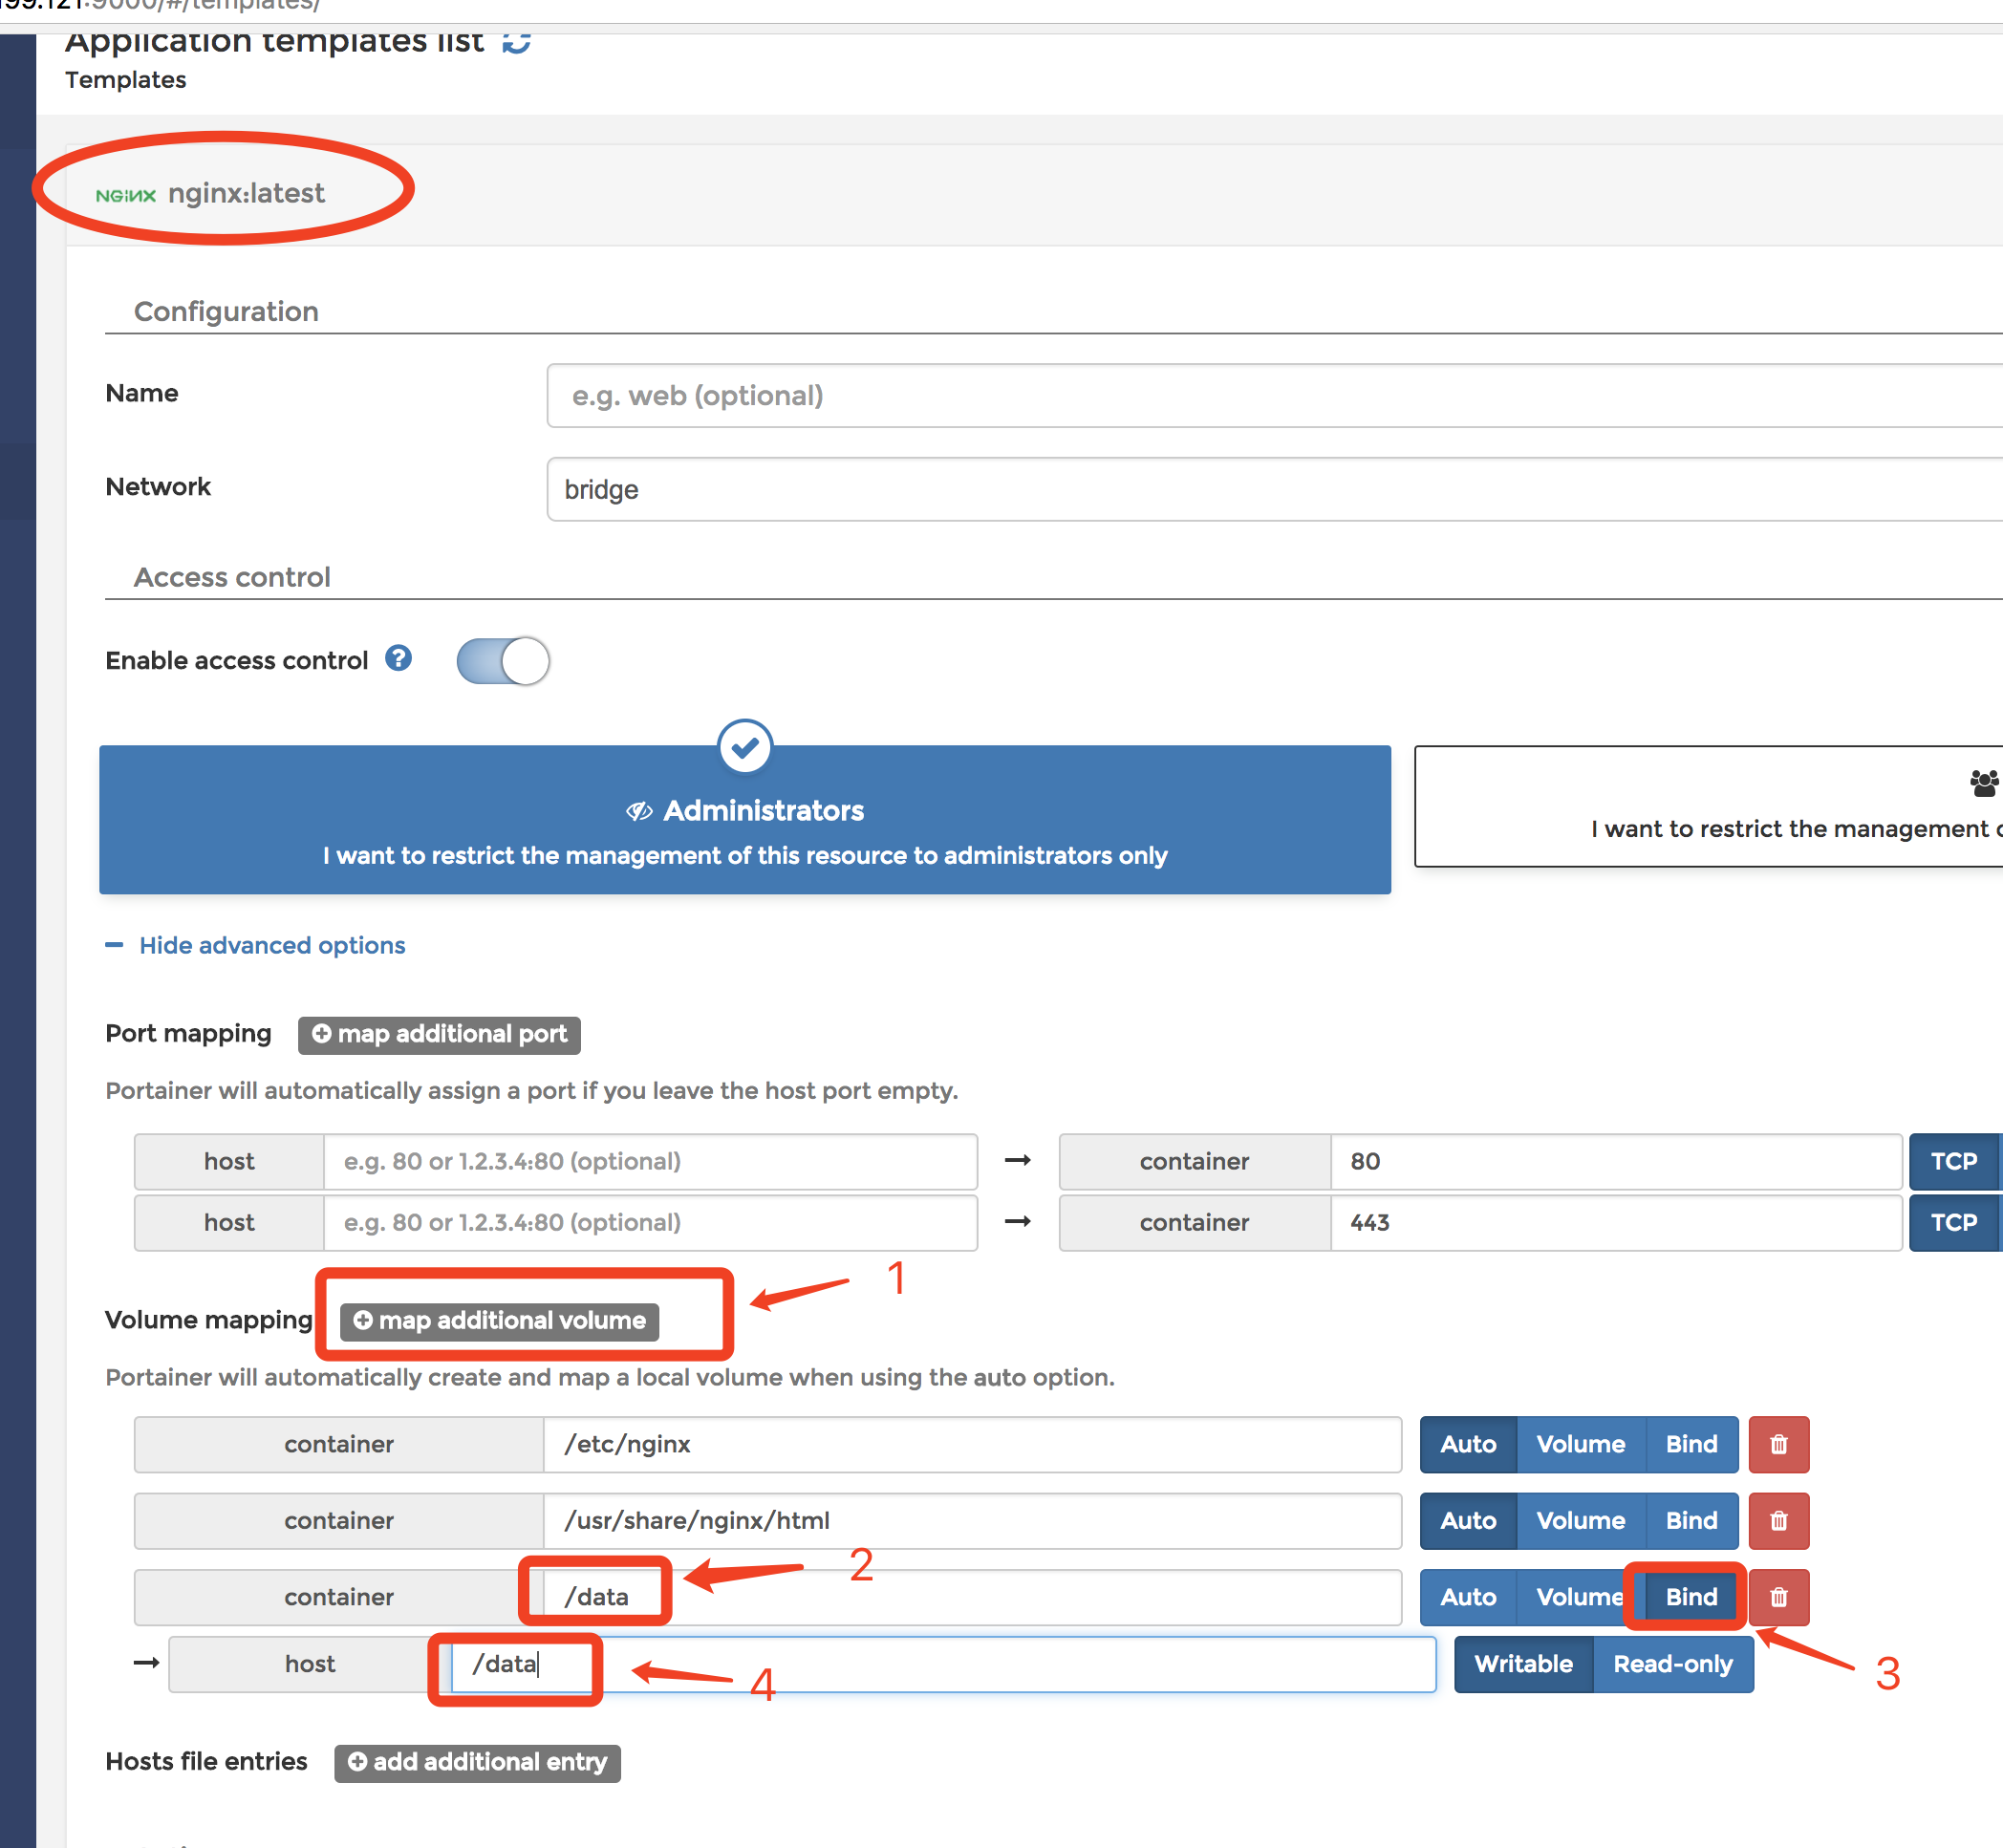
2.Enter the App Template page and select the MariaDB option.
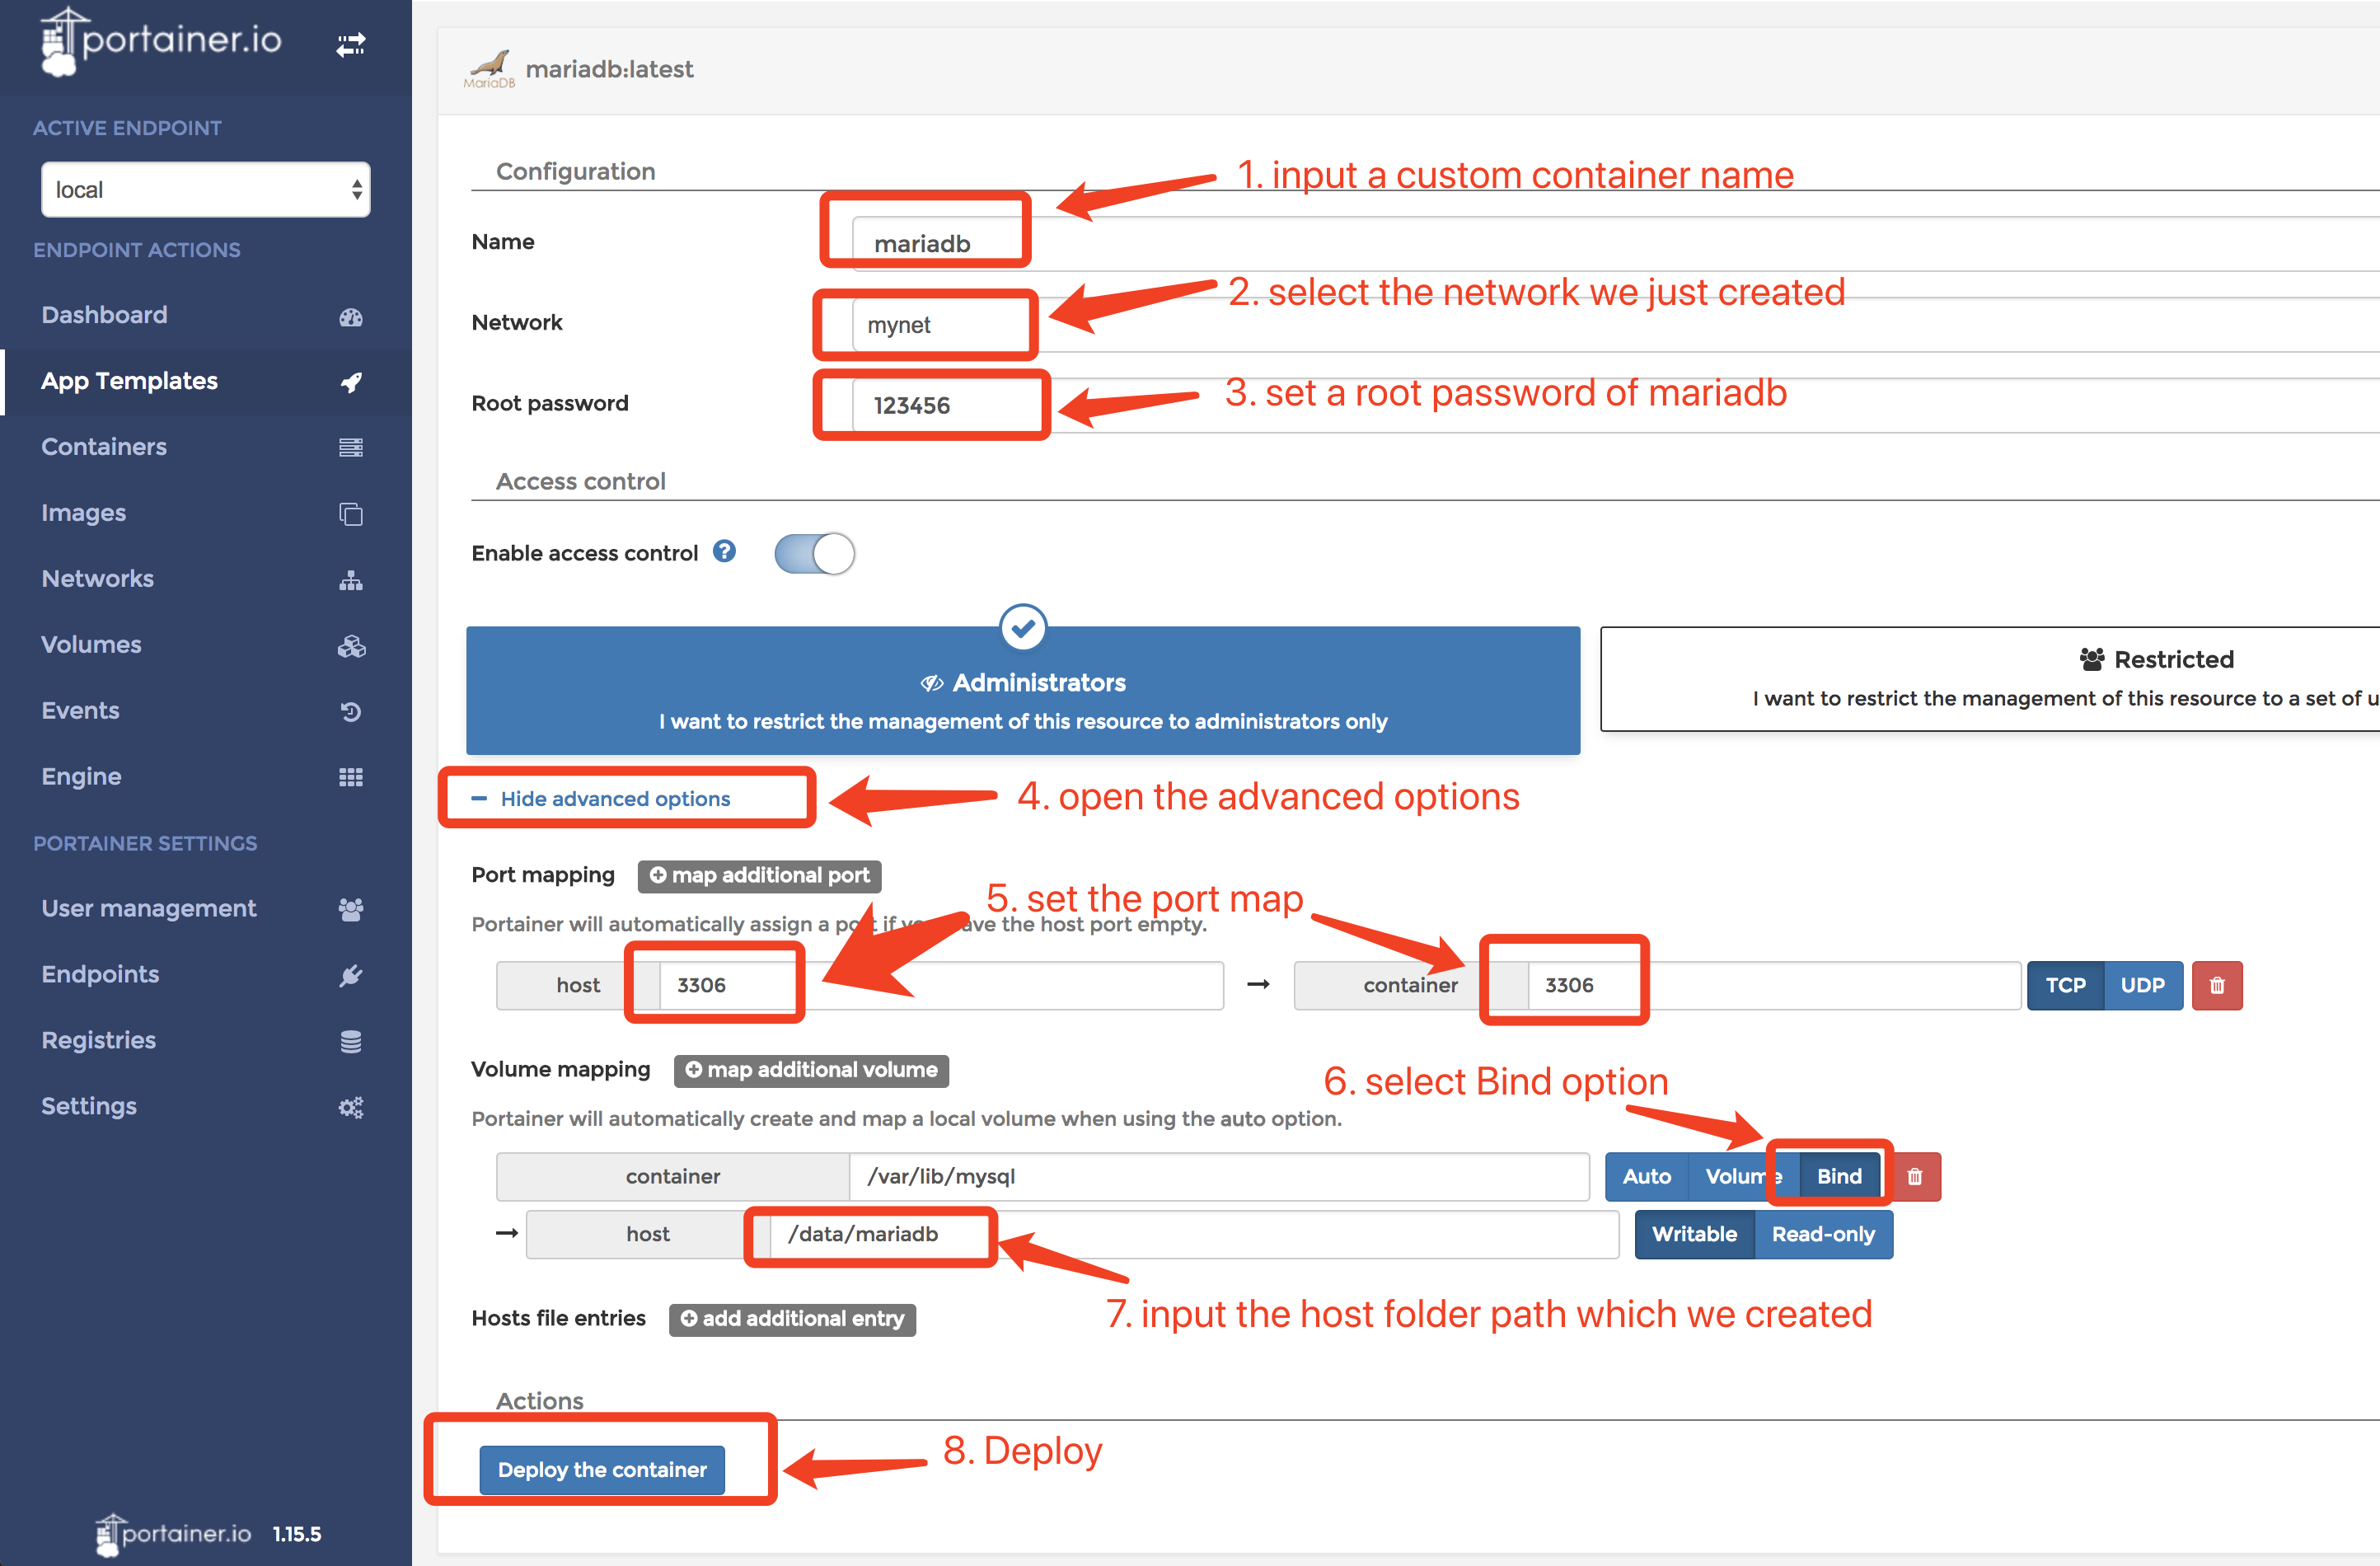
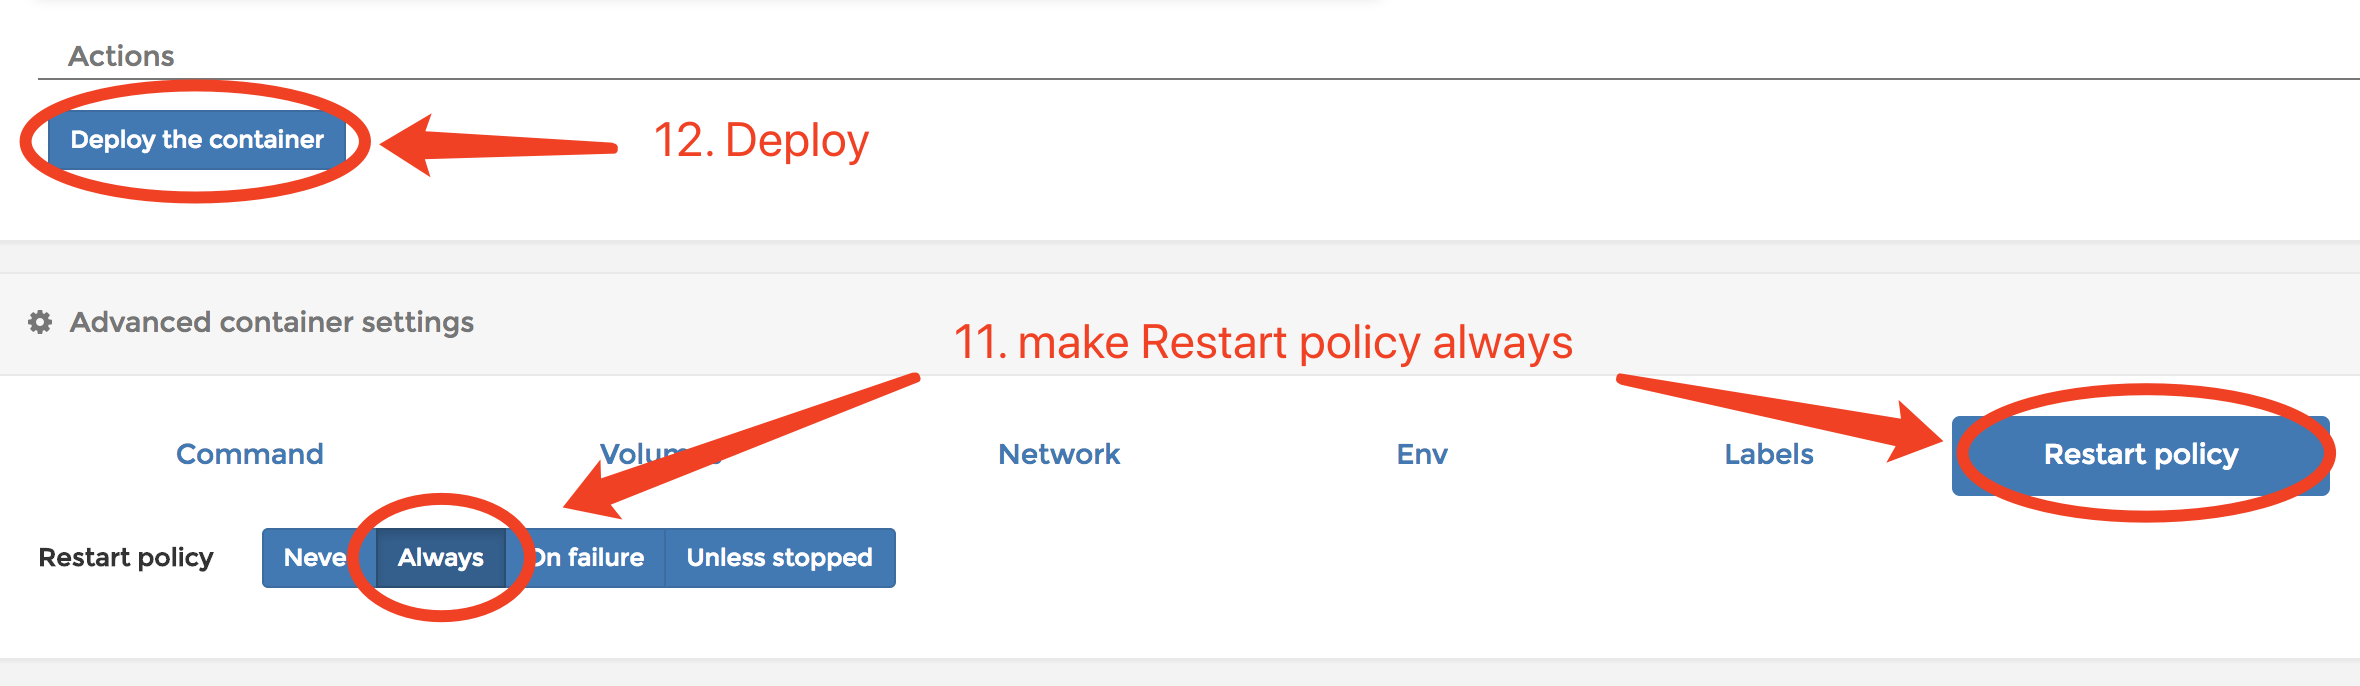
3.Input required information with snapshot (When you clicked the Deploy the container button, you need waiting a while. Because docker is pulling the portainer image.)
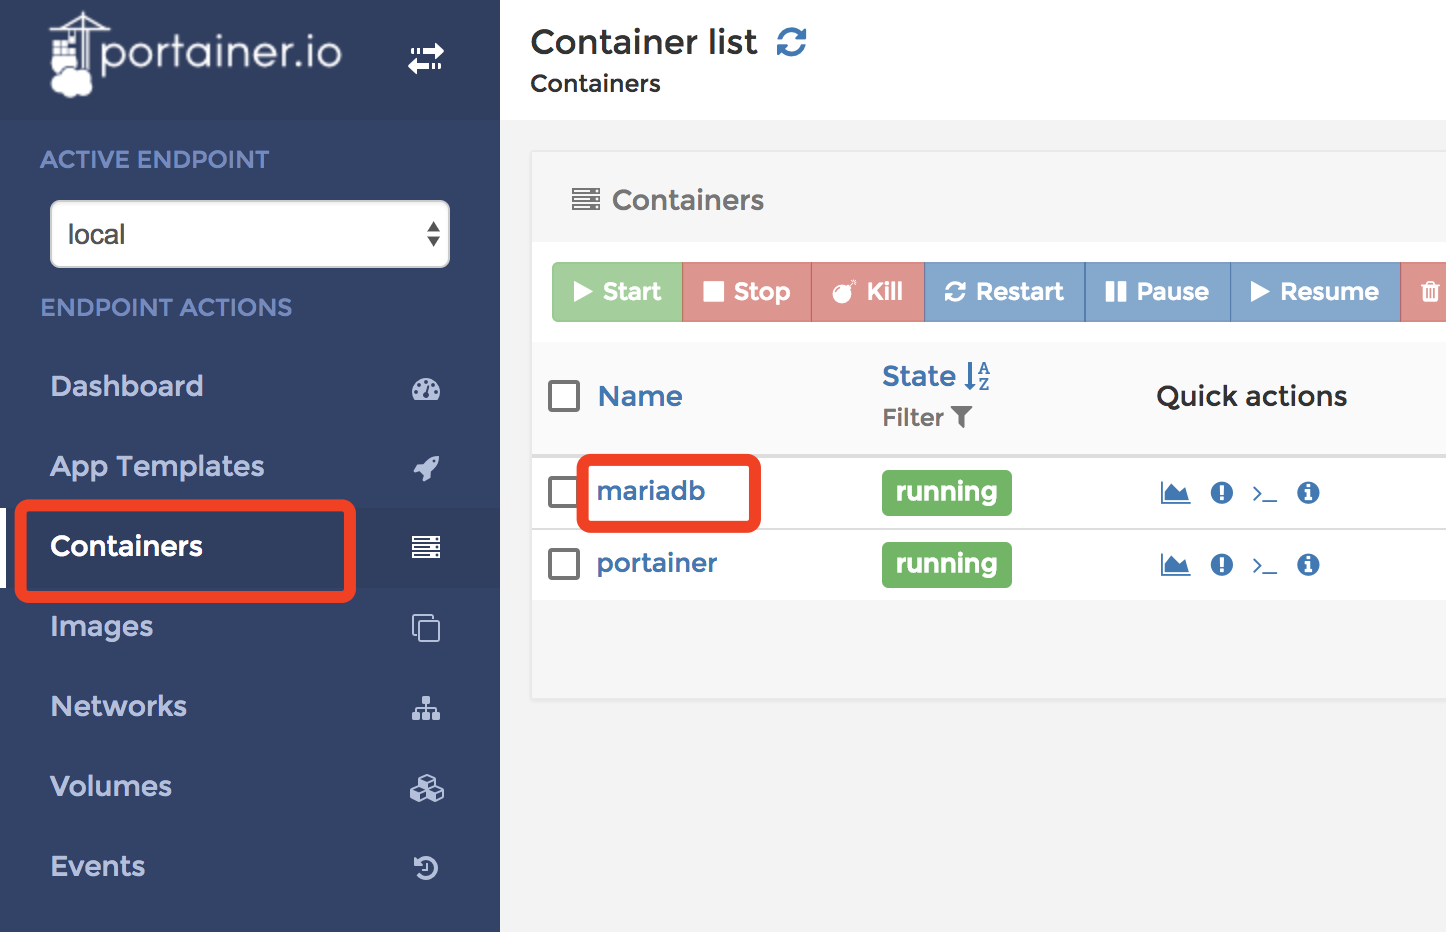
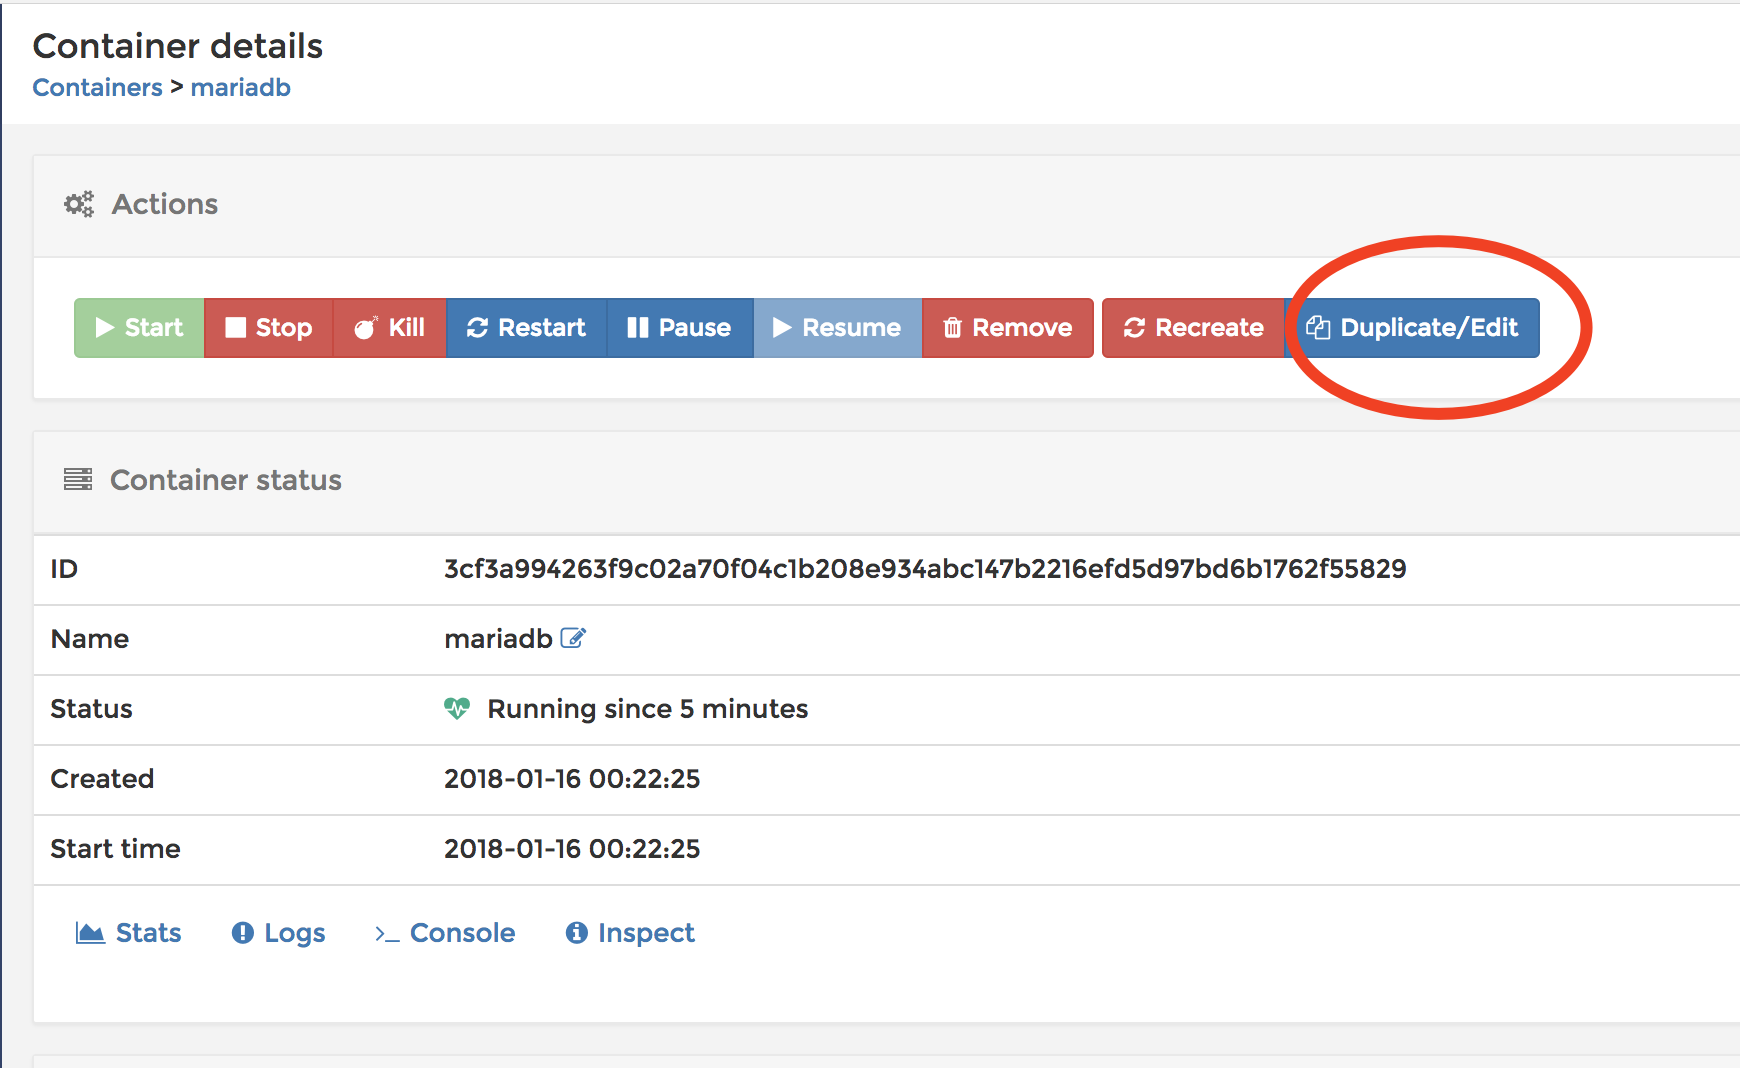
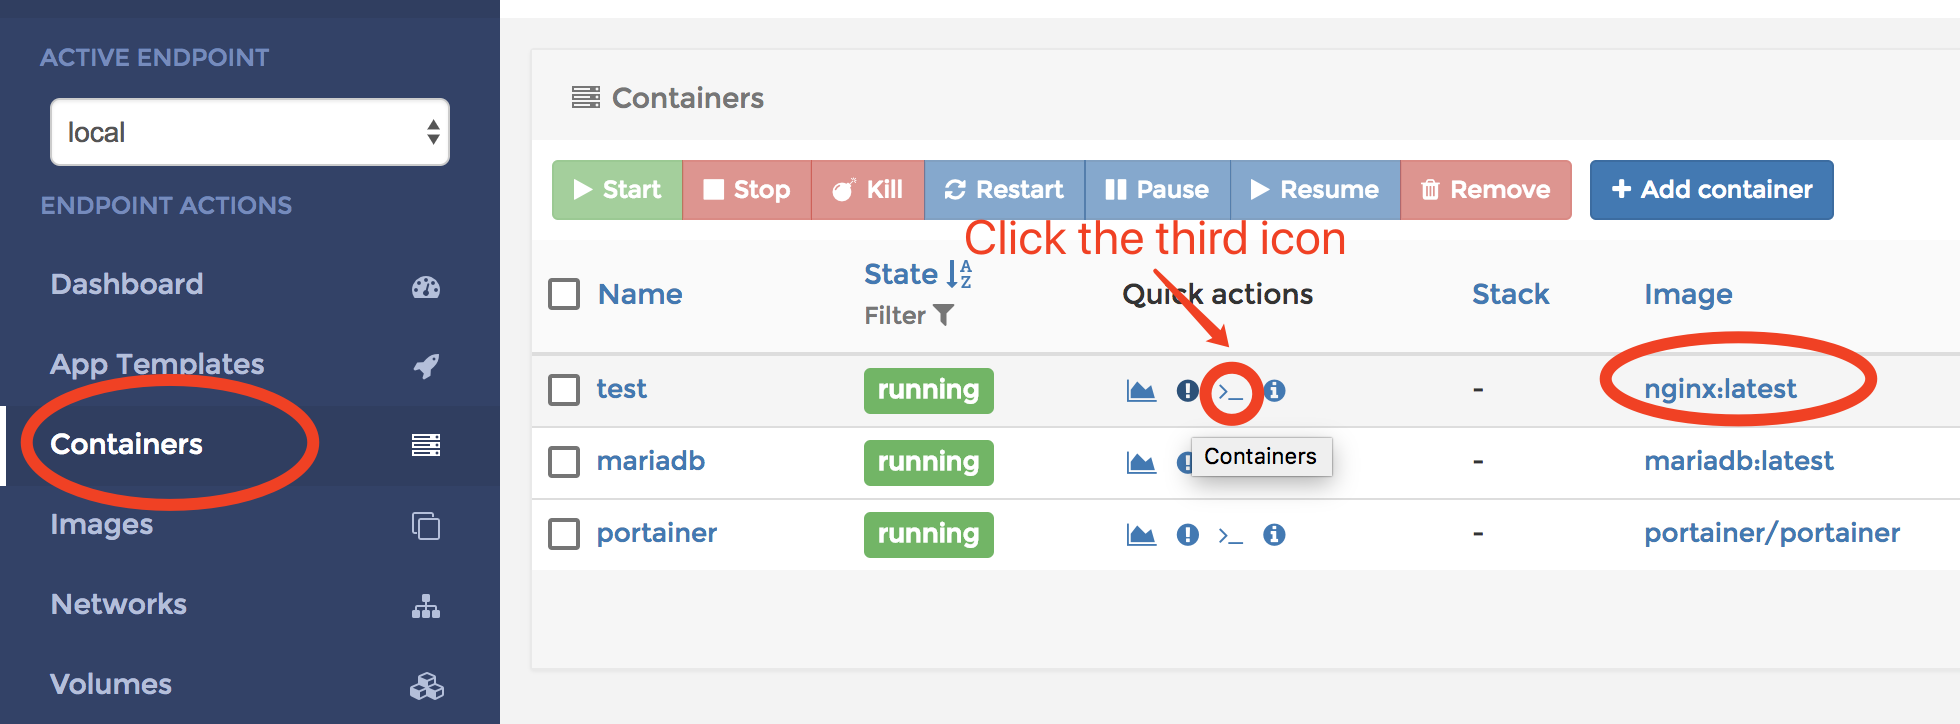
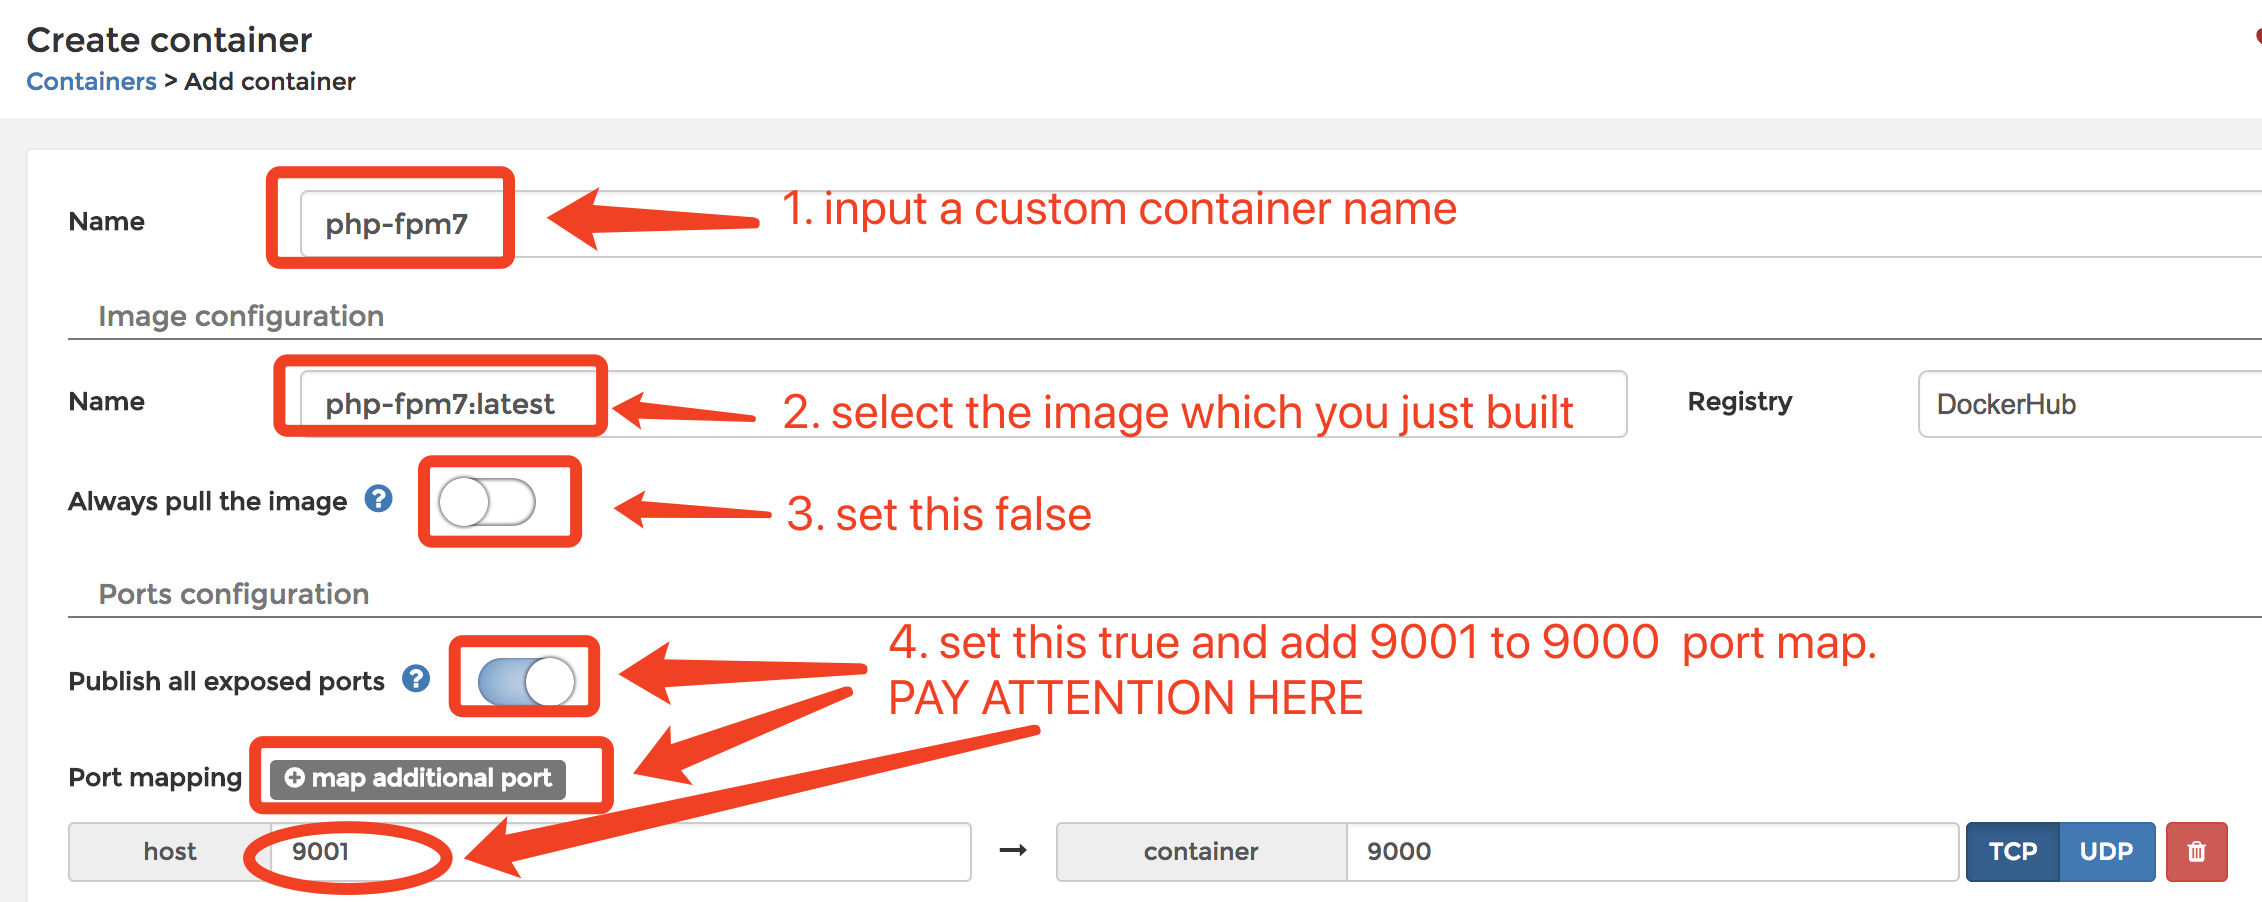
4.Because the App Template doesn’t set the static IP, we need set it with editing the container configurations manually. Open the container detail page:
5.Click the Duplicate/Edit button
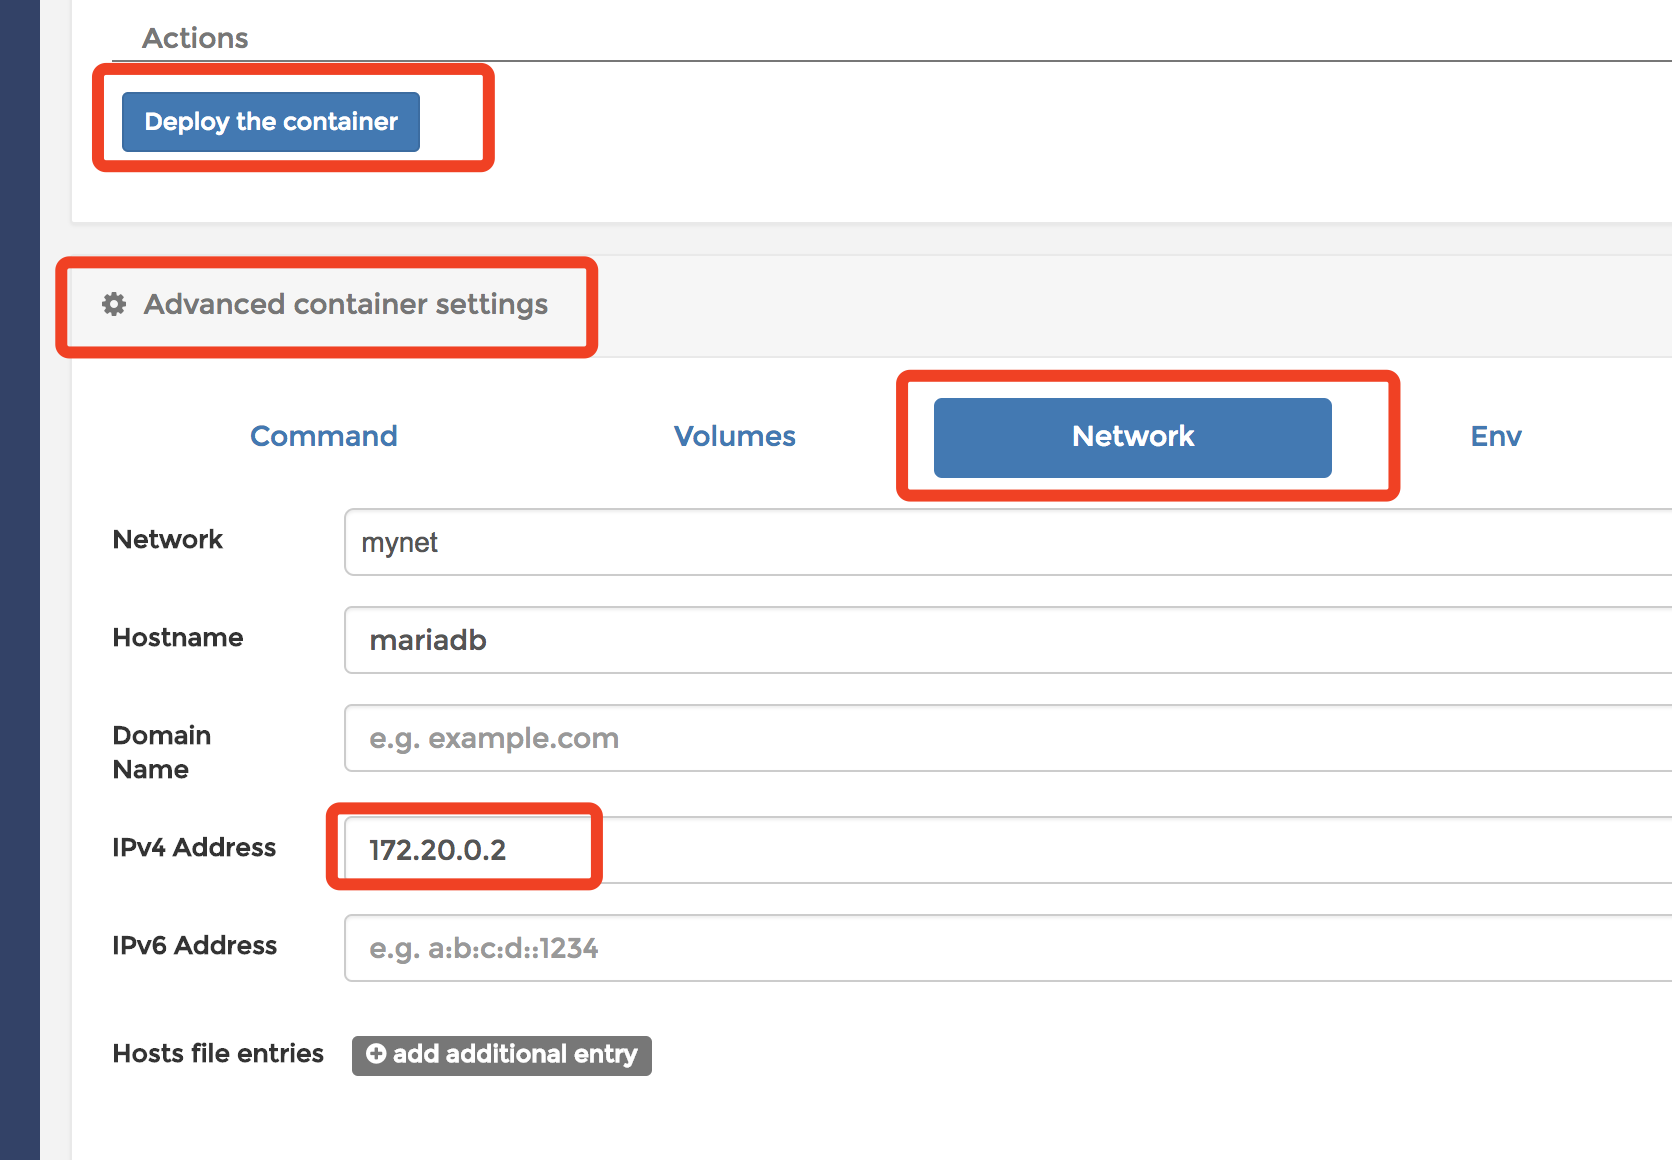
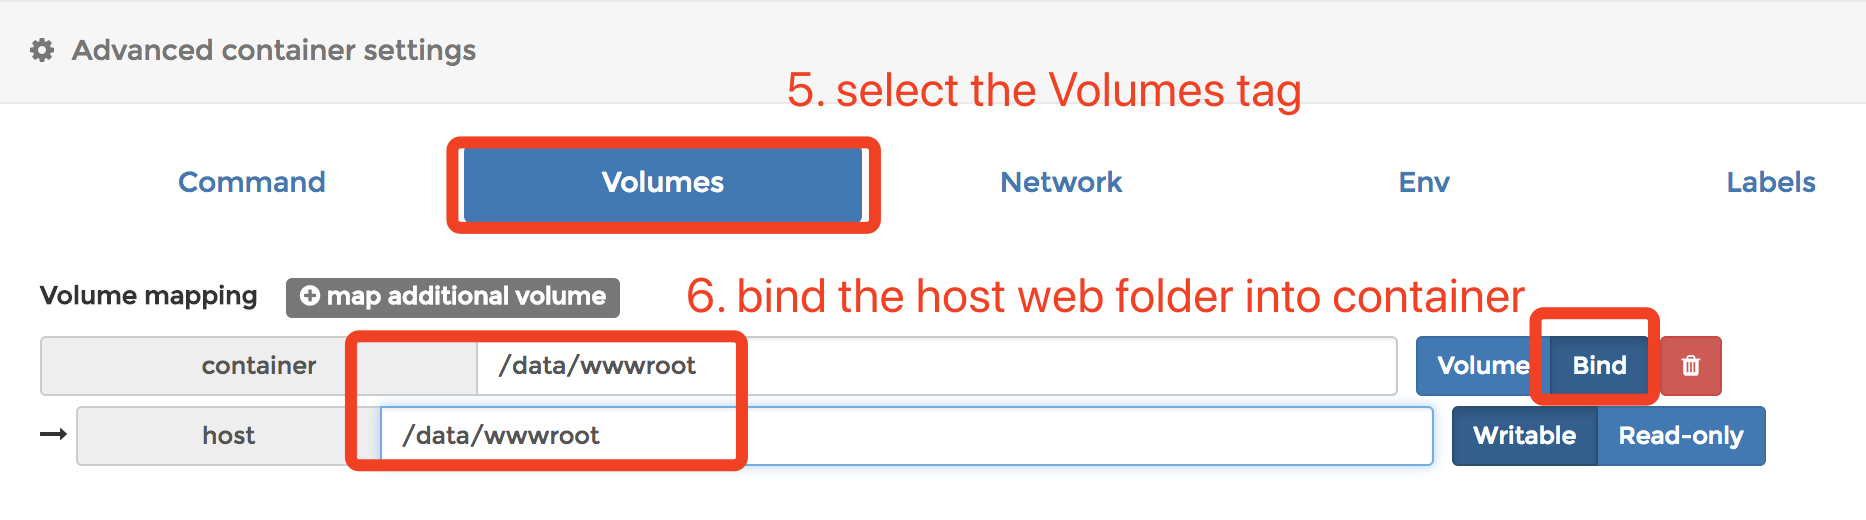
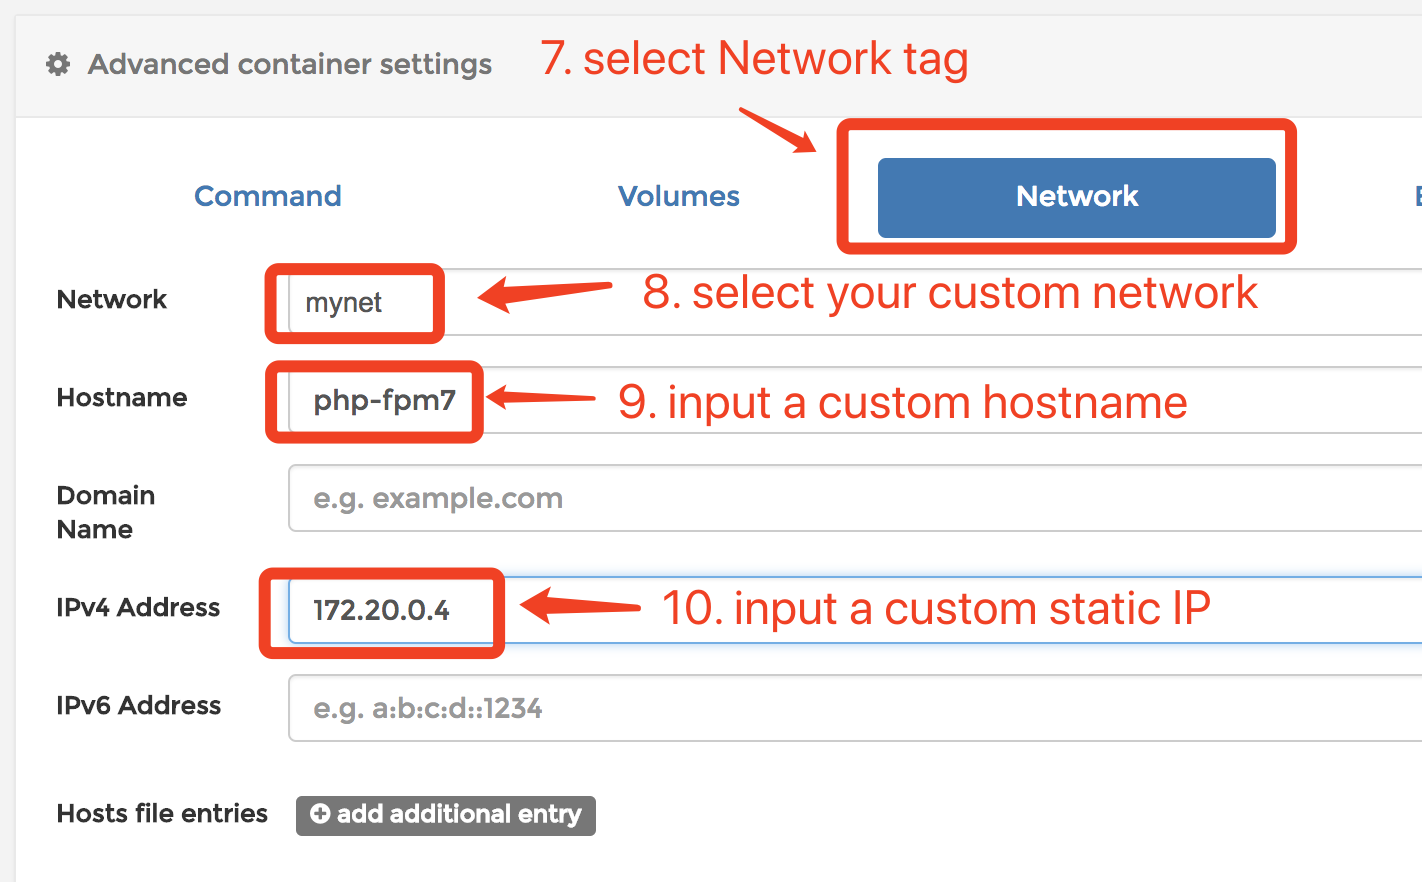
6.Find the Advanced container settings section, select the Network tab, input a static IP into the IPv4 address, click Deploy the container.
7.Portainer will mention you whether if to replace the original container. Click Replace.
8.If we want to connect to the database on the host, we can run this command