安装proxychains
在终端下翻墙的重要性,当你使用composer之类的东西的时候就体现出来了。
安装proxychains可以实现执行指定的命令的时候,使用代理去访问。
1 | brew install proxychains-ng |
在终端下翻墙的重要性,当你使用composer之类的东西的时候就体现出来了。
安装proxychains可以实现执行指定的命令的时候,使用代理去访问。
1 | brew install proxychains-ng |
安装ROR真费劲。。
1 | sudo yum install ruby |
1 | sudo yum install ruby=devel |
1 | sudo gem install rails |
可能需要设置gem的资源服务器为淘宝的。
最好再安装上,mechanize,
1 | sudo gem install mechanize |
好的吧,终于搞定了aria2c的开机自启动问题。No zuo no die,离开计算所后,好像很久没有这么折腾了,
一个配置的问题引发的一系列的问题。
简单说下我的环境是树莓派 + Archlinux,看着 ArchWiki 上面关于 aria2c 的相关页面,
很快就安装配置ok了,不过,重启后,发现 aria2c 根本就没有启动起来。报错信息如下:
1 | Mar 31 22:31:40 alarmpi aria2c[150]: 03/31 22:31:40 [ERROR] IPv4 RPC: failed to bind TCP port 6800 |
绑定失败?怎么破?
再看下 Wiki 上 /etc/systemd/system/aria2c.service 这个配置文件,貌似没啥问题,然后又手动启动了下,也失败了。
执行 systemctl status aria2c 发现程序成功返回0,systemctl显示也是正在执行,但是ps一下,没有aria2c的进程。
见鬼了!
继续看 wiki ,发现里面说到
1 | Ensure your config is set to deamonize (use daemon=true). |
我的配置文件没问题,已经加了daemon=true。。。恍惚了好久,在wiki上看到了systemd的页面,看到里面有这么一句话,
1 | Type=forking: systemd considers the service started up once the process forks and the parent has exited. For classic daemons use this type unless you know that it is not necessary. |
然后我在原来的wiki给出的那个配置的基础上加上了一行 Type=forking(也就是你们现在在wiki中看到的那样,我已经提交修改到wiki了)。
添加好以后,手动启动 systemctl start aria2c 成功!赶紧重启试试。结果还是不行,依旧报错,还是绑定的问题。
后来,就又继续看systemd的配置,尝试添加wants和requires之类的配置,但是都不管用,不过看了这么一段话,在这个页面,
1 | The most typical case is that the unit A requires the unit B to be running before A is started. In that case add Requires=B and After=B to the [Unit] section of A. If the dependency is optional, add Wants=B and After=B instead. Note that Wants= and Requires= do not imply After=, meaning that if After= is not specified, the two units will be started in parallel. |
好吧,wiki给出的那个配置还不是很完善,我又加上了一行,最终配置如下
1 | file path: |
再次重启试试,还是不行。。。继续看配置,发现 systemd 还可以配置 timer,我想,既然开机启动不成功,
而开机后手动启动可以,就证明有什么依赖的程序没有启动,系统就启动 aria2c 了,那我延时执行不久可以了么。
于是看文档学习下,写了个针对 aria2c 的 timer,代码如下:
1 | file path: |
重启成功。这里我忽略了我测试OnBootSec的步骤,其实刚开始是1,结果有时候能启动,有时候启动不起来,才改成10的。
本来以为这就告一段落了,但是突然不知道怎么想的,脑子里闪现静态ip这个词,于是,也就顺带看看systemd的网络配置怎么搞的。
配置好静态ip后,就手贱的把这个 timer 关掉了,然后奇迹发生,aria2c 启动成功!好的吧,原来是这个地方的坑啊。。
收拾下战场,完善下 ArchWiki 的 Start aria2c on system boot 这一节的内容,顺带着去ArchBBS上把一个帖子也回复了
(我放狗搜遍网络,就这一个哥们跟我遇到了同样的问题,却没有被解决)。
就在我快要写完这篇博文的时候,收到了 ArchWiki 管理员的回复,关于daemon=true与Type=forking的这个修改接受了,
不过,对于failed to bind errors则没有接受,可能再接下来的版本会修复这个bug。(PS:庆幸我写的英文,管理员看懂了。)
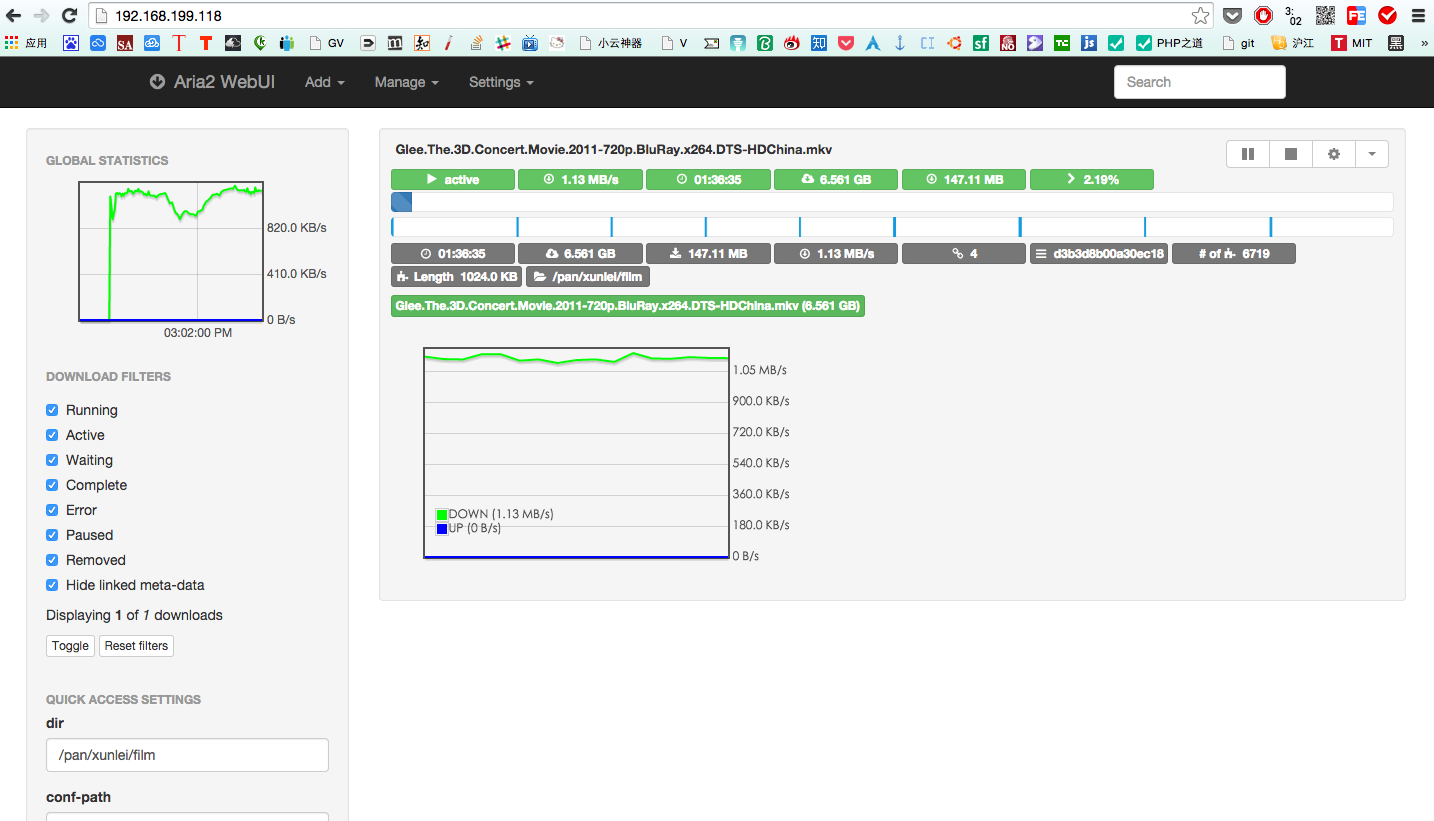
最后放出我的 aria2 的网页管理界面,终于完工了,下载个Glee 3D Concert测试下:
回到家后整理完所有的行李后,第一件事,就是把我的树莓派上电,但是系统起来后,发现分区是read-only的状态,
于是输入下面的命令,发现了错误:
1 | [root@alarmpi ~]# mount |
发现/dev/mmcblk0p2是以ro模式挂载的,而mmcblk0p1分区可能有数据corrupt。执行下面的命令,把根目录重新挂载,
然后安装下fsck.fat,并修复/boot分区的data corrupt。
1 | [root@alarmpi ~]# mount -o remount,rw / |
修复后,重启,发现/目录的挂载还是ro,于是看了下/boot/cmdline.txt
1 | [root@alarmpi ~]# cat /boot/cmdline.txt |
在该文件的mmcblk0p2后面加入rw,如下
1 | [root@alarmpi ~]# cat /boot/cmdline.txt |
重启后,一切正常了。不过这到底是啥原因导致的呢?经过google,发现是由于意外掉电频度太高,导致的数据损坏,参考这里。貌似好几篇文章都提到了,要把分区做成read-only,需要升级的时候再打开。由于现在我的树莓派内的软件还都没有完全调好,
所以就先不做成read-only了。以后做好bt下载机和家庭数据中心后,再来设置下。
今天线上遇到一个bug无法解决,于是去查Log,发现Thinkphp的Log设置的全开,很详细。
但是里面掺杂着很多无用的信息,于是需要写个脚本提取下,也为了日后高效处理日志。
脚本如下:
1 | #!/bin/bash |
样例数据:
2019-11-09 补充
websocket 的反代
1 | map $http_upgrade $connection_upgrade { |
下面是简单的一个nginx反向代理的配置,只需要替换掉proxy_pass中的配置内容即可。
1 | server |
这两天在写第三方登录的SDK,其中遇到了一个有意思的问题,就是用file_get_content去读取github的接口的时候,
发现一直是false,而浏览器访问则没有问题。经过搜索,发现需要设置下user-agent,只要在php.ini中打开user-agent,
即可正常返回数据了。
这算是file_put_content的高级用法了吧~
1 | $params = array( |
这两天在写一个python脚本,以实现把数据从多个excel导入进一个mdb中,遇到了比较纠结的问题,
下面的代码是我把问题简化后的代码:
1 | test = u'测试' |
执行后的报错信息如下:
1 | Traceback (most recent call last): |
在python下两者的转化需要使用decode和encode,具体情况如下:
1 | a = '测试' # str类型 |
每次装完树莓派上的系统,第一件事就是要把没有利用的SD卡空间利用上,因为img镜像一般都是最小化的,所以用dd还原镜像到SD卡后,SD卡都还会有一部分未使用的空间。
之前我一直都是装完系统,把SD卡笔记本上的gparted这种图形界面的软件进行扩容操作,由于现在笔记本上没有Archlinux系统了,所以这次就直接在树莓派上操作了。
[root@alarmpi ~]# fdisk /dev/mmcblk0

Welcome to fdisk (util-linux 2.25.2).
Changes will remain in memory only, until you decide to write them.
Be careful before using the write command.


Command (m for help): p
Disk /dev/mmcblk0: 14.9 GiB, 15931539456 bytes, 31116288 sectors
Units: sectors of 1 * 512 = 512 bytes
Sector size (logical/physical): 512 bytes / 512 bytes
I/O size (minimum/optimal): 512 bytes / 512 bytes
Disklabel type: dos
Disk identifier: 0x0e8c6e83

Device         Boot  Start     End Sectors  Size Id Type
/dev/mmcblk0p1        2048  206847  204800  100M  c W95 FAT32 (LBA)
/dev/mmcblk0p2      206848 2097151 1890304  923M 83 Linux

Command (m for help): d
Partition number (1,2, default 2): 2

Partition 2 has been deleted.
注意第二个分区的Start,记录下来。然后删掉第二个分区。
Command (m for help): n
Partition type
   p   primary (1 primary, 0 extended, 3 free)
   e   extended (container for logical partitions)
Select (default p): p
Partition number (2-4, default 2): 2
First sector (206848-31116287, default 206848):
Last sector, +sectors or +size{K,M,G,T,P} (206848-31116287, default 31116287):

Created a new partition 2 of type 'Linux' and of size 14.8 GiB.

Command (m for help): p
Disk /dev/mmcblk0: 14.9 GiB, 15931539456 bytes, 31116288 sectors
Units: sectors of 1 * 512 = 512 bytes
Sector size (logical/physical): 512 bytes / 512 bytes
I/O size (minimum/optimal): 512 bytes / 512 bytes
Disklabel type: dos
Disk identifier: 0x0e8c6e83

Device         Boot  Start      End  Sectors  Size Id Type
/dev/mmcblk0p1        2048   206847   204800  100M  c W95 FAT32 (LBA)
/dev/mmcblk0p2      206848 31116287 30909440 14.8G 83 Linux
创建个新的主分区,First sector输入第一步记录下来的那个值,也就是我这里的Default的值。新建好后,输入p查看,第二个分区的size已经调整完毕。
Command (m for help): w
The partition table has been altered.
Calling ioctl() to re-read partition table.
Re-reading the partition table failed.: Device or resource busy

The kernel still uses the old table. The new table will be used at the next reboot or after you run partprobe(8) or kpartx(8).

[root@alarmpi ~]# reboot
输入w,保存分区表并退出,会提示分区表写入失败,因为设备正忙,直接重启即可。
[root@alarmpi ~]# resize2fs /dev/mmcblk0p2
resize2fs 1.42.12 (29-Aug-2014)
Filesystem at /dev/mmcblk0p2 is mounted on /; on-line resizing required
old_desc_blocks = 1, new_desc_blocks = 2
The filesystem on /dev/mmcblk0p2 is now 3863680 (4k) blocks long.

[root@alarmpi ~]# df -h
Filesystem      Size  Used Avail Use% Mounted on
/dev/root        15G  647M   14G   5% /
devtmpfs        214M     0  214M   0% /dev
tmpfs           218M     0  218M   0% /dev/shm
tmpfs           218M  260K  218M   1% /run
tmpfs           218M     0  218M   0% /sys/fs/cgroup
tmpfs           218M     0  218M   0% /tmp
/dev/mmcblk0p1  100M   17M   84M  17% /boot
tmpfs            44M     0   44M   0% /run/user/0
重启后,立即执行resize2fs命令,df查看容量,Avail已经是14G啦,搞定,收工。
码字不易,见好就分享~